2016年11月28日 星期一

Unreal: VR Template

since: 2016/11/28
update: 2016/12/19

reference:
1. VR Template Guide for Unreal Engine 4 – Tom Looman
2. Creating a basic VR demo using Unreal
3. 虚幻引擎 4.14 版发布!
4. monsieurgustav/UE4-OSC

5. Using Raycasts (Tracing) in Blueprints | Unreal Engine

A. 版本:
     1. Windows 10
     2. Unreal 4.14.0
     3. Visual Studio 2015 Update 2

-----------------------------------------------------------------------------------------------

B. 新增專案

     1. New Project > Blueprint > Virtual Reality
         > Name: VR_Template > Create Project

     2. 切換到 Motion Controller 的關卡地圖:
          > Content > VirtualRealityBP > Maps
          > 滑鼠雙擊 MotionControllerMap

     3. 調整專案設定:
          > Edit > Project Settings...

     4. 設定編輯器預設地圖遊戲預設地圖:
         > 將 Editor Startup MapGame Default Map 皆設為: MotionControllerMap

-----------------------------------------------------------------------------------------------

C. 將 Blueprint 專案轉換成 C++ 專案
     1. Add New > New C++ Class...

     2. Choose Parent Class:
         > None > Next

     3. Name: MyClass(預設)
          > Create Class

     4. 接著, 會開啟 Visual Studio, 等它處理完後, 左下角的裝態列會顯示: Ready
          > File > Save All > Exit (養成存檔的好習慣)

     5. 離開 Visual Studio 後, 也要離開 Unreal Editor 

     6. 在檔案總管, 將專案下的 Source > VR_Template 目錄內的:
         MyClass.hMyClass.cpp 刪除

     7.  也將專案下的整個 Binaries 資料夾刪除 

     8. 點選專案下 Unreal 的專案執行檔:
         
> 右鍵 > Generate Visual Studio project files

     9. 結果:

   10. 重新開啟 Unreal 專案:
         > .... rebuild .... >

   11. Unreal Editor 開啟完成後, 離開 Unreal Editor.

-----------------------------------------------------------------------------------------------

D. 加入 OSC 功能
     1. 在專案目錄下新增 Plugins 資料夾
         > 下載 monsieurgustav/UE4-OSC 的檔案
         > 解壓縮後, 將整個 OSC 目錄複製到 Plugins 資料夾內

     2. 開啟 Unreal 專案, 並檢查 Plugins 設定:

     3. 點選左邊 OSC 項目, 接著將 OSC 的 Enabled 勾選, 並點選右下方的 "Restart Now"

     4. .... rebuild .... >

     5. 再次確認 Edit > Plugins > OSC Enabled 已經勾選.

     6. 檢查專案設定

     7. OSC: Receive From, Send Targets

-----------------------------------------------------------------------------------------------

E. Send OSC (Pickup / Drop)
     1. 開啟 BP_PickupCube

     2. 上半部: Event Pickup (1/2)
          > 不作修改


     3. 上半部: Event Pickup (2/2)
          > 加入 SendOSC 相關節點


     4. 下半部: Event Drop (1/2)
         
> 不作修改

     5. 下半部: Event Drop (2/2)         
         > 加入 SendOSC 相關節點


-----------------------------------------------------------------------------------------------

F. OSC Received (Level Blueprint)
     1.  從 Event BeginPlay 連結 Add Osc Receiver Component 節點
           >  再連結 Assign On Osc Received 節點

     2. 結果:
          > 產生 Bind Event to OnOscReceived
OnOscReceived_Event_0 節點

     3. 新增相關節點連結如下:


-----------------------------------------------------------------------------------------------   

G. Get Player Location (Level Blueprint)

-----------------------------------------------------------------------------------------------

H. Move Player Location (MotionControllerPawn)
     1. 滑鼠雙擊 MotionControllerPawn 來開啟

     2. 新增 Timeline_TrackZ 節點並編輯內容

     3. 取得 Player 並移動位置

     4. 與原本的 Event Tick 做串接

-----------------------------------------------------------------------------------------------

I. Get Actor from any Blueprint (ex: MotionControllerPawn)
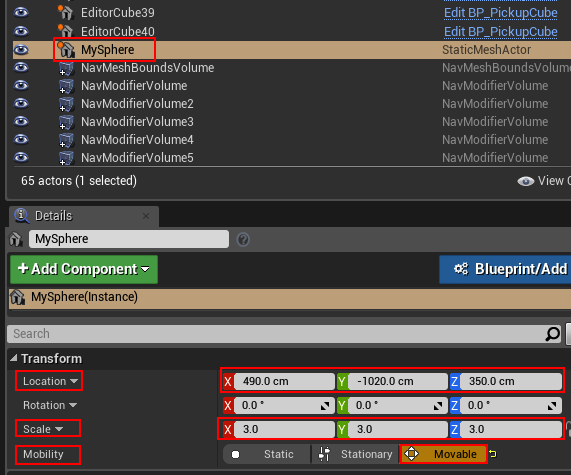
   1. 新增一個 Sphere, 取名為 MySphere, 調整位置大小後, 設為可移動.
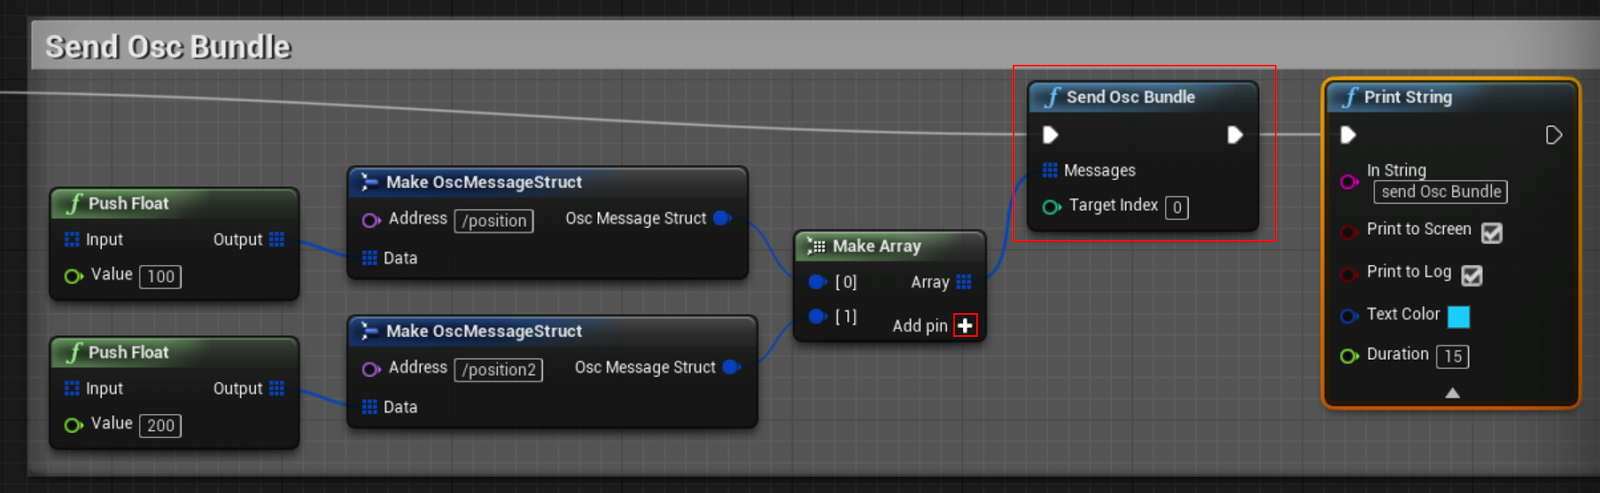
   2. 開啟 BP_PickupCube

   3. 從 EventPickup 節點串接的結束開始

-----------------------------------------------------------------------------------------------

J. Send OSC Bundle

    1. Processing: send; Unreal: receive
        a. send by Processing:
import oscP5.*;
import netP5.*;

OscP5 oscP5;
NetAddress myRemoteLocation;

void setup() {
  size(400,400);
  frameRate(25);
  /* start oscP5, listening for incoming messages at port 12000 */
  oscP5 = new OscP5(this,12000);
 
  /* myRemoteLocation is a NetAddress. a NetAddress takes 2 parameters,
   * an ip address and a port number. myRemoteLocation is used as parameter in
   * oscP5.send() when sending osc packets to another computer, device,
   * application. usage see below. for testing purposes the listening port
   * and the port of the remote location address are the same, hence you will
   * send messages back to this sketch.
   */

  myRemoteLocation = new NetAddress("127.0.0.1",8000);
}

void draw() {
  background(0); 
  delay(500); //delay 0.5 second
  sendMyOSC();
}

//void mousePressed() {
void sendMyOSC() { 
  /* create an osc bundle */
  OscBundle myBundle = new OscBundle();
 
  /* createa new osc message object */
  OscMessage myMessage = new OscMessage("/position");
  myMessage.add(123.0); 
 
  /* add an osc message to the osc bundle */
  myBundle.add(myMessage);
 
  /* reset and clear the myMessage object for refill. */
  myMessage.clear();
 
  /* refill the osc message object again */

  myMessage.setAddrPattern("/position2");
  myMessage.add(456.0); 
 
  myBundle.add(myMessage);
 
  myBundle.setTimetag(myBundle.now() + 10000);
  /* send the osc bundle, containing 2 osc messages, to a remote location. */
  oscP5.send(myBundle, myRemoteLocation);
}


        b. received by Unreal:(Level Blueprint)

* * * * * * * * * * * * * * * * * * * * * * * * * * * * * * * * * * * * * * * * * * * * * * * *

    2. Unreal: send; Processing: receive
        a. send by Unreal: (might in BP_PickupCube)

        b. received by Processing:
import oscP5.*;
import netP5.*;

OscP5 oscP5;
NetAddress myRemoteLocation;

void setup() {
  size(400,400);
  frameRate(25);
  /* start oscP5, listening for incoming messages at port 12000 */
  oscP5 = new OscP5(this,12000);
 
  /* myRemoteLocation is a NetAddress. a NetAddress takes 2 parameters,
   * an ip address and a port number. myRemoteLocation is used as parameter in
   * oscP5.send() when sending osc packets to another computer, device,
   * application. usage see below. for testing purposes the listening port
   * and the port of the remote location address are the same, hence you will
   * send messages back to this sketch.
   */

  myRemoteLocation = new NetAddress("127.0.0.1",8000);
}

void draw() {
  background(0); 
}

/* incoming osc message are forwarded to the oscEvent method. */
void oscEvent(OscMessage theOscMessage) {
  /* print the address pattern and the typetag of the received OscMessage */
  print("### received an osc message.");
  print(" addrpattern: "+theOscMessage.addrPattern());
  print(" typetag: "+theOscMessage.typetag());
  println(" timetag: "+theOscMessage.timetag());
 
  // get values format:
  //int myInt = theOscMessage.get(0).intValue();  
  //float myFloat = theOscMessage.get(1).floatValue(); 

  //String myStr = theOscMessage.get(0).stringValue();
 
  if(theOscMessage.checkAddrPattern("/position") == true) {
    float myFloat = theOscMessage.get(0).floatValue(); // get the first osc argument
    println("/position myFloat: "+myFloat);
  }
  else if (theOscMessage.checkAddrPattern("/position2") == true) {
    float myFloat = theOscMessage.get(0).floatValue(); // get the first osc argument
    println("/position2 myFloat: "+myFloat);
  }   
}

        c. 結果:

-----------------------------------------------------------------------------------------------
K. Ray Casts(光線投射)
     1. Capsule Trace By Channel (Level Blueprint)


     2. Line Trace By Channel (MotionControllerPawn)


2016年11月27日 星期日

Unreal: Beam Particle

since: 2016/11/26
update: 2016/11/27

reference:
1. Beam Particle (Tutorial) - Epic Wiki
2. Particle Instance Parameters - UE4 AnswerHub


A. 新增專案, 匯入紋理與新增材質
    1. 新增專案:

    2. 匯入紋理:
        下載: BaseBeam.pngBeamPulse.png 檔案, 並匯入成紋理
 

    3. 新增材質:

    4. 取名為 BeamParticleMaterial  , 並雙擊滑鼠開啟

    5. 開啟後, 先到右邊的 Details 裡, 將 MaterialBlend Mode 改成:
        Translucent(半透明)

    6. 新增二個 Texture Sample(紋理樣本) 節點

    7. 點選上方的 Texture Sample 節點, 將其 Texture 屬性設為之前匯入的:
        BaseBeam 紋理

    8. 點選下方的 Texture Sample 節點, 將其 Texture 屬性設為之前匯入的:
        BeamPulse 紋理

    9. 最後加入以下節點, 並作相關連結:
        Panner, Add, Multiply, Particle Color

-----------------------------------------------------------------------------------------------

B. 新增 Particle System
     1. Add New > Particle System

     2. 取名為 BeamParticleSystem 並雙擊滑鼠進入

     3. 先點選中上方 Particle Emitter 下的 "Required" Module:
         在 Details 裡: Emitter > Material 屬性
         > 設定為之前調整好的 BeamParticleMaterial

     4. 新增 Beam Data Module:
          > TypeData > New Beam Data

     5. 結果:

-----------------------------------------------------------------------------------------------

C. 調整 BeamParticleSystem 的 Module Properties
     1. Lifetime Module
         > 將 Lifetime 屬性設為 0.0: 允許光束恆定(永遠活動)

     2. Beam Data Module:
          > 將 Beam Method 屬性設為 Distance : 光束將通過沿著發射器的X軸的距離
             來計算,而不是需要來源目標


          > 將 Texture Tile Distance 屬性設為 500 : 每500個 Unreal 單位平鋪紋理。
             允許動畫脈衝顯示更清晰。

          > 將 Max Beam Count 屬性設為 3 : 再多加幾個光束。
             (當有雜訊時,視覺效果會不錯)

          > 將 Speed 屬性設為 0 : 光束會立即前往目標。

          > 將 Interpolation Points 屬性設為 50 : 給予光束一些添加雜訊的靈活性。

          > 將 Distance 屬性設為 1000 : 將光束沿著X軸擴展 1000 Unreal 單位。

     3. 刪除 Initial VelocityColor Over Life modules

     4. 新增 Initial Color module

     5. 結果:

-----------------------------------------------------------------------------------------------

D.  增加 BeamParticleSystem 的雜訊
      1. 新增 Beam Noise

      2. 結果:

      3. 調整 Noise Module 的 Properties
          > 將 Low Freq Enabled 勾選 : 啟用雜訊的隨機化。
        
          > 將 Frequency 屬性設為 30 : 雜訊的數量

          > 將 Noise Range 屬性 : 告訴雜訊它可以遠離光束移動多遠
              >
Distribution Vector Uniform (向量均勻分佈)
              >
Max:( 0, 50, 50)              
              > Min:( 0, -50, -50)


          > 將 Noise Tessellation 屬性設為 10 : 讓雜訊平滑一些

          > 將 Frequency Distance 屬性設為 100 : 修飾雜訊的形狀


      4. 結果:

-----------------------------------------------------------------------------------------------

E. 設定 BeamParticleSystem 的來源與目標
      1. 在場景加入二個 Note Actor

      2. 幫 Particle Emitter 新增 SourceTarget module.

      3. 結果:

      4. 調整 Beam Data, Source and Target  Module 的 Properties

          a. Beam Data Module
              > 將 Beam Method 屬性設為 Target: 光束需要來源目標

          b. Source Module
              > 將 Source Method 屬性設為 Actor: 告訴光束在 Actor 的位置開始

              > 將 Source Name 屬性設為 BeamSource

              > 將 Source 屬性設為: Distribution Vector Constant, Value:(0, 0, 0)
                  (會在 preview window 中設定來源位置為 0,0,0)

          c. Target Module
              > 將 Source Method 屬性設為 Actor: 告訴光束在 Actor 的位置結束

              > 將 Source Name 屬性設為 BeamTarget

              > 將 Source 屬性設為: Distribution Vector Constant, Value:(1000, 0, 0)
                  (會在 preview window 中設定目標位置為 1000,0,0)

      5. 回到關卡場景, 將 BeamParticleSystem 拖拉進來.

      6. 點選 BeamParticleSystem , 在 Details 裡按下 "Expose Parameter

      7. 在 Instance Parameters 裡, 設定BeamSourceBeamTargetActor

      8. 編譯執行: