update: 2015/11/01
reference:
1. Adafruit BNO055 Absolute Orientation Sensor
A. 硬體:
1. Adafruit BNO055 Sensor
2. Arduino Nano
3. Mac OS X
-----------------------------------------------------------------------------------------------
B. 軟體:
1. Arduino IDE
2. Processing
-----------------------------------------------------------------------------------------------
C. 將 Arduino 程式碼寫入:
1. 下載 Adafruit_BNO055 driver 與 Adafruit_Sensor
2. 解壓縮後, 將其資料夾更名為: Adafruit_BNO055 與 Adafruit_Sensor
3. 複製到 /Users/Lanli/Documents/Arduino/libraries 下:

/Adafruit_BNO055/examples/rawdata/rawdata.ino, 撰寫以下的程式碼:
#include <Wire.h>
#include <Adafruit_Sensor.h>
#include <Adafruit_BNO055.h>
#include <utility/imumaths.h>
/* This driver reads raw data from the BNO055
Connections
===========
Connect SCL to analog 5
Connect SDA to analog 4
Connect VDD to 3.3V DC
Connect GROUND to common ground
History
=======
2015/MAR/03 - First release (KTOWN)
*/
/* Set the delay between fresh samples */
#define BNO055_SAMPLERATE_DELAY_MS (100)
Adafruit_BNO055 bno = Adafruit_BNO055();
/**************************************************************************/
/*
Arduino setup function (automatically called at startup)
*/
/**************************************************************************/
void setup(void)
{
Serial.begin(9600);
Serial.println("Orientation Sensor Raw Data Test"); Serial.println("");
/* Initialise the sensor */
if(!bno.begin())
{
/* There was a problem detecting the BNO055 ... check your connections */
Serial.print("Ooops, no BNO055 detected ... Check your wiring or I2C ADDR!");
while(1);
}
delay(1000);
/* Display the current temperature */
/*
int8_t temp = bno.getTemp();
Serial.print("Current Temperature: ");
Serial.print(temp);
Serial.println(" C");
Serial.println("");
*/
bno.setExtCrystalUse(true);
Serial.println("Calibration status values: 0=uncalibrated, 3=fully calibrated");
}
/**************************************************************************/
/*
Arduino loop function, called once 'setup' is complete (your own code
should go here)
*/
/**************************************************************************/
void loop(void)
{
// Possible vector values can be:
// - VECTOR_ACCELEROMETER - m/s^2
// - VECTOR_MAGNETOMETER - uT
// - VECTOR_GYROSCOPE - rad/s
// - VECTOR_EULER - degrees
// - VECTOR_LINEARACCEL - m/s^2
// - VECTOR_GRAVITY - m/s^2
// EULER
imu::Vector<3> euler = bno.getVector(Adafruit_BNO055::VECTOR_EULER);
/* Display the floating point data */
/*
Serial.print("X: ");
Serial.print(euler.x());
Serial.print(" Y: ");
Serial.print(euler.y());
Serial.print(" Z: ");
Serial.print(euler.z());
Serial.print("\t\t");
*/
Serial.print("euler: ");
Serial.print(euler.x());
Serial.print(" ");
Serial.print(euler.y());
Serial.print(" ");
Serial.print(euler.z());
Serial.print(" ");
// GYROSCOPE
imu::Vector<3> gyroscope = bno.getVector(Adafruit_BNO055::VECTOR_GYROSCOPE);
Serial.print("gyro: ");
Serial.print(gyroscope.x());
Serial.print(" ");
Serial.print(gyroscope.y());
Serial.print(" ");
Serial.print(gyroscope.z());
Serial.print(" ");
// ACCELEROMETER
imu::Vector<3> accelerometer = bno.getVector(Adafruit_BNO055::VECTOR_ACCELEROMETER);
Serial.print("acc: ");
Serial.print(accelerometer.x());
Serial.print(" ");
Serial.print(accelerometer.y());
Serial.print(" ");
Serial.print(accelerometer.z());
Serial.print(" ");
/*
// Quaternion data
imu::Quaternion quat = bno.getQuat();
Serial.print("qW: ");
Serial.print(quat.w(), 4);
Serial.print(" qX: ");
Serial.print(quat.y(), 4);
Serial.print(" qY: ");
Serial.print(quat.x(), 4);
Serial.print(" qZ: ");
Serial.print(quat.z(), 4);
Serial.print("\t\t");
*/
/* Display calibration status for each sensor. */
uint8_t system, gyro, accel, mag = 0;
bno.getCalibration(&system, &gyro, &accel, &mag);
//Serial.print("CALIBRATION: Sys=");
Serial.print("CAL: Sys=");
Serial.print(system, DEC);
Serial.print(" Gyro=");
Serial.print(gyro, DEC);
Serial.print(" Accel=");
Serial.print(accel, DEC);
Serial.print(" Mag=");
Serial.println(mag, DEC);
delay(BNO055_SAMPLERATE_DELAY_MS);
}
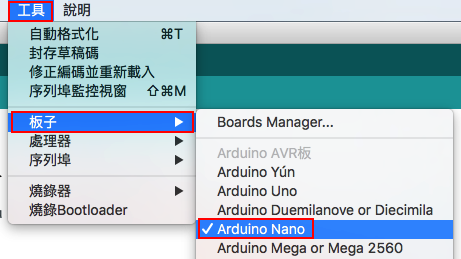
4. 選取板子:
Arduino > 工具 > 板子 > Arduino Nano
Arduino > 工具 > 序列埠 > /dev/cu.usbserial-AJ02WWCS

Arduino > 檔案 > 上傳

7. 完成:

D. Processing:
1. 相關程式碼如下:
void setup() {
....
// initial Serial
println(Serial.list());
Serial port;
// baudRate: 從一裝置發到另一裝置的位元率,即每秒鐘多少位元(bit/s)。
int arduinoBaudRate = 9600;
int arduinoPortIndex;
int lineFeed= 10; // ASCII: line feed (new line)
String arduinoSerialName = "usbserial";
String arduinoPort;
// automatic set arduino port index
for (int i = 0; i < Serial.list ().length; i++) {
if (Serial.list()[i].indexOf(arduinoSerialName) > 0) { // if find string "usbserial"
arduinoPortIndex = i;
println(">>> arduino Port Index = " + arduinoPortIndex)
break;
}
}
arduinoPort = Serial.list()[arduinoPortIndex];
port = new Serial(this, arduinoPort, arduinoBaudRate);
port.bufferUntil(lineFeed);
....
}
void serialEvent(Serial p) {
String rawStr = p.readString();
println(">>> BNO055 = " + rawStr);
}
2. 執行結果:


