顯示具有 Unreal 標籤的文章。 顯示所有文章

2017年4月16日 星期日

Unreal: How To Read Customized Configuration File

since: 2017/04/16
update: 2017/04/16
reference:
1. I touchs: Unreal: Create C++ Blueprint Function Library
2. How can I load text from file with blueprint? - UE4 AnswerHub
3. Newline character in UE4 – Bocil Mania
4. set array elem - UE4 AnswerHub


A. 新增專案
    1. 新增 BlueprintBlank 專案, 取名為: ReadConfigFile

    2. 新增 MapsData 資料夾:
        Maps 用來存放預設的關卡地圖; Data 用來放置 config.ini

    3. 新增一個檔名為 config.ini 的檔案, 內容如下:
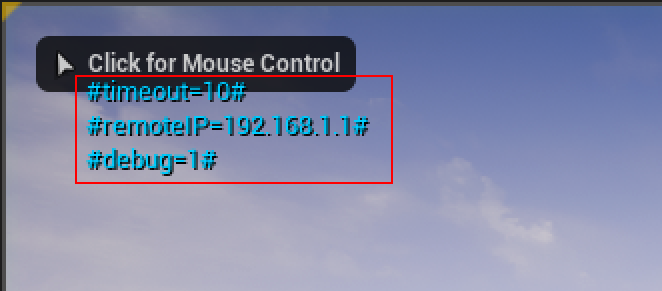
# show debug information (1:true / 0:false)
debug=1

# remote IP (String)
remoteIP=192.168.1.1

# connect timeout (int)
timeout=10


說明: a. # 開頭為註解
         b. 變數名稱與變數值之間用 "=" 號連接, 且前後不可以有空白
         c. 此例有 3 行是變數的設定(之後需要在字串陣列變數指定此數量)


    4. 點選 Data 資料夾 > 滑鼠右鍵 > Show in Explorer

    5. 將剛剛的 config.ini 檔案 copy 進來

-----------------------------------------------------------------------------------------------

B. 新增 C++ Blueprint Function Library
    1. Add New > New C++ Class...

    2. 點選: Blueprint Function Library > Next

    3. Name: FileHelperFunction > Create Class
        > 自動開啟 visual studio 2015


    4. 修改 FileHelperFunction.h
// Fill out your copyright notice in the Description page of Project Settings.

#pragma once

#include "Kismet/BlueprintFunctionLibrary.h"
#include "FileHelperFunction.generated.h"

/**
 *
 */
UCLASS()
class READCONFIGFILE_API UFileHelperFunction : public UBlueprintFunctionLibrary
{
    GENERATED_BODY()

   
    //@add ######
    public:

    UFUNCTION(BlueprintCallable, Category = "save")
        static bool FileSaveString(FString SaveString, FString SavePath);

    UFUNCTION(BlueprintPure, Category = "save")
        static bool FileLoadString(FString LoadPath, FString& LoadString);

};

    5. 修改 FileHelperFunction.cpp
// Fill out your copyright notice in the Description page of Project Settings.

#include "ReadConfigFile.h"
#include "FileHelperFunction.h"


//@add ######
bool UFileHelperFunction::FileSaveString(FString SaveString, FString SavePath)
{
    return FFileHelper::SaveStringToFile(SaveString, *(FPaths::GameDir() + SavePath));
}

bool UFileHelperFunction::FileLoadString(FString LoadPath, FString& LoadString)
{
    return FFileHelper::LoadFileToString(LoadString, *(FPaths::GameDir() + LoadPath));
}


    6. 建置 > 建置方案

-----------------------------------------------------------------------------------------------

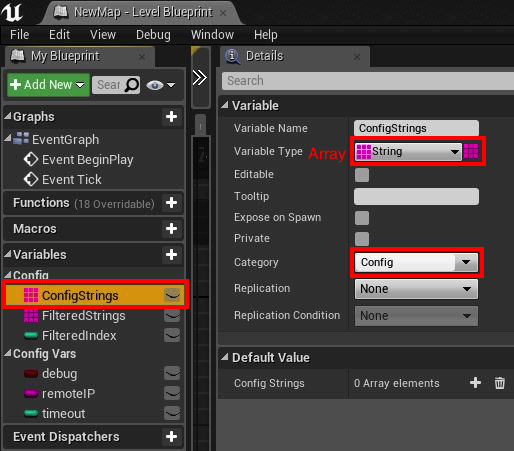
C. Level Blueprint: 新增變數
    1. ConfigStrings: 字串陣列

    2. FilteredStrings: 字串陣列

    3. FilteredIndex: 整數

    4. debug: 布林

    5. remoteIP: 字串

    6. timeout: 整數

-----------------------------------------------------------------------------------------------

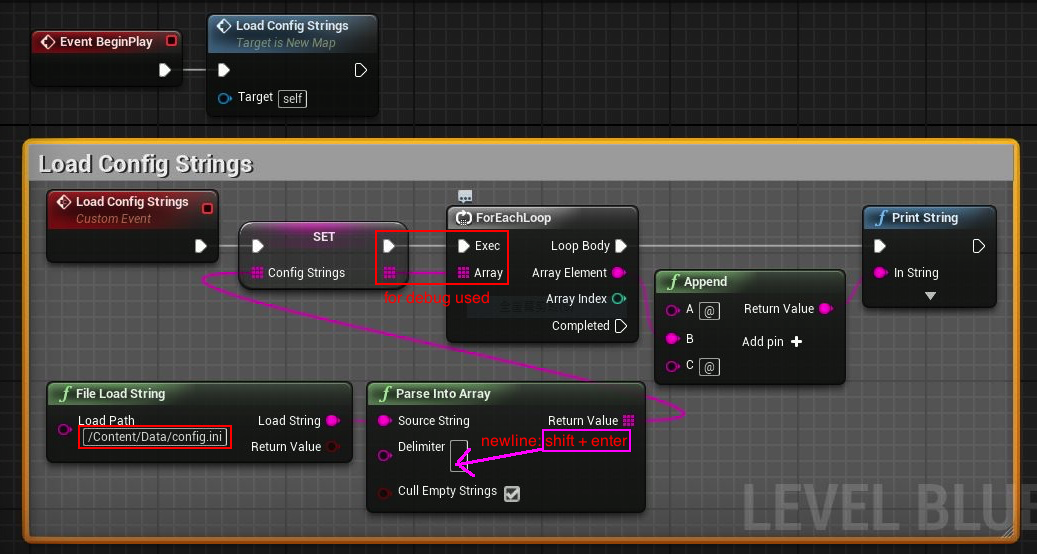
D. Level Blueprint: Load Config Strings


-----------------------------------------------------------------------------------------------

E. Level Blueprint: Filter Config Strings


-----------------------------------------------------------------------------------------------

F.
Level Blueprint: Set Config Vars


-----------------------------------------------------------------------------------------------

G. Package Project: Windows


-----------------------------------------------------------------------------------------------

H. Package Project: Mac


2017年3月27日 星期一

Unreal: Simple Head Up Display (HUD)

since: 2017/03/27
update: 2017/04/14
reference:
1. UMG UI Designer Quick Start Guide | Unreal Engine

A. 新增 Widget Blueprints
    1. Add New > User Interface > Widget Blueprint
        > 取名為: HUD, 並開啟.


    2. 在 Canvas Panel 下新增: Horizonal Box Panel

       Details:
    備註: 若要匯出成 VR 執行檔, 建議: Size X = 380; Size Y = 350, 螢幕才看得到.

    3. 在 Horizonal Box 下新增: Text Box (Editable)

       Details:

-----------------------------------------------------------------------------------------------

B. 在 Level Blueprint, 將此 Widget 顯示出來
     1. Event BeginPlay -> Create Widget

     2. 將 Class 設為先前新增的 HUD Widget

     3. 將 Return Value 提升(Promote)為變數

     4. 將此變數取名為: HUD Reference

      Details:

     結果:

     5. 加上 "Add to Viewport" 節點

-----------------------------------------------------------------------------------------------

C. 在 Level Blueprint, 設定 HUD Widget 顯示特定的文字
     1. 新增存放 Text 的變數:

      Details:

     2. 設定 HUD Widget 顯示特定的文字

     3. 顯示 / 隱藏 HUD Widget

2016年12月30日 星期五

Unreal: Sound Analysis

since: 2016/12/30
update: 2016/12/30

reference:
1. eXifreXi/eXiSoundVis: UE4 Plugin
2. Plugin eXi's Sound Visualization Plugin
3. BigSoundBank.com - Download sounds in WAV, AIFF, MP3 and OGG


A. 版本
     1. Windows 10
     2. Unreal 4.14.1
     3. Visual Studio 2015 Update 2

-----------------------------------------------------------------------------------------------

B. 新增專案
    1. New Project > C++ > Basic Code
         > Name: SoundAnalysis > Create Project

    2. 關閉 Unreal > 在 SoundAnalysis 專案目錄內:
        > 刪除 Binaries 目錄
        > 新增 Plugins 目錄

    3. 到 eXifreXi/eXiSoundVis: UE4 Plugin下載 eXiSoundVis-master.zip 檔案
        解壓縮後更名為 eXiSoundVis 資料夾

    4. 將 eXiSoundVis 資料夾 copy 到專案目錄下的 Plugins 目錄內,
        並刪除
eXiSoundVis 裡的 Binaries 目錄.

    5. 到 BigSoundBank.com 下載.ogg 音效檔 (在此為 0614.ogg)
        > copy 到專案目錄下的 Songs 目錄(自行新增)

    6. Unreal 專案名稱 > Generate Visual Studio project files

    7. 重新開啟 Unreal 專案:
        > Would you like to rebuild them now? > 是(Y)

    8. 檢查 Plugin 是否已裝好:


    9. 檢查是否能正常編譯

   10. 新增 Empty Actor 到場景裡

   11. 新增此 ActorBlueprint

   12. 取名為: Actor_Blueprint

    13. 開啟 Actor_Blueprint, 新增 Sound Vis Component

     結果:

-----------------------------------------------------------------------------------------------

C.  列出專案下的 Songs 目錄內所有的 .ogg 音效檔
    1. 新增 Load Sound File Names 節點

    2. 結果(目前只有一個 0614.ogg 檔案)

-----------------------------------------------------------------------------------------------

D. 載入單一音檔(.ogg) 並加入 "載入完成" 的事件
    1. Add Load Sound File Node & Assign OnFileLoadCompleted Event


    2. 結果:

-----------------------------------------------------------------------------------------------

(舊方法,  不建議使用)
E. 分析音效頻率
    1. 新增 2 個變數:
        startTime: float , default: 0.0
        duration: float, default: 1.0

    startTime:


   duration:


    2. Calculate Freq Spectrum 相關節點

    3. 結果:

-----------------------------------------------------------------------------------------------

(新方法,  建議使用)
F. 分析音效頻率
    1. 新增 Start Calculate Freq Spectrum 相關節點

    2. 產生 OnFrequencySpectrumCalculated Event 節點

    3. 新增 Get Freq Value 相關節點:

    4. 結果: