顯示具有 Processing 標籤的文章。 顯示所有文章

2015年12月21日 星期一

Processing 3: Kinect for Windows v2

since: 2015/12/21
update: 2015/12/21

reference:
1. ThomasLengeling/KinectPV2

A. 系統需求:
     1. A Kinect for Windows v2 Device (K4W2)
     2. 64bit computer with a dedicated USB 3.0
     3. Windows 10, 8, 8.1
     4. Update your latest video card driver
     5. Install DirectX 11


     備註:
      a. How to Check Direct X Version in Windows:
      (1). Click “Start” > “Run” or hold down the “Windows Key” and press “R“.
      (2). Type “dxdiag“, then click “OK“.
      (3). The version of DirectX you are currently running will be displayed on your screen.

       b.  check your system: run the Kinect Configuration Verifier tool


-----------------------------------------------------------------------------------------------

B. 安裝軟體:
     1. Kinect SDK v2
     2. Processing 3.0

-----------------------------------------------------------------------------------------------

C. 安裝 Kinect v2 for Processing Library

     1. Sketch > Import Library... > Add Library...

     2. find: Kinect v2 for Processing > Install

-----------------------------------------------------------------------------------------------

D. 執行範例程式:
     1. File > Examples... > Contributed Libraries > Kinect v2 for Processing
                > DepthTest > Run

     2. 執行結果:

2015年10月30日 星期五

Processing: Get Datas From Adafruit BNO055 Sensor

since: 2015/10/30
update: 2015/11/01

reference:
1. Adafruit BNO055 Absolute Orientation Sensor

A. 硬體:

    1. Adafruit BNO055 Sensor
    2. Arduino Nano
    3. Mac OS X

-----------------------------------------------------------------------------------------------

B. 軟體:
    1. Arduino IDE
    2. Processing

-----------------------------------------------------------------------------------------------

C. 將 Arduino 程式碼寫入:

     1. 下載 Adafruit_BNO055 driver 與 Adafruit_Sensor
 
     2. 解壓縮後, 將其資料夾更名為: Adafruit_BNO055 與 Adafruit_Sensor

     3. 複製到 /Users/Lanli/Documents/Arduino/libraries 下:

     4. 打開  Arduino IDE , 參考剛剛 libraries 資料夾下的
         /Adafruit_BNO055/examples/rawdata/rawdata.ino, 撰寫以下的程式碼:
 
#include <Wire.h>
#include <Adafruit_Sensor.h>
#include <Adafruit_BNO055.h>
#include <utility/imumaths.h>

/* This driver reads raw data from the BNO055

   Connections
   ===========
   Connect SCL to analog 5
   Connect SDA to analog 4
   Connect VDD to 3.3V DC
   Connect GROUND to common ground

   History
   =======
   2015/MAR/03  - First release (KTOWN)
*/

/* Set the delay between fresh samples */
#define BNO055_SAMPLERATE_DELAY_MS (100)

Adafruit_BNO055 bno = Adafruit_BNO055();

/**************************************************************************/
/*
    Arduino setup function (automatically called at startup)
*/
/**************************************************************************/

void setup(void)
{
  Serial.begin(9600);
  Serial.println("Orientation Sensor Raw Data Test"); Serial.println("");

  /* Initialise the sensor */
  if(!bno.begin())
  {
    /* There was a problem detecting the BNO055 ... check your connections */
    Serial.print("Ooops, no BNO055 detected ... Check your wiring or I2C ADDR!");
    while(1);
  }

  delay(1000);

  /* Display the current temperature */
  /*
  int8_t temp = bno.getTemp();
  Serial.print("Current Temperature: ");
  Serial.print(temp);
  Serial.println(" C");
  Serial.println("");
  */

  bno.setExtCrystalUse(true);

  Serial.println("Calibration status values: 0=uncalibrated, 3=fully calibrated");
}

/**************************************************************************/
/*
    Arduino loop function, called once 'setup' is complete (your own code
    should go here)
*/
/**************************************************************************/

void loop(void)
{
  // Possible vector values can be:
  // - VECTOR_ACCELEROMETER - m/s^2
  // - VECTOR_MAGNETOMETER  - uT
  // - VECTOR_GYROSCOPE     - rad/s
  // - VECTOR_EULER         - degrees
  // - VECTOR_LINEARACCEL   - m/s^2
  // - VECTOR_GRAVITY       - m/s^2

 
  // EULER
  imu::Vector<3> euler = bno.getVector(Adafruit_BNO055::VECTOR_EULER);

  /* Display the floating point data */
  /*
  Serial.print("X: ");
  Serial.print(euler.x());
  Serial.print(" Y: ");
  Serial.print(euler.y());
  Serial.print(" Z: ");
  Serial.print(euler.z());
  Serial.print("\t\t");
  */

  Serial.print("euler: ");
  Serial.print(euler.x());
  Serial.print(" ");
  Serial.print(euler.y());
  Serial.print(" ");
  Serial.print(euler.z());
  Serial.print(" "); 
 
  // GYROSCOPE
  imu::Vector<3> gyroscope = bno.getVector(Adafruit_BNO055::VECTOR_GYROSCOPE);

  Serial.print("gyro: ");
  Serial.print(gyroscope.x());
  Serial.print(" ");
  Serial.print(gyroscope.y());
  Serial.print(" ");
  Serial.print(gyroscope.z());
  Serial.print(" ");
 
  // ACCELEROMETER
  imu::Vector<3> accelerometer = bno.getVector(Adafruit_BNO055::VECTOR_ACCELEROMETER);

  Serial.print("acc: ");
  Serial.print(accelerometer.x());
  Serial.print(" ");
  Serial.print(accelerometer.y());
  Serial.print(" ");
  Serial.print(accelerometer.z());
  Serial.print(" "); 
 
  /*
  // Quaternion data
  imu::Quaternion quat = bno.getQuat();
  Serial.print("qW: ");
  Serial.print(quat.w(), 4);
  Serial.print(" qX: ");
  Serial.print(quat.y(), 4);
  Serial.print(" qY: ");
  Serial.print(quat.x(), 4);
  Serial.print(" qZ: ");
  Serial.print(quat.z(), 4);
  Serial.print("\t\t");
  */


  /* Display calibration status for each sensor. */
  uint8_t system, gyro, accel, mag = 0;
  bno.getCalibration(&system, &gyro, &accel, &mag);
  //Serial.print("CALIBRATION: Sys=");
  Serial.print("CAL: Sys=");
  Serial.print(system, DEC);
  Serial.print(" Gyro=");
  Serial.print(gyro, DEC);
  Serial.print(" Accel=");
  Serial.print(accel, DEC);
  Serial.print(" Mag=");
  Serial.println(mag, DEC);

  delay(BNO055_SAMPLERATE_DELAY_MS);
}

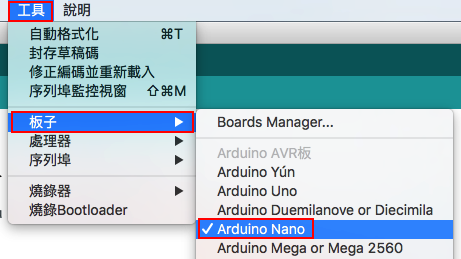
     4. 選取板子:
         Arduino > 工具 > 板子 > Arduino Nano 

     5. 選取序列埠:
         Arduino > 工具 > 序列埠 > /dev/cu.usbserial-AJ02WWCS 


     6. 上傳:
         Arduino > 檔案 > 上傳  

     7. 完成:

-----------------------------------------------------------------------------------------------

D. Processing:
    1. 相關程式碼如下:

void setup() {
....
  // initial Serial
  println(Serial.list());

  Serial port;
  // baudRate: 從一裝置發到另一裝置的位元率,即每秒鐘多少位元(bit/s)。
  int arduinoBaudRate = 9600;     
  int arduinoPortIndex;
  int lineFeed= 10;         // ASCII: line feed (new line)
  String arduinoSerialName = "
usbserial";
  String arduinoPort;

  // automatic set arduino port index 

 
for (int i = 0; i < Serial.list ().length; i++) {
    if (Serial.list()[i].indexOf(
arduinoSerialName) > 0) { // if find string "usbserial"
      arduinoPortIndex = i;
      println(">>> arduino Port Index = " + arduinoPortIndex)      
      break;
    }
  }

    arduinoPort = Serial.list()[arduinoPortIndex];
    port = new Serial(this, arduinoPort, arduinoBaudRate);
    port.bufferUntil(lineFeed);

....
}

void serialEvent(Serial p) { 
  String rawStr = p.readString();
  println(">>> BNO055 = " +  rawStr);
}


    2. 執行結果:

2015年6月29日 星期一

Creating a wireless MIDI connection between computers

since: 2015/06/29
update: 2015/06/29

reference:
1. Mac OS:Creating a wireless MIDI connection between computers
2. How to send Midi via Wifi on Mac - Tutorial on Vimeo

A. 功能定義:
     1. Master (主控)端:
         利用 Processing 程式, 將 MIDI 訊號藉由( 程式 / Ableton Live) 輸出給 Slave 端.

     2. Slave (隨從)端:
         輸入(接受) Master 端送來的 MIDI 訊號, 播放對應的音軌效果.

-----------------------------------------------------------------------------------------------

B. MIDI 網路設定:
    1. Master 端:
        a. 工具程式 > 音訊 MIDI 設定:

        b. 視窗 > 顯示 MIDI 錄音室
             > 雙擊 "網路"

        c. > 在左上方,  "我的區段", 按下 "+" 新增一個區段.
            > 於右上方, 勾選 "已啟用", 並將 "本機名稱" 與 "Bonjour 名稱" 設為:
                Wireless MIDI Master

            > 在左下方, 將 "可能連接本機的有": 設為 "所有參與者"

    2. Slave 端:
        類似 Master 的方式:
        > 在左上方,  "我的區段", 按下 "+" 新增一個區段.
        > 於右上方, 勾選 "已啟用", 並將 "本機名稱" 與 "Bonjour 名稱" 設為:
           Wireless MIDI Slave

        > 在左下方, 將 "可能連接本機的有": 設為 "所有參與者"

    3. 建立 Master 與 Slave 區段的連結:
        a. 於 Master 端:
            先點選 "Wireless MIDI Master" 區段,
            再點選目錄內的 "Wireless MIDI Slave",
            按下 "連線" 後, 可於右方的 "參與者" 看到 "Wireless MIDI Slave"

        b. 於 Slave 端:
            先點選 "Wireless MIDI Slave" 區段,
            再點選目錄內的 "Wireless MIDI Master",
            按下 "連線" 後, 可於右方的 "參與者" 看到 "Wireless MIDI Master"

-----------------------------------------------------------------------------------------------

C. Ableton Live 偏好設定:
    1. Master 端:
        將 Wireless MIDI Master 網路輸出的 Track, Sync, Remote 皆設成 On. 

        備註: 由於在此例 MIDI 訊號是由 Processing 程式送出, 因此關閉 Ableton Live ,
                  也可正常運作, 亦即不需要設定 Ableton Live (尚未驗證).

    2. Slave 端:
        將 Wireless MIDI Master 網路輸入的 Track, Sync, Remote 皆設成 On.

-----------------------------------------------------------------------------------------------

D. 音軌 Mapping:
     Slave 端:
     1. 拖拉一個 Drum Rack 到下方, 確認按鍵與位置的對應, 在此為:
          "A 鍵" 對應到 "C5" 位置.

     2. 將一個音效拖拉到剛剛 "C5" 的位置, 並按下 "A 鍵", 來確認是否有聽到聲音播放.

-----------------------------------------------------------------------------------------------

E. Processing 程式:
    1. MIDI Note Numbers Mappings

    說明: 由上表可查得 C5 對應到 Note Number 為: 84
    2. Master 端:
        開啟 Processing 轉寫程式如下:

import themidibus.*; //Import the MIDI library

MidiBus myBus; // The MidiBus

void setup() {
  size(400, 400);
  background(0);

  MidiBus.list();
  // Create a new MidiBus with no input device
  // and the "Wireless MIDI Master" as output device.

  myBus = new MidiBus(this, -1, "Wireless MIDI Master");
}

void draw() {
  int channel = 0; // 頻道: 0 ~ 15
  int pitch = 84; // 音調
  int velocity = 127; // 速度

  Note note = new Note(channel, pitch, velocity);
  myBus.sendNoteOn(note);
  delay(2000);
 
  myBus.sendNoteOff(note);

  int number = 0;
  int value = 120;
  ControlChange change = new ControlChange(channel, number, value);
  myBus.sendControllerChange(change); // Send a controllerChange
  delay(1000);
}

void delay(int time) {
  int current = millis();
  while (millis () < current+time) Thread.yield();
}


2015年6月26日 星期五

Processing: MIDI Mappings To Ableton Live With The MidiBus

since: 2015/06/26
update: 2015/06/26

reference:
1. Small But Digital - The MidiBus
2. snoize: MIDI Monitor

A. Create a virtual MIDI Port:
    1. 應用程式 > 工具程式 > 音訊 MIDI 設定.app


   2. 視窗 > 顯示 MIDI 錄音室

   3. 滑鼠雙擊 IAC (Inter-application communication) 驅動程式:

    4. 勾選: 裝置已接上電腦; 新增自訂名稱的傳輸埠, 即完成.

-----------------------------------------------------------------------------------------------


B. Setup
virtual MIDI Port on Processing:
 
     說明: 我們的目的是要從 Processing 發送 MIDI 訊號給 Ableton Live 接收,
               1. 程式本身不需要輸入 MIDI 訊號, 因而將 Input Device 設成 -1.
               2. 而將 MIDI 訊號 Output 到剛剛新增的 virtual MIDI Port: "IAC_MIDI"

-----------------------------------------------------------------------------------------------

C. Setup virtual MIDI Port on Ableton Live: 
     說明:
     1. Ableton Live > Preferences > MIDI Sync
     2. 將 Processing 用來 Output MIDI 訊號的 virtual MIDI Port: "IAC_MIDI",
         設定成 Ableton Live 的 Input MIDI Port, 並且將其 Track 與 Remote 設成 On.

-----------------------------------------------------------------------------------------------

D. 製作音軌資料, 並將上方的量化選單(Quantization Menu)設成:
     None (不使用節拍)


-----------------------------------------------------------------------------------------------

E. Processing 擊鼓模擬:  
     ---> 發送 ControllerChange 訊號給 Ableton Live

    固定值:
    int channel = 0; // 頻道: 0 ~ 15
    int controllerValue = 127;

    調整值:
    int controllerNumber = 0;  // 0, 1, 2, 3 .....


-----------------------------------------------------------------------------------------------

F. Ableton Live: MIDI Mappings
    1. 按下 Ableton Live 右上方的 "MIDI", 切換到 MIDI Map 模式.
    2. 每次點取不同的音軌, 接著執行 Processing 程式發送出 ControllerChange 訊號.
    3. Ableton Live 會自動將所接收到的 ControllerChange 訊號,
        與所點取的 音軌 作Mapping.   

2015年6月10日 星期三

Processing: Get Free Memory Info With AppleScript

since: 2015/06/10
update: 2015/06/10

reference:
1. Troubleshooting · processing/processing Wiki

2. Applescript show free memory | Apple Support Communities
3. AppleScript: Essential Sub-Routines
4. io - How do I write to a text file using AppleScript? - Stack Overflow

A. 撰寫 Applescript:
    1. 開啟 Automator:

   
     2. Automator > 檔案 > 新增 > 應用程式 > 選擇:
    
     3. 工具程式 > 執行 AppleScript > 拖拉到右方

    4. 預設程式碼:
on run {input, parameters}
   
    (* Your script goes here *)
   
    return input
end run


    5. 修改如下:
on run {input, parameters}
   
   
    # get the number of free pages using 'vm_stat' and multiply by the page size
    set vmStats to (text 12 thru -2 of (do shell script "vm_stat | grep 'Pages free'")) * 4096
    # display dialog vmStats with title "Memory usage" buttons {"OK"} default button 1
   
    # write to file
    set someText to number_to_string(vmStats)
   
    set textFile to "/Lanli/RD/Projects/Processing/memory_test/free_mem.txt"
    do shell script "echo  " & quoted form of someText & " >  " & quoted form of textFile


    return input
end run


# A sub-routine that converts numeric values to strings
on number_to_string(this_number)
    set this_number to this_number as string
    if this_number contains "E+" then
        set x to the offset of "." in this_number
        set y to the offset of "+" in this_number
        set z to the offset of "E" in this_number
        set the decimal_adjust to characters (y - (length of this_number)) thru ¬
            -1 of this_number as string as number
        if x is not 0 then
            set the first_part to characters 1 thru (x - 1) of this_number as string
        else
            set the first_part to ""
        end if
        set the second_part to characters (x + 1) thru (z - 1) of this_number as string
        set the converted_number to the first_part
        repeat with i from 1 to the decimal_adjust
            try
                set the converted_number to ¬
                    the converted_number & character i of the second_part
            on error
                set the converted_number to the converted_number & "0"
            end try
        end repeat
        return the converted_number
    else
        return this_number
    end if
end number_to_string


    6. 檔案 > 儲存: 
        /Lanli/RD/Projects/Processing/memory_test/free_mem.app

-----------------------------------------------------------------------------------------------

B. 開啟 Processing 撰寫程式如下:
import java.util.Date;

String words1;
String words2;
String words3;
String words4;

long allocated;
long free;
long maximum;
long checkTimer;

String[] config;
float free_mem;

void setup() {
  frameRate(15);
  size(400, 400);
  textSize(24);
 
  words1 = "";
  words2 = "";
  words3 = "";
  words4 = "";
 
  checkTimer = (new Date()).getTime();

  //  File[] roots = File.listRoots();
  //
  //  // For each filesystem root, print some info 
  //  for (File root : roots) {
  //    println("File system root: " + root.getAbsolutePath());
  //    println("Total space (bytes): " + root.getTotalSpace());
  //    println("Free space (bytes): " + root.getFreeSpace());
  //    println("Usable space (bytes): " + root.getUsableSpace());
  //  }

}

void draw() {
  background(0);

  if ((new Date()).getTime() - checkTimer >= 2000) {
    checkTimer = (new Date()).getTime();

    open("/Lanli/RD/Projects/Processing/memory_test/free_mem.app");
    //delay(250);
    config = loadStrings("free_mem.txt"); 
    free_mem = float(config[0]) / 1024 / 1024; 

    // The amount of memory allocated so far (usually the -Xms setting)
    allocated = Runtime.getRuntime().totalMemory() / 1024 /1024;

    // Free memory out of the amount allocated (value above minus used)
    free = Runtime.getRuntime().freeMemory() / 1024 /1024;

    // The maximum amount of memory that can eventually be consumed
    // by this application. This is the value set by the Preferences
    // dialog box to increase the memory settings for an application.

    maximum = Runtime.getRuntime().maxMemory() / 1024 / 1024; 

    words1 = "app allocated = "+ allocated + " MB";
    words2 = "app free = "+ free + " MB";
    words3 = "app maximum = "+ maximum + " MB";
    words4 = "sys free_mem = "+ free_mem + " MB";
  }

  text(words1, 10, 25, 540, 300);
  text(words2, 10, 125, 540, 300);
  text(words3, 10, 225, 540, 300);
  text(words4, 10, 325, 540, 300);

  System.gc();
}

-----------------------------------------------------------------------------------------------

C. 執行結果:
       備註: 實體記憶體 (8.00 GB) - 記憶體用量 (2.45 GB) - 快取(2.59 GB)
                 = 2.96 GB 接近 3015.1016 MB / 1024 = 2.944 GB

2015年6月7日 星期日

Processing: Play Ableton Live 9 With LiveOSC and oscP5

since: 2015/06/07
update: 2015/06/07

reference:
1. Andreas Schlegel - oscP5
2. LiveOSC 
3. LiveOSC Processing Bridge

A. 在 Ableton Live 上設置 LiveOSC:
     1. 下載 LiveOSC, 檔名: trunk_LiveOSC-141.zip 解壓縮後的 trunk 資料夾下
         有一個 LiveOSC 的資料夾. (其內的 OSCAPI.txt 可看)

     2. 應用程式 > Ableton Live 9 Suite.app > 顯示套件內容:

     3. 將 LiveOSC 資料夾複製到: Contents > App-Resources > MIDI Remote Scripts 下:

     4. 開啟 Ableton Live:
         a. Live > Preferences... > MIDI Sync > Control Surface: LiveOSC
         > 設定好後, 請先關閉 Live, 再重新開啟.

         b. 新增 Live Set , 編輯完成後存檔.

-----------------------------------------------------------------------------------------------

B. Processing:

     1. 開啟 Processing, 新增 Sketch, 程式碼可完全取自: LiveOSC Processing Bridge

     2. 執行後如下:

2015年6月3日 星期三

Processing: Play GarageBand With Virtual MIDI Cables(Ports) On Mac

since: 2015/06/03
update: 2015/06/03

reference:
1. How to use the IAC Driver - MFA Lab
2. Create virtual MIDI ports on Mac


A. Create a virtual MIDI Port:

    1. 應用程式 > 工具程式 > 音訊 MIDI 設定.app

    2. 視窗 > 顯示 MIDI 錄音室

    3. 滑鼠雙擊 IAC (Inter-application communication) 驅動程式:

    4. 勾選: 裝置已接上電腦; 新增自訂名稱的傳輸埠, 即完成.

-----------------------------------------------------------------------------------------------

B. GarageBand:

    1. 打開 GarageBand, 點選電子樂, 按下 "選擇"

    2. 檢查 "偏好設定": (預設即可)

    3. 選擇合適的演奏樂器, 檔案 > 儲存

-----------------------------------------------------------------------------------------------

C. Processing:
     1. 打開 Processing, 新增 Sketch , 並匯入 MidiBus 函式庫:

     2. 撰寫程式碼如下:
import themidibus.*; //Import the library

MidiBus myBus; // The MidiBus

int channel;
int pitch;
int velocity;

int number;
int value;

void setup() {
  size(400, 400);
  background(0);

  // List all available Midi devices on STDOUT.
  // This will show each device's index and name.

  MidiBus.list();
 
  // Create a new MidiBus with no input device and the "IAC_MIDI" as the output device.
  //myBus = new MidiBus(this, -1, 2);
  myBus = new MidiBus(this,
"IAC_MIDI", "IAC_MIDI"); // Input, Output device
 

  channel = 0;
  pitch = 64;
  velocity = 127;
 
  number = 0;
  value = 90; 
}

void draw() {

  pitch = int(random(127));
  velocity = int(random(127));

  myBus.sendNoteOn(channel, pitch, velocity); // Send a Midi noteOn
  delay(200);
  myBus.sendNoteOff(channel, pitch, velocity); // Send a Midi nodeOff
 
  myBus.sendControllerChange(channel, number, value); // Send a controllerChange
  delay(2000);
}

void noteOn(int channel, int pitch, int velocity) {
  // Receive a noteOn
  println();
  println("Note On:");
  println("--------");
  println("Channel:"+channel);
  println("Pitch:"+pitch);
  println("Velocity:"+velocity);
}

void noteOff(int channel, int pitch, int velocity) {
  // Receive a noteOff
  println();
  println("Note Off:");
  println("--------");
  println("Channel:"+channel);
  println("Pitch:"+pitch);
  println("Velocity:"+velocity);
}

void controllerChange(int channel, int number, int value) {
  // Receive a controllerChange
  println();
  println("Controller Change:");
  println("--------");
  println("Channel:"+channel);
  println("Number:"+number);
  println("Value:"+value);
}

void delay(int time) {
  int current = millis();
  while (millis () < current+time) Thread.yield();
}

     2. 執行結果: