since: 2014/12/27
update: 2014/12/27
reference:
1. Taking control of the iPhone camera in iOS 8 with Swift (Part 1)
2. Taking control of the iPhone camera in iOS 8 with Swift (Part 2)
3. Manual Camera Controls in iOS 8 With Swift: Focus
A. 前言:
延續上篇 Manual Camera Controls in iOS 8 With Swift: Focus 的專案.
在這篇文章裡, 將會對 API 有更深一點的探究, 並且利用所建立的第二個軸(Y)
的垂直觸控位置, 來控制影像的 ISO.
-----------------------------------------------------------------------------------------------
B. 記錄觸控時的水平與垂直方向位置遠近百分比:
1. 水平方向: 螢幕總寬百分比; 垂直方向: 螢幕總高百分比
例如:
觸控點在螢幕的最右上方之值為: (x, y) = (1, 1)
觸控點在螢幕的最左下方之值為: (x, y) = (0, 0)
觸控點在螢幕的正中央之值為: (x, y) = (0.5, 0.5)
2. 開啟 ViewController.swift 檔案, 修改如下:
....
class ViewController: UIViewController {
....
//@@add
// take the touched point and divide by the total number of points for either the width or height of the screen.
func touchPercent(touch : UITouch) -> CGPoint {
// Get the dimensions of the screen in points
let screenSize = UIScreen.mainScreen().bounds.size
// Create an empty CGPoint object set to 0, 0
var touchPer = CGPointZero
// Set the x and y values to be the value of the tapped position, divided by the width/height of the screen
touchPer.x = touch.locationInView(self.view).x / screenSize.width
touchPer.y = touch.locationInView(self.view).y / screenSize.height
// Return the populated CGPoint
return touchPer
}
/*
// Gets a value from 0.0 to 1.0 based on how far you are touching on the screen horizontally
//@add
let screenWidth = UIScreen.mainScreen().bounds.size.width
override func touchesBegan(touches: NSSet, withEvent event: UIEvent) {
var anyTouch = touches.anyObject() as UITouch
var touchPercent = anyTouch.locationInView(self.view).x / screenWidth
focusTo(Float(touchPercent))
}
//@add
override func touchesMoved(touches: NSSet, withEvent event: UIEvent) {
var anyTouch = touches.anyObject() as UITouch
var touchPercent = anyTouch.locationInView(self.view).x / screenWidth
focusTo(Float(touchPercent))
}
*/
// we need to adjust the touchesBegan and touchesMoved method to use our new function.
//@@add
override func touchesBegan(touches: NSSet, withEvent event: UIEvent) {
let touchPer = touchPercent( touches.anyObject() as UITouch )
focusTo(Float(touchPer.x))
}
//@@add
override func touchesMoved(touches: NSSet, withEvent event: UIEvent) {
let touchPer = touchPercent( touches.anyObject() as UITouch )
focusTo(Float(touchPer.x))
}
....
}
3. 執行後:
將原本水平方向觸控的手動控制對焦, 調整新函式後, 功能不變.
-----------------------------------------------------------------------------------------------
C. 手動控制 ISO 值大小:
1. 開啟 ViewController.swift 檔案, 修改如下:
....
class ViewController: UIViewController {
....
//@@add
func updateDeviceSettings(focusValue : Float, isoValue : Float) {
if let device = captureDevice {
// normal locking and setting of the focus
if(device.lockForConfiguration(nil)) {
device.setFocusModeLockedWithLensPosition(focusValue, completionHandler: { (time) -> Void in
//
})
// Adjust the iso to clamp between minIso and maxIso based on the active format
let minISO = device.activeFormat.minISO
let maxISO = device.activeFormat.maxISO
let clampedISO = isoValue * (maxISO - minISO) + minISO
device.setExposureModeCustomWithDuration(AVCaptureExposureDurationCurrent, ISO: clampedISO, completionHandler: { (time) -> Void in
//
})
device.unlockForConfiguration()
}
}
}
....
// we need to adjust the touchesBegan and touchesMoved method to use our new function.
//@@add
override func touchesBegan(touches: NSSet, withEvent event: UIEvent) {
let touchPer = touchPercent( touches.anyObject() as UITouch )
//focusTo(Float(touchPer.x))
updateDeviceSettings(Float(touchPer.x), isoValue: Float(touchPer.y))
}
//@@add
override func touchesMoved(touches: NSSet, withEvent event: UIEvent) {
let touchPer = touchPercent( touches.anyObject() as UITouch )
//focusTo(Float(touchPer.x))
updateDeviceSettings(Float(touchPer.x), isoValue: Float(touchPer.y))
}
....
}
2. 執行後:
用手指在 iPhone 螢幕上, 從上往下滑, 就可以手動控制 ISO 了.
2014年12月27日 星期六
2014年12月26日 星期五
Manual Camera Controls in iOS 8 With Swift: Focus
since: 2014/12/26
update: 2014/12/26
reference:
1. Taking control of the iPhone camera in iOS 8 with Swift (Part 1)
A. 前言:
AVFoundation API 可以使用所有新增到 iOS 8 的 camera 細密控制功能,
利用建立好的 capture session 來製作一個 app, 包含手動控制: 對焦, 曝光與 ISO.
首先, 我們只需要建立一個基本的 camera preview. 這篇文章結束後, 我們就會有
一個俏皮的方式來控制對焦. 準備好了嗎? 讓我們開始吧......
-----------------------------------------------------------------------------------------------
B. 新增專案:
1. Xcode > File > New > Project...
iOS > Application > Single View Application
> Next

2. Choose options for your new project:
Product Name: CameraPi
Organization Identifier: com.blogspot
Language: Swift
Device: Universal
> Next > Create

-----------------------------------------------------------------------------------------------
C. 查詢 iPhone 上有哪些影音擷取設備:
1. 開啟 ViewController.swift 檔案, 修改如下:
import UIKit
//@add
import AVFoundation
class ViewController: UIViewController {
//@add: create a AVCaptureSession object
let captureSession = AVCaptureSession()
var previewLayer : AVCaptureVideoPreviewLayer?
// If we find a device we'll store it here for later use
var captureDevice : AVCaptureDevice?
override func viewDidLoad() {
super.viewDidLoad()
// Do any additional setup after loading the view, typically from a nib.
//@add: set our quality settings
captureSession.sessionPreset = AVCaptureSessionPresetHigh
//@add: find a device (to record from).
let devices = AVCaptureDevice.devices()
println(devices)
}
....
}
2. 執行後:
可以看到在 iPhone 5 上, 除了前置鏡頭, 後置鏡頭外, 還有一個麥克風.
我們的目的是要取得後置鏡頭.

-----------------------------------------------------------------------------------------------
D. 呈現相機的預覽模式:
1. 開啟 ViewController.swift 檔案, 修改如下:
....
class ViewController: UIViewController {
....
override func viewDidLoad() {
....
//@add: find a device (to record from).
let devices = AVCaptureDevice.devices()
//@add: Loop through all the capture devices on this phone
for device in devices {
// Make sure this particular device supports video
if (device.hasMediaType(AVMediaTypeVideo)) {
// Finally check the position and confirm we've got the back camera
if(device.position == AVCaptureDevicePosition.Back) {
captureDevice = device as? AVCaptureDevice
if captureDevice != nil {
println("Capture device found")
beginSession()
}
}
}
}
//println(devices)
}
//@add
func beginSession() {
var err : NSError? = nil
captureSession.addInput(AVCaptureDeviceInput(device: captureDevice, error: &err))
if err != nil {
println("error: \(err?.localizedDescription)")
}
previewLayer = AVCaptureVideoPreviewLayer(session: captureSession)
self.view.layer.addSublayer(previewLayer)
previewLayer?.frame = self.view.layer.frame
captureSession.startRunning()
}
....
}
2. 執行後:
可以看到標準的 iOS 相機預覽模式

-----------------------------------------------------------------------------------------------
E.相機設為固定對焦模式:
1. 開啟 ViewController.swift 檔案, 修改如下:
....
class ViewController: UIViewController {
....
//@add
func configureDevice() {
if let device = captureDevice {
// locks the device
device.lockForConfiguration(nil)
// sets the focus to locked
device.focusMode = .Locked
// unlocks the device
device.unlockForConfiguration()
}
}
//@add
func beginSession() {
//@add
configureDevice()
....
}
....
}
2. 執行後:
相機對焦固定, 已經無法自動對焦. 這代表我們可以自行控制對焦的距離.
-----------------------------------------------------------------------------------------------
F.相機設為手動對焦模式
1. 開啟 ViewController.swift 檔案, 修改如下:
....
class ViewController: UIViewController {
....
//@add
func focusTo(value : Float) {
// validate that the device exists
if let device = captureDevice {
// lock the device & If the lock is successful
if(device.lockForConfiguration(nil)) {
// tell the lens to focus on the point ‘value’
device.setFocusModeLockedWithLensPosition(value, completionHandler: { (time) -> Void in
//
})
device.unlockForConfiguration()
}
}
}
// Gets a value from 0.0 to 1.0 based on how far you are touching on the screen horizontally
//@add
let screenWidth = UIScreen.mainScreen().bounds.size.width
override func touchesBegan(touches: NSSet, withEvent event: UIEvent) {
var anyTouch = touches.anyObject() as UITouch
var touchPercent = anyTouch.locationInView(self.view).x / screenWidth
focusTo(Float(touchPercent))
}
//@add
override func touchesMoved(touches: NSSet, withEvent event: UIEvent) {
var anyTouch = touches.anyObject() as UITouch
var touchPercent = anyTouch.locationInView(self.view).x / screenWidth
focusTo(Float(touchPercent))
}
....
}
2. 執行後:
用手指在 iPhone 螢幕上, 從左往右滑, 就可以手動控制對焦了.
update: 2014/12/26
reference:
1. Taking control of the iPhone camera in iOS 8 with Swift (Part 1)
A. 前言:
AVFoundation API 可以使用所有新增到 iOS 8 的 camera 細密控制功能,
利用建立好的 capture session 來製作一個 app, 包含手動控制: 對焦, 曝光與 ISO.
首先, 我們只需要建立一個基本的 camera preview. 這篇文章結束後, 我們就會有
一個俏皮的方式來控制對焦. 準備好了嗎? 讓我們開始吧......
-----------------------------------------------------------------------------------------------
B. 新增專案:
1. Xcode > File > New > Project...
iOS > Application > Single View Application
> Next
Product Name: CameraPi
Organization Identifier: com.blogspot
Language: Swift
Device: Universal
> Next > Create
C. 查詢 iPhone 上有哪些影音擷取設備:
1. 開啟 ViewController.swift 檔案, 修改如下:
import UIKit
//@add
import AVFoundation
class ViewController: UIViewController {
//@add: create a AVCaptureSession object
let captureSession = AVCaptureSession()
var previewLayer : AVCaptureVideoPreviewLayer?
// If we find a device we'll store it here for later use
var captureDevice : AVCaptureDevice?
override func viewDidLoad() {
super.viewDidLoad()
// Do any additional setup after loading the view, typically from a nib.
//@add: set our quality settings
captureSession.sessionPreset = AVCaptureSessionPresetHigh
//@add: find a device (to record from).
let devices = AVCaptureDevice.devices()
println(devices)
}
....
}
2. 執行後:
可以看到在 iPhone 5 上, 除了前置鏡頭, 後置鏡頭外, 還有一個麥克風.
我們的目的是要取得後置鏡頭.
D. 呈現相機的預覽模式:
1. 開啟 ViewController.swift 檔案, 修改如下:
....
class ViewController: UIViewController {
....
override func viewDidLoad() {
....
//@add: find a device (to record from).
let devices = AVCaptureDevice.devices()
//@add: Loop through all the capture devices on this phone
for device in devices {
// Make sure this particular device supports video
if (device.hasMediaType(AVMediaTypeVideo)) {
// Finally check the position and confirm we've got the back camera
if(device.position == AVCaptureDevicePosition.Back) {
captureDevice = device as? AVCaptureDevice
if captureDevice != nil {
println("Capture device found")
beginSession()
}
}
}
}
//println(devices)
}
//@add
func beginSession() {
var err : NSError? = nil
captureSession.addInput(AVCaptureDeviceInput(device: captureDevice, error: &err))
if err != nil {
println("error: \(err?.localizedDescription)")
}
previewLayer = AVCaptureVideoPreviewLayer(session: captureSession)
self.view.layer.addSublayer(previewLayer)
previewLayer?.frame = self.view.layer.frame
captureSession.startRunning()
}
....
}
2. 執行後:
可以看到標準的 iOS 相機預覽模式
E.相機設為固定對焦模式:
1. 開啟 ViewController.swift 檔案, 修改如下:
....
class ViewController: UIViewController {
....
//@add
func configureDevice() {
if let device = captureDevice {
// locks the device
device.lockForConfiguration(nil)
// sets the focus to locked
device.focusMode = .Locked
// unlocks the device
device.unlockForConfiguration()
}
}
//@add
func beginSession() {
//@add
configureDevice()
....
}
....
}
2. 執行後:
相機對焦固定, 已經無法自動對焦. 這代表我們可以自行控制對焦的距離.
-----------------------------------------------------------------------------------------------
F.相機設為手動對焦模式
1. 開啟 ViewController.swift 檔案, 修改如下:
....
class ViewController: UIViewController {
....
//@add
func focusTo(value : Float) {
// validate that the device exists
if let device = captureDevice {
// lock the device & If the lock is successful
if(device.lockForConfiguration(nil)) {
// tell the lens to focus on the point ‘value’
device.setFocusModeLockedWithLensPosition(value, completionHandler: { (time) -> Void in
//
})
device.unlockForConfiguration()
}
}
}
// Gets a value from 0.0 to 1.0 based on how far you are touching on the screen horizontally
//@add
let screenWidth = UIScreen.mainScreen().bounds.size.width
override func touchesBegan(touches: NSSet, withEvent event: UIEvent) {
var anyTouch = touches.anyObject() as UITouch
var touchPercent = anyTouch.locationInView(self.view).x / screenWidth
focusTo(Float(touchPercent))
}
//@add
override func touchesMoved(touches: NSSet, withEvent event: UIEvent) {
var anyTouch = touches.anyObject() as UITouch
var touchPercent = anyTouch.locationInView(self.view).x / screenWidth
focusTo(Float(touchPercent))
}
....
}
2. 執行後:
用手指在 iPhone 螢幕上, 從左往右滑, 就可以手動控制對焦了.
2014年11月15日 星期六
進入 Mac OSX 的隱藏資料夾
since: 2014/11/15
update: 2014/11/15
A. 方式一:
1. Finder > 前往 > 前往檔案夾...
(Go To 的快速鍵: Command + Shift + G)

2. 輸入要前往的隱藏資料夾名稱後, 按下 "前往"

3. 另外, 最近有拜訪過的任何資料夾, 可利用以下方式, 再次進入:
Finder > 前往 > 最近使用過的檔案夾 > ....

-----------------------------------------------------------------------------------------------
B. 方式二:
1. 打開終端機, 輸入以下指令後, 按下 Enter:
defaults write com.apple.finder AppleShowAllFiles TRUE
2. 承上, 再輸入 killall Finder 然後按 Enter, 就可以在 Finder 下看到隱藏的資料夾
3. 由於會顯示所有的隱藏檔, 因此也會在桌面出現, 如果要取消的話, 請輸入:
defaults write com.apple.finder AppleShowAllFiles FALSE ---> Enter
killall Finder ---> Enter

update: 2014/11/15
A. 方式一:
1. Finder > 前往 > 前往檔案夾...
(Go To 的快速鍵: Command + Shift + G)
例如:
a. iTunes 的備份位置:
~/Library/Application Support/MobileSync/
b. 存放 CameraProfiles 檔的位置
~/Library/Application Support/Adobe/CameraRaw/CameraProfiles
a. iTunes 的備份位置:
~/Library/Application Support/MobileSync/
b. 存放 CameraProfiles 檔的位置
~/Library/Application Support/Adobe/CameraRaw/CameraProfiles
3. 另外, 最近有拜訪過的任何資料夾, 可利用以下方式, 再次進入:
Finder > 前往 > 最近使用過的檔案夾 > ....
-----------------------------------------------------------------------------------------------
1. 打開終端機, 輸入以下指令後, 按下 Enter:
defaults write com.apple.finder AppleShowAllFiles TRUE
2. 承上, 再輸入 killall Finder 然後按 Enter, 就可以在 Finder 下看到隱藏的資料夾
3. 由於會顯示所有的隱藏檔, 因此也會在桌面出現, 如果要取消的話, 請輸入:
defaults write com.apple.finder AppleShowAllFiles FALSE ---> Enter
killall Finder ---> Enter
2014年10月18日 星期六
製作 OS X Yosemite USB 安裝開機碟
since: 2014/10/18
update: 2014/10/18
reference:
http://osxdaily.com/2014/10/16/make-os-x-yosemite-boot-install-drive/
A. 準備動作:
1. 16 GB 的 USB 隨身碟.
2. 從 Mac App Store 下載 OS X Yosemite, 下載完成後, 離開安裝步驟, 先不要安裝.
--------------------------------------------------------------------------------------------
B. 製作可開機的 USB 碟:
1. 將 USB 隨身碟連結 Mac, 並開啟 "磁碟工具程式",
從左邊的磁碟清單點選 USB 隨身碟.
2. 點選 "清除" 頁籤, 格式選為: Mac OS 擴充格式(日誌式), 按下 "清除" 並確認.

3. 點選 "分割" 頁籤, 將分割區佈局從旁邊的下拉式選單選取 "1個分割區",
並將分割區資訊裡的名稱, 改成: Untitled .

4. 點選 "選項...", 點選 "GIUD 磁碟分割區表格" > 好 > 套用 > 分割 > 確認

5. 磁碟工具程式 > 結束磁碟工具程式
--------------------------------------------------------------------------------------------
C. 製作 OS X Yosemite 安裝碟:
1. 開啟 "終端機", 鍵入以下的指令:
2. 鍵入 admin 密碼, 等待完成的訊息(約 15~ 20 分鐘), 離開終端機.

3. 完成後, 可以在 Mac Finder 看到剛出爐的 OS X Yosemite 安裝碟.

--------------------------------------------------------------------------------------------
D. 進行安裝:
重新開機, 按下 "option" 鍵, 就可以選擇 "Install OS X Yosemite" 了.
update: 2014/10/18
reference:
http://osxdaily.com/2014/10/16/make-os-x-yosemite-boot-install-drive/
A. 準備動作:
1. 16 GB 的 USB 隨身碟.
2. 從 Mac App Store 下載 OS X Yosemite, 下載完成後, 離開安裝步驟, 先不要安裝.
--------------------------------------------------------------------------------------------
B. 製作可開機的 USB 碟:
1. 將 USB 隨身碟連結 Mac, 並開啟 "磁碟工具程式",
從左邊的磁碟清單點選 USB 隨身碟.
2. 點選 "清除" 頁籤, 格式選為: Mac OS 擴充格式(日誌式), 按下 "清除" 並確認.
並將分割區資訊裡的名稱, 改成: Untitled .
--------------------------------------------------------------------------------------------
C. 製作 OS X Yosemite 安裝碟:
1. 開啟 "終端機", 鍵入以下的指令:
sudo /Applications/Install\ OS\ X\
Yosemite.app/Contents/Resources/createinstallmedia --volume
/Volumes/Untitled --applicationpath /Applications/Install\ OS\ X\
Yosemite.app --nointeraction
2. 鍵入 admin 密碼, 等待完成的訊息(約 15~ 20 分鐘), 離開終端機.
--------------------------------------------------------------------------------------------
重新開機, 按下 "option" 鍵, 就可以選擇 "Install OS X Yosemite" 了.
2014年8月11日 星期一
Photoshop 影像處理小記
since: 2014/08/08
update: 2014/08/11
A. 說明:
1. 利用 Photoshop 來對照片作適當的後製編修.
2. 檢查版本更新: Help > Updates...

3. 檢查支援 Camera Raw 的版本:
Photoshop > About Plug-In > Camera Raw...


4. 設定用滑鼠滾輪來放大縮小圖片:
Photoshop > Preferences > General...


---------------------------------------------------------------------------------------------
B. 查看相片相關資訊:
(先開啟相片)
File > File Info...

Camera Data > OK(關閉)

---------------------------------------------------------------------------------------------
C. 顯示照片色階圖/ 直方圖(Histogram):
(先開啟相片)
右上方 >> (更多選項) > Photography(照片)

> Expanded View

> Channel: Luminosity(亮度)

---------------------------------------------------------------------------------------------
D. 調整高光位(Hi Light) 與陰影(Shadow) 的曲線(Curve):
(先開啟相片)
Image > Adjustments(調整) > Curves...(曲線)

操作說明:
1. 增強對比度: (形成 S 型曲線)
將紅圈往左上方拖曳, 可使亮處更亮;
將藍圈往右下方拖曳, 可將暗處更暗;
2. 調整後, 按下 Alt 鍵不放, 可使 Cancel 鍵變成 Reset 鍵.
3. 按下 "Auto" 可由程式自動調整.
4. 藉由: 勾選 / 取消勾選 Preview, 可觀看修改前後的差異

5. 結果比較:
原始檔:

調整後: (增強對比)

---------------------------------------------------------------------------------------------
E. 調整色相(Hue) 飽和度(Saturation) 與明度(Lightness):
(以飽和度為例, 先開啟相片)
Image > Adjustments(調整) > Hue/Saturation...

操作說明:
1. 將顏色選取藍色, 提高飽和度 > OK

2. 將顏色選取綠色, 降低飽和度 > OK


調整後:(提升藍色飽和度, 降低綠色飽和度)

---------------------------------------------------------------------------------------------
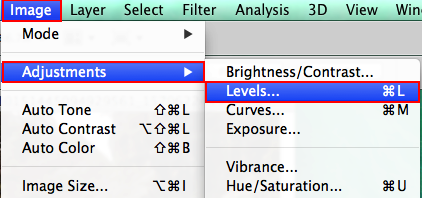
F. 調整色階分佈圖(Levels):
(先開啟相片)
Image > Adjustments > Levels...(色階)
操作說明:
將中間色調三角標示往左拖曳以提高整體亮度

結果:
原始檔:

調整後:(較亮)

---------------------------------------------------------------------------------------------
G. 調整水平:
(先開啟相片)
點選 "Crop Tool" (裁切工具)

> 滑鼠移至右下方角落, 出現半圓弧雙箭頭符號時, 旋轉角度, 按下 Enter.

結果:
原始檔:

調整後:(正常水平)

---------------------------------------------------------------------------------------------
H. 調整亮度(Brightness)與對比(Contrast):
Image > Adjustments > Brightness/Contrast...

> 適當的調整亮度與對比, 並注意色階分布圖.

結果:
原始檔:

調整後:

---------------------------------------------------------------------------------------------
I. 進塵處理:
(先開啟相片)
點選 "Spot Healing Brush Tool" (汙點修復筆刷工具)

> 調整筆刷大小, 並在照片上汙點處做處理.

結果:
原始檔:

處理後:

---------------------------------------------------------------------------------------------
J. 移除小點景:
(先開啟相片)
點選 "Clone Stamp Tool" (圖章複製工具), 並先在要移除的點景旁,
按 ALT 點一下(複製圖樣), 接著在點景上進行貼上(覆蓋)的處理.

結果:
原始檔:

處理後: (移除綠色植物)

---------------------------------------------------------------------------------------------
K. 移除大點景:
(先開啟相片)
點選 "Rectangular Marquee Tool" (矩形選框工具)

> 框選要移除的景點

> Edit > Fill...(填滿)

> 使用: Content-Aware(內容感知)
透明度: 100 %
> OK

結果:
原始檔:

處理後: (貓咪不見了)

update: 2014/08/11
A. 說明:
1. 利用 Photoshop 來對照片作適當的後製編修.
2. 檢查版本更新: Help > Updates...
3. 檢查支援 Camera Raw 的版本:
Photoshop > About Plug-In > Camera Raw...
4. 設定用滑鼠滾輪來放大縮小圖片:
Photoshop > Preferences > General...
勾選: Zoom with Scroll Wheel > OK
---------------------------------------------------------------------------------------------
B. 查看相片相關資訊:
(先開啟相片)
File > File Info...
C. 顯示照片色階圖/ 直方圖(Histogram):
(先開啟相片)
右上方 >> (更多選項) > Photography(照片)
---------------------------------------------------------------------------------------------
D. 調整高光位(Hi Light) 與陰影(Shadow) 的曲線(Curve):
(先開啟相片)
Image > Adjustments(調整) > Curves...(曲線)
1. 增強對比度: (形成 S 型曲線)
將紅圈往左上方拖曳, 可使亮處更亮;
將藍圈往右下方拖曳, 可將暗處更暗;
2. 調整後, 按下 Alt 鍵不放, 可使 Cancel 鍵變成 Reset 鍵.
3. 按下 "Auto" 可由程式自動調整.
4. 藉由: 勾選 / 取消勾選 Preview, 可觀看修改前後的差異
5. 結果比較:
原始檔:
E. 調整色相(Hue) 飽和度(Saturation) 與明度(Lightness):
(以飽和度為例, 先開啟相片)
Image > Adjustments(調整) > Hue/Saturation...
1. 將顏色選取藍色, 提高飽和度 > OK
2. 將顏色選取綠色, 降低飽和度 > OK
3. 結果比較:
原始檔: F. 調整色階分佈圖(Levels):
(先開啟相片)
Image > Adjustments > Levels...(色階)
將中間色調三角標示往左拖曳以提高整體亮度
原始檔:
G. 調整水平:
(先開啟相片)
點選 "Crop Tool" (裁切工具)
原始檔:
調整後:(正常水平)
H. 調整亮度(Brightness)與對比(Contrast):
Image > Adjustments > Brightness/Contrast...
結果:
原始檔:
調整後:
I. 進塵處理:
(先開啟相片)
點選 "Spot Healing Brush Tool" (汙點修復筆刷工具)
> 調整筆刷大小, 並在照片上汙點處做處理.
結果:
原始檔:
處理後:
J. 移除小點景:
(先開啟相片)
點選 "Clone Stamp Tool" (圖章複製工具), 並先在要移除的點景旁,
按 ALT 點一下(複製圖樣), 接著在點景上進行貼上(覆蓋)的處理.
結果:
原始檔:
處理後: (移除綠色植物)
---------------------------------------------------------------------------------------------
K. 移除大點景:
(先開啟相片)
點選 "Rectangular Marquee Tool" (矩形選框工具)
> 框選要移除的景點
> Edit > Fill...(填滿)
透明度: 100 %
> OK
結果:
原始檔:
訂閱:
文章 (Atom)