update: 2015/03/28
reference:
1. Processing.org
2. The Issue | LED Tricks: Gamma Correction | Adafruit Learning System
A. 前言:
最近開始接觸 Processing, 把學習中遇到的一些問題與解決辦法記錄下來,
這篇文章主要是說明在 Processing 中作伽瑪校正(Gamma correction)的方式.
目前的螢幕與影像相關應用程式都會作伽瑪校正, 這邊主要是應用在對特定的
色偏對象(通常是螢幕) 作微調的處理.
-----------------------------------------------------------------------------------------------
B. 說明:
1. 人眼對於光線的感受能力具有非線性的高動態範圍, 在較亮處與較暗處皆可
看到物體的細節.
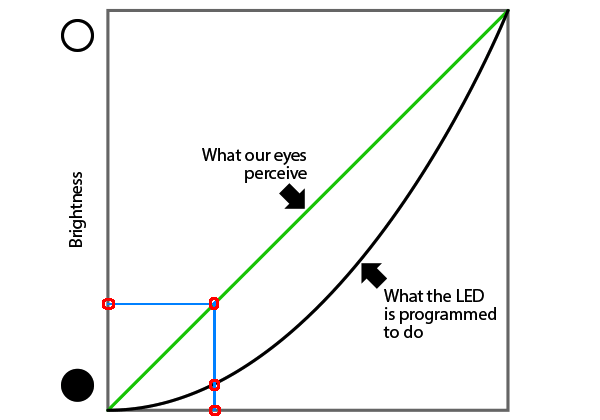
2. 如下圖所示:
水平軸方向為 LED 的發光功率, 黑色的斜線為其線性的亮度值, 但對應到人眼
所感受到的光線卻是紅色的曲線. 垂直軸則是人眼所實際感受到的亮度值.

(圖片來源: https://learn.adafruit.com/led-tricks-gamma-correction/)
(圖片來源: https://learn.adafruit.com/led-tricks-gamma-correction/)
3. 解決方式是在我們的視覺上作非線性的感知補賞: 套用一個反函數, 即是作伽瑪校正.
(圖片來源: https://learn.adafruit.com/led-tricks-gamma-correction/)
現在灰階圖的每個階調之間更平滑了.
(圖片來源: https://learn.adafruit.com/led-tricks-gamma-correction/)
-----------------------------------------------------------------------------------------------
C. 新增 Processing sketch:
1. 下載並安裝 Processing, 在此使用 Pre-Releases 3.0a5 Mac OS X 版.
底下所要製作的伽瑪校正對應表(gammaTableCorrection), 會將線性輸入值
轉換成非線性的經伽瑪校正輸出值.
2. 開啟 Processing 新增一個 sketch 名稱存成 gamma_correction.

// simulate original input data
int colorR = 128;
int colorG = 128;
int colorB = 128;
void setup() {
size(200, 200);
}
void draw() {
fill(colorR, colorG, colorB);
rect(25, 25, 150, 150);
}

D. 新增參數設定檔:
1. 在 sketch 目錄內, 新增一個參數設定檔: config.txt

/* start: gamma-correction */
// Red Correction factor(gammaRed)
2.8
// Green Correction factor(gammaGreen)
2.8
// Blue Correction factor(gammaBlue)
2.8
// Top end of INPUT range(max_in)
255
// Top end of OUTPUT range Red(max_out_red)
255
// Top end of OUTPUT range Green(max_out_green)
255
// Top end of OUTPUT range Blue(max_out_blue)
255
/* end: gamma-correction */
說明:
(1). R / G / B Correction factor == 1.0 ---> no correction (不做校正)
(2). Correction factor 值越高, 中間色調越暗; 值越低, 中間色調越亮.
(3). Correction factor 預設值 2.8, 僅為測試用, 不太科學.
(4). max_in 與 max_out(R / G / B) 用來設定輸入與輸出的最大值.
-----------------------------------------------------------------------------------------------
E. 伽瑪校正處理:
1. 新增以下程式碼到 sketch 裡:
// simulate original input data
int colorR = 128;
int colorG = 128;
int colorB = 128;
// ----------------------------------------------------
//@for gamma-correction
// load config Strings
String[] configLines;
// begin: gamma-correction table (if value == 1.0, no correction)
float gammaRed = 1.0; // Red Correction factor
float gammaGreen = 1.0; // Green Correction factor
float gammaBlue = 1.0; // Blue Correction factor
// default INPUT & OUTPUT range
int max_in = 255; // Top end of INPUT range
int max_out_red = 255; // Top end of OUTPUT range Red
int max_out_green = 255; // Top end of OUTPUT range Green
int max_out_blue = 255; // Top end of OUTPUT range Blue
int[] gammaTableRed = new int[256];
int[] gammaTableGreen = new int[256];
int[] gammaTableBlue = new int[256];
// end: gamma-correction table
// ----------------------------------------------------
void setup() {
size(200, 200);
println("original colorR = " + colorR);
println("original colorG = " + colorG);
println("original colorB = " + colorB);
//@for gamma-correction
// load gamma-correction parameters
loadConfig();
// Red gamma-correction
gammaTableRed = gammaTableCorrection(gammaRed, max_out_red);
// println("gammaTableRed: ");
// for(int i = 0; i < gammaTableRed.length; i++) {
// println(gammaTableRed[i]);
// }
// Green gamma-correction
gammaTableGreen = gammaTableCorrection(gammaGreen, max_out_green);
// println("gammaTableGreen: ");
// for(int i = 0; i < gammaTableGreen.length; i++) {
// println(gammaTableGreen[i]);
// }
// Blue gamma-correction
gammaTableBlue = gammaTableCorrection(gammaBlue, max_out_blue);
// println("gammaTableBlue: ");
// for(int i = 0; i < gammaTableBlue.length; i++) {
// println(gammaTableBlue[i]);
// }
colorR = gammaTableRed[colorR];
colorG = gammaTableGreen[colorG];
colorB = gammaTableBlue[colorB];
println("corrected colorR = " + colorR);
println("corrected colorG = " + colorG);
println("corrected colorB = " + colorB);
}
void draw() {
fill(colorR, colorG, colorB);
rect(25, 25, 150, 150);
}
//@for gamma-correction
// gamma Table Correction
int[] gammaTableCorrection(float _gamma, int _maxOut) {
int[] gammaTableTmp = new int[256];
for(int i = 0; i <= max_in; i++) {
gammaTableTmp[i] = (int)((int)(pow((float)i / (float)max_in, _gamma) * _maxOut + 0.5));
}
return gammaTableTmp;
}
void loadConfig(){
println("load config data ....");
configLines = loadStrings("config.txt");
if(configLines.length > 21) {
println("getting data from config ....");
// Gamma Correction factor
gammaRed = Float.parseFloat(configLines[2]);
println("gammaRed = " + gammaRed);
gammaGreen = Float.parseFloat(configLines[5]);
println("gammaGreen = " + gammaGreen);
gammaBlue = Float.parseFloat(configLines[8]);
println("gammaBlue = " + gammaBlue);
// Top end of INPUT range
max_in = int(configLines[11]);
println("max_in = " + max_in);
// Top end of OUTPUT range Red
max_out_red = int(configLines[14]);
println("max_out_red = " + max_out_red);
// Top end of OUTPUT range Green
max_out_green = int(configLines[17]);
println("max_out_green = " + max_out_green);
// Top end of OUTPUT range Blue
max_out_blue = int(configLines[20]);
println("max_out_blue = " + max_out_blue);
}
else {
println("warnning! load config data error; use default data....");
}
}
-----------------------------------------------------------------------------------------------
F. 實驗結果:
實驗一: 同時將 RGB 的 gamma 值調小(設為 0.5), 灰色變淡.