2013年11月5日 星期二

Developing Leap Motion Applications in C++ On Mac OS X

since: 2013/11/05
update: 2013/11/05

reference:
1. Leap SDK and Xcode Setup for C++ Command Line
2. How to Open a Terminal in any Folder from OS X Finder

A. 新增位於檔案夾位置的終端機標籤頁: (非必要)
     1. Mac > 系統偏好設定 > 鍵盤 > 快速鍵 > 服務
                 > 勾選: 新增位於檔案夾位置的終端機標籤頁
                 > 關閉此視窗.

     2. 開啟方式:
         點選資料夾 > control + 滑鼠左鍵 > 服務 > 新增位於檔案夾位置的終端機標籤頁

-----------------------------------------------------------------------------------

B. 下載 Leap SDK:

     1. 網址: Leap Motion Developer
     2. 目前版本: v.1.0.9.8391 for OS X
     3. 掛載後, 將整個 LeapDeveloperKit 資料夾 copy 到自定的目錄內.
         ex: /Lanli/RD/SDK/LeapDeveloperKit

-----------------------------------------------------------------------------------

C. 新增 Xcode 專案:

     1. Xcode > File > New > Project... >

         Choose a template for your project:

         OS X > Application > Command Line Tool > Next

     2. Choose options for your new project:
         Product Name: LeapOnMac
         Type: C++
          > Next

     3.  > 選取存放專案的資料夾:
          > 勾選: Create git repository on My Mac
          > Create

-----------------------------------------------------------------------------------

D. 專案開發環境設定:
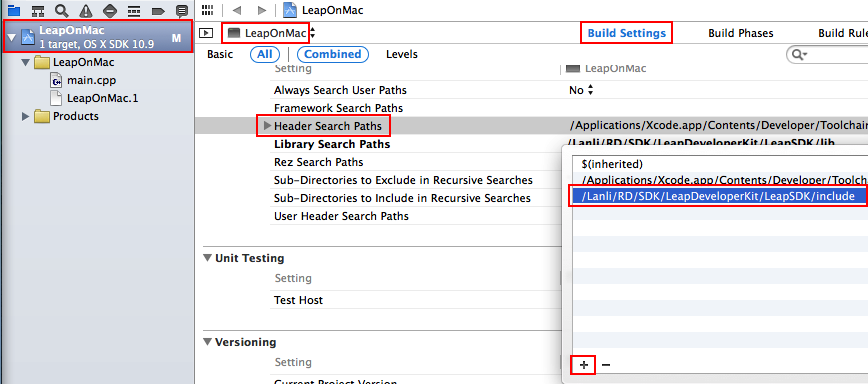
     1. 設定 target 專案的 Library Search Paths
          > 設為 Leap SDKlib 資料夾路徑:
             /Lanli/RD/SDK/LeapDeveloperKit/LeapSDK/lib

     2. 設定 target 專案的 Header Search Paths
         > 設為 Leap SDKinclude 資料夾路徑:
            /Lanli/RD/SDK/LeapDeveloperKit/LeapSDK/include


     3. 修改目前 targetbuild Scheme:
         > 新增環境變數:
            名稱: DYLD_LIBRARY_PATH
                值: /Lanli/RD/SDK/LeapDeveloperKit/LeapSDK/lib
                      (Leap SDKlib 資料夾路徑)

    step 1:

     step 2:

     4. 將 Leap SDK lib 資料夾下 libLeap.dylib 檔案, 連結到 target 專案
         Build Phases 設定.

    step 1:
    target 專案 > Build Phases > Link Binary With Libraries > +

    step 2:
     Choose frameworks and libraries to add:
      > Add Other...

    step 3:
    > 選取 Leap SDK lib 資料夾下 libLeap.dylib 檔案 > Open

    step 4:
     完成 ~

-----------------------------------------------------------------------------------

E. 程式碼測試:

     1. 簡易測試:
         開啟 main.cpp 修改如下:
#include <iostream>
//@add for Leap

#include "Leap.h"

int main(int argc, const char * argv[])
{
    // insert code here...
    //std::cout << "Hello, World!\n";
    //return 0;
   
    //@add for Leap

    Leap::Listener listener;
    Leap::Controller controller;
    controller.addListener(listener);
   
    std::cout << "Hello, Leap Motion!\n\nPress Enter to quit..." << std::endl;
    std::cin.get();
   
    controller.removeListener(listener);
   
    return 0;

}

執行結果:

按 Enter , 離開程式.

     2. 執行官方的 Sample 測試:
         a. 先將 Leap SDK samples 資料夾下 Sample.cpp 檔案 copy 出來(放到桌面

         b. 專案資料夾 > control + 滑鼠左鍵 > Add File to "專案名稱"...

         c. > 選取剛剛的 Sample.cpp 檔案
             > 勾選: Copy items into destination group's folder (if needed)
             > Add

         d. 將 main.cppmain function 改名稱:
             > 因為剛剛加進來的 Sample.cpp 裡, 已經有一個 main function 了 
//
//  main.cpp
//  LeapOnMac
//
//  Created by Lanli on 2013/11/5.
//  Copyright (c) 2013年 Lanli. All rights reserved.
//

#include <iostream>
//@add for Leap
#include "Leap.h"


//int main(int argc, const char * argv[])
int main_backup(int argc, const char * argv[])
......

         e. 接上裝好驅動程式Leap Motion 硬體, 並啟動 Leap Motion 應用程式,
             不需要啟動 AirSpace.

         f. 執行結果:
            在 Leap Motion 上方作一些手勢, 便會偵測到數值的變化; 按 Enter , 離開程式.

2013年11月2日 星期六

Get started developing for Kindle Fire On Mac OS X

since: 2013/11/02
update: 2013/11/02

reference:
1. Amazon Mobile App Distribution Program
2. Kindle Fire Development Essentials - Techotopia
3. I touchs: Seting up an Android Development Environment
4. I touchs: Installing the Android SDK on the Mac OS X
5. I touchs: Setting Up the Android Device for Development on Windows7

A. Setting Up Your Development Environment
    1. Installing the JDK:
        終端機 > $ java -version
                        java version "1.7.0_45"
                        (至少需要 JDK 6)

                     > 下載 JDK: Java SE Downloads

    2. Installing the Android SDK and Eclipse IDE:
        在此使用 Android SDK bundle: Android SDK | Android Developers

         其中已包含了:
         Eclipse + ADT plugin
         Android SDK Tools
         Android Platform-tools
         The latest Android platform
         The latest Android system image for the emulator


         ---------------------------------------------------------------------------

         目前檔名: adt-bundle-mac-x86_64-20131030.zip
         存放位置: /Lanli/RD/sources

         安裝:
         $ cd /Lanli/RD/IDE/
         $ unzip /Lanli/RD/sources/adt-bundle-mac-x86_64-20131030.zip

    3. 打開 eclipse:

        /Lanli/RD/IDE/adt-bundle-mac-x86_64-20131030/Eclipse.app


     > 系統偏好設定 > 安全與隱私 > 一般 :

     > 再打開一次, 並選擇 workspace:

     > ADT > 偏好設定 > General > Workspace:
        Text file encoding >  Other: UTF-8 > OK

    4. Installing SDK Add-Ons:
        a. ADK > 偏好設定 > Android > SDK Location > OK

        b. ADK > Window > Android SDK Manager:
            > Tools > Manage Add-on Sites...

            > User Defined Site > New... >
               輸入: http://kindle-sdk.s3.amazonaws.com/addon.xml > OK > Close

        c. 在 Android SDK Manager 中, 勾選以下的套件:
            備註: 如果你傾向於使用實體的 Kindle Fire 平板來測試 app 而不想使用模擬器, 
                      你仍然必須選取其中之一的套件作為 Kindle Fire system images. 每個
                      Kindle Fire 套件包含用來識別不同的實體 Kindle Fire 平板作為測試與除錯
                      使用的 Android Debug Bridge (ADB).

            Tools:
            Android SDK Tools (install the latest version)
            Android SDK Platform-tools (install the latest version)

           Android 4.2.2 API 17:
           SDK Platform
           ARM EABI v7a System Image (emulator prerequisite for ARM system images)
          Intel x86 Atom System Image (emulator prerequisite for x86 system images)
          Kindle Fire HD 7" (3rd Generation) (ARM and x86 system images for emulator)
          Kindle Fire HDX 7" (3rd Generation) (ARM and x86 system images for emulator)
          Kindle Fire HDX 8.9" (3rd Generation) (ARM and x86 system images for emulator)

          Android 4.0.3 API 15:
          SDK Platform
          ARM EABI v7a System Image (emulator prerequisite for ARM system images)
          Intel x86 Atom System Image (emulator prerequisite for x86 system images)
          Kindle Fire (2nd Generation) (ARM and x86 system images for emulator)
          Kindle Fire HD 7" (ARM and x86 system images for emulator)
          Kindle Fire HD 8.9" (ARM and x86 system images for emulator)

          Android 2.3.3 API 10:
          SDK Platform
          Intel x86 Atom System Image (emulator prerequisite for x86 system images)
          Kindle Fire (ARM system image for emulator)

            Extras:
            Kindle Fire Device Definitions
            Kindle Fire USB Driver (not applicable for OS X)
            Android Support Library
            Intel x86 Emulator Accelerator (HAXM) (emulator prerequisite for x86 system images)
            Amazon AVD Launcher

            > 按下 "Install xx packages..."
            >  Choose Packages to Install:
                分別選取不同分類的 Packages, 並點選: Accept License
            > Install
            > 安裝完成後, 關閉 Android SDK Manager.

----------------------------------------------------------------------

B. Installing and Running the Amazon AVD Launcher
     1. 啟動 Amazon AVD Launcher:
         $ cd /Lanli/RD/IDE/adt-bundle-mac-x86_64-20131030/sdk/extras/amazon/AVDLauncherMacOSX

         $ ./amazonavd

         > 當出現 "SDK path verification" 視窗, 瀏覽到正確的 Android SDK 位置後,
            按下 "OK".

     2. 在 Amazon AVD Manager 視窗中, 選擇要模擬的設備, 接著按下 "Create AVD".

     3. 在 "Main Settings" 頁籤, 設定 AVD 名稱, 並選取 Use Host GPU 以增進效能.

     4. 切換到 "Advanced Options" 頁籤, 調整以下設定:
         Keyboard: My computer keyboard
         Skin: No skin
         > 按下 "OK".

     5. 在 Amazon AVD Launcher 的 "Amazon AVDs" 頁籤中, 點選所要啟動的 AVD,
          按下 "Start..." 即可啟動.
    備註: 之後亦可在: AVD > Window > Android Virtual Device Manager 中啟動 AVD.

----------------------------------------------------------------------

C. Creating Your First Kindle Fire App
     1. 開啓 Eclipse > ADT > File > New > Android Application Project:
         設定以下項目:
         Application Name: HelloKindleFire
         Minimum Required SDK: API 10: Android 2.3.3 (最小支援 Kindle Fire 的 API)
         Target SDK: API 17: Android 4.2 (至少要 API 15, API 17 為目前支援 Kindle Fire 的最大 API )
         Compile SDK: API 17: Android 4.2 (至少要 API 15)
         Theme: None

     2. Next > Next > Create Activity: Blank Activity > Next

     3. 設定以下項目:
         Activity Name: HelloKindleFireActivity
         Navigation Type: None
         > Finish 

     4. Run > Run Configurations...

     5. 點選專案 > Run > Run As > Android Application