顯示具有 Filter4Cam 標籤的文章。 顯示所有文章

2012年9月6日 星期四

Filter4Cam 實作: 30. 濾鏡轉場特效

since: 2012/09/06
update: 2012/09/06

reference:
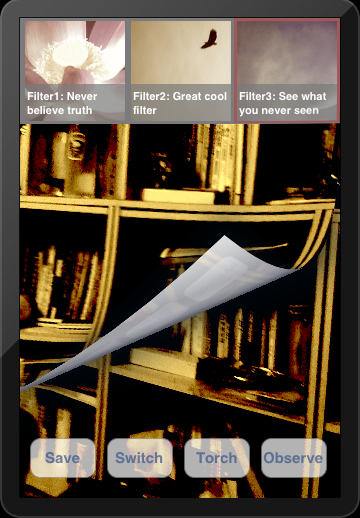
I touchs: Filter4Cam 學習之 Core Image Filter With CATransition

A. 說明
      1. 使用轉場特效的時機:
           a. 原始影像 -> 套用濾鏡.
           b. 套用濾鏡的影像 -> 恢復成原始影像
           c. 套用 A 濾鏡 -> 套用 B 濾鏡

      2. 在這邊有二個時間要處理: 一是 "執行轉場特效" 所花的時間(將設為 1.5 秒),
          另外是, 開始執行轉場特效多久後, 會去作濾鏡的套用.(將設為 0.75 秒)

      3. 在轉場的過程中, 當轉場還未完全結束時(即使看起來好像結束了), 此時去點選
           濾鏡應該是不能發生作用的.
           a. 因此需要在 ViewController 裡宣告一個可用來決定是否可點選濾鏡
               自定 protocol 變數: id<TableSelectionDelegate> tsDelegate;

                並且將此工作委派(delegate)給存放濾鏡 Cell 的 Table (HorizontalTableCell):
                // ViewController => tableView:cellForRowAtIndexPath:
                self.tsDelegate = cell;

           b. 接著, 在存放濾鏡 Cell 的 Table 類別 (HorizontalTableCell) 裡, 宣告依循
                <TableSelectionDelegate> 協定, 並實作 "是否可點選濾鏡" 的功能:

                - (void)allowsTableSelection:(BOOL)allows
                {
                     self.currentTableView.allowsSelection = allows;
                }


           c. 備註:
                原本在 ViewController.h 裡, 直接定義 <TableSelectionDelegate> 協定,
                但是 HorizontalTableCell 類別卻無法參照到, 可能是 Xcode 本身的問題,
                因此將 <TableSelectionDelegate> 協定, 放到一個新增的 header file 來處理.

-------------------------------------------------------------------------------

B. 新增 "可否點選濾鏡表單之代理" 協定
      1. Xcode > File > New > File...
          iOS > Cocoa Touch > Objective-C protocol > Next
          Protocol: TableSelectionDelegate
          > Next

          Targets: Filter4Cam (checked)
          > Create

       2. 開啟 TableSelectionDelegate.h 檔案, 修改如下:
#import <Foundation/Foundation.h>

// "可否點選濾鏡表單之代理" 協定
@protocol TableSelectionDelegate <NSObject>

//@add

- (void)allowsTableSelection:(BOOL)allows;

@end

-------------------------------------------------------------------------------

C. 新增用來標示 "是否要作轉場特效" 的全域變數
      1. 說明: (以下將在之後一一處理)
          a. 在 HorizontalTableCell.m 的 tableView:didSelectRowAtIndexPath: 方法裡,
               無論是 "選取濾鏡" 或 "取消濾鏡",  都會標示要作 "轉場特效":
               self.dataObj.startTransition = YES;

          b. 接著, 在 ViewController.m 的
               captureOutput:didOutputSampleBuffer:fromConnection: 方法裡, 
               會檢查是否要作轉場特效: [self checkTransition];

          c. 承上, 如果是的話, 就會開始執行轉場特效: [self startAnimation];
              當轉場特效結束時, 會自動呼叫: animationDidStop:finished: 方法,
              並且將 "是否要作轉場特效" 標示為否: self.dataObj.startTransition = NO;

      2. 開啟 GlobalDataClass.h 檔案, 修改如下:
....
@interface GlobalDataClass : NSObject
{   
    //@add: array for storage filterCells
    NSMutableArray *filterCellArray;
    BOOL isUsingFilter;        // 有使用濾鏡?
    BOOL startTransition;    // 標示: 是否啟用轉場特效?
....
}

//@add
@property (nonatomic, strong) NSMutableArray *filterCellArray;
@property (assign) BOOL isUsingFilter;
@property (assign) BOOL startTransition;
....


      3. 開啟 GlobalDataClass.m 檔案, 修改如下:
....
//@add
@synthesize filterCellArray = _filterCellArray;
@synthesize isUsingFilter = _isUsingFilter;

@synthesize startTransition = _startTransition;
....

-------------------------------------------------------------------------------

D.  轉場特效

       1. 開啟 ViewController.h 檔案, 修改如下:
           (檢查: 必須要 #import <QuartzCore/QuartzCore.h>)
....
//@add
#import "Filter4CamHelper.h"
#import "ConstantDefined.h"
#import "HorizontalTableCell.h"
#import "GlobalDataClass.h"

#import "TableSelectionDelegate.h"
....
@interface ViewController : GLKViewController <AVCaptureVideoDataOutputSampleBufferDelegate, UITableViewDelegate, UITableViewDataSource>
{
....   

    //@add for CATransition
    BOOL transitioning; // 是否正在作轉場特效?
   
    //@add for delegate used
    id<TableSelectionDelegate> tsDelegate;

}
....

@property (assign) BOOL isUsingFrontCamera;
@property (assign) BOOL isLastFrontCamera;

@property (assign) BOOL transitioning;

@property (assign) CGRect destRect;
@property (assign) /* weak ref */ id<TableSelectionDelegate> tsDelegate;
....
//@add: functional buttons 
- (void)savePhoto; // "拍照"
- (void)switchCameras; // "鏡頭切換"
- (void)switchLight; // "閃光燈切換"
- (void)switchObserver; // "觀察者模式"


- (void)checkTransition; // 檢查是否要作轉場特效
- (void)startAnimation;  // 開始執行轉場特效


@end

       2. 開啟 ViewController.m 檔案, 修改如下:
....
// step 01:
@synthesize isUsingFrontCamera = _isUsingFrontCamera;
@synthesize isLastFrontCamera = _isLastFrontCamera;

@synthesize transitioning = _transitioning;
....
//@add
@synthesize destRect = _destRect;

@synthesize tsDelegate = _tsDelegate;
....
// step 02:
- (UITableViewCell *)tableView:(UITableView *)tableView cellForRowAtIndexPath:(NSIndexPath *)indexPath
{
    //@update: use reusableCells
    HorizontalTableCell *cell = [self.reusableCells objectAtIndex:indexPath.section];

   
    // 說明: 一般是在 AppDelegate 中, 設定 delegate 的關係, 在此處剛好可利用
    self.tsDelegate = cell;
   
    return cell;
}
....


// step 03:
- (void)captureOutput:(AVCaptureOutput *)captureOutput didOutputSampleBuffer:(CMSampleBufferRef)sampleBuffer fromConnection:(AVCaptureConnection *)connection {
....
    //@add: 檢查是否要作轉場特效
    [self checkTransition];

    
    if(self.dataObj.isUsingFilter == YES)
    {
        if (self.currentFilter = [self.dataObj.filterDictionary objectForKey:self.dataObj.filterID])
        {
            self.ciImage = [self.currentFilter filterImage:self.ciImage];
        }
    }
....
}
....


// step 04:
- (void)viewDidLoad
{
    [super viewDidLoad];

    self.dataObj.isUsingFilter = NO;

    self.dataObj.startTransition = NO; // 預設: 不進行轉場特效

    self.isUsingFrontCamera = NO; // 預設為後置鏡頭
    self.isLastFrontCamera = NO;  // 預設上次為後置鏡頭

    self.transitioning = NO;      // 目前沒有正在作轉場特效
   
    lastOrientation = Unknown; // 設備上次的擺放方向: 未知
....
}


....
// step 05:
- (void)viewDidUnload
{   
....
    self.observerButton = nil;
    self.dataObj = nil;
    self.currentFilter = nil;

    self.tsDelegate = nil;
}
....


// step 06:

// 檢查是否要作轉場特效
- (void)checkTransition
{
    // 要開始進行轉場特效
    if (self.dataObj.startTransition)
    {
        [self startAnimation];
    }
}

....

// step 07:
// 開始執行轉場特效
- (void)startAnimation
{
   
// 先讓濾鏡表單無法選取
    [self.tsDelegate allowsTableSelection:NO];
   
    // 如果, 目前不是正在進行 "轉場特效" 的話, 就開始進行
    if(!self.transitioning)
    {
        CATransition *transition = [CATransition animation];
        transition.duration = 1.50; // 轉場的時間 (秒)
       
        transition.timingFunction = [CAMediaTimingFunction functionWithName:kCAMediaTimingFunctionEaseInEaseOut];
       
        transition.type = @"pageCurl"; // 翻頁(由下往上)
       
        self.transitioning = YES;
        transition.delegate = self;
       
        //[self.view.layer addAnimation:transition forKey:nil]; // 亦可
        [self.glView.layer addAnimation:transition forKey:nil];
    }
}

....

// step 08:
//@add for CATransition(轉場特效結束時, 會自動呼叫)
-(void)animationDidStop:(CAAnimation *)anim finished:(BOOL)flag
{
    // "轉場特效" 進行完畢
    self.transitioning = NO;
   
    // 停止進行轉場特效(標示為否)
    self.dataObj.startTransition = NO;

    // 恢復濾鏡表單可選取狀態
    [self.tsDelegate allowsTableSelection:YES];
}

....

-------------------------------------------------------------------------------

E. 延緩濾鏡套用

      1. 開啟 HorizontalTableCell.h 檔案, 修改如下:
....
#import "GlobalDataClass.h"

#import "TableSelectionDelegate.h"

//@interface HorizontalTableCell : UITableViewCell <UITableViewDelegate, UITableViewDataSource>
//@update
@interface HorizontalTableCell : UITableViewCell <UITableViewDelegate, UITableViewDataSource, TableSelectionDelegate>
{
....
    NSIndexPath *lastIndexPath;
    NSIndexPath *currentIndexPath; // 目前所點選的 table 之 IndexPath
    UITableView *currentTableView; // 目前所點選的 Table
   
    GlobalDataClass *dataObj;
}

....
@property (nonatomic, strong) NSIndexPath *lastIndexPath;

@property (nonatomic, strong) NSIndexPath *currentIndexPath;
@property (nonatomic, strong) UITableView *currentTableView;

@property (nonatomic, strong) GlobalDataClass *dataObj;

//@add: 設定 "選取 / 取消選取 濾鏡 Cell" 的行程
- (void)setSelectProgress;

//@add: 進行 "選取 / 取消選取 濾鏡 Cell" 的行程
- (void)goSelectProgress:(NSTimer *)theTimer;

@end


      2. 開啟 HorizontalTableCell.m 檔案, 修改如下:
....
// step 01:
@synthesize lastIndexPath = _lastIndexPath;
@synthesize currentIndexPath = _currentIndexPath;
@synthesize currentTableView = _currentTableView;

@synthesize dataObj = _dataObj;
....


// step 02:
#pragma mark Getter
....

- (NSIndexPath *)currentIndexPath
{
    if (_currentIndexPath == nil) {
        _currentIndexPath = [NSIndexPath indexPathForRow:-1 inSection:0];
    }
   
    return _currentIndexPath;
}

- (UITableView *)currentTableView
{
    if (_currentTableView == nil) {
        _currentTableView = [[UITableView alloc] init];
    }
   
    return _currentTableView;
}

....

// step 03:

- (void)dealloc
{
    self.filterTableView = nil;
    self.filters = nil;
    self.lastIndexPath = nil;
    self.dataObj = nil;

    self.currentIndexPath = nil;
    self.currentTableView = nil;

}
....


// step 04:
- (void)tableView:(UITableView *)tableView didSelectRowAtIndexPath:(NSIndexPath *)indexPath
{
    // 說明:
    // 1. GlobalDataClass 的變數 startTransition, 最初在 ViewController 的
    //    viewDidLoad 裡, 設值為 NO (即預設: 不進行轉場特效)
    //
    // 2. 當第一次點選濾鏡時, 會進入到本方法裡,
    //    a. 先設定: self.dataObj.startTransition = YES; 標示要作 "轉場特效".
    //        在 ViewController 的
    //        captureOutput:didOutputSampleBuffer:fromConnection: 裡,
    //        先檢查是否要作轉場特效(checkTransition), 接著開始執行轉場特效
    //        (startAnimation), 轉場特效結束時, 會自動呼叫 CATransition 的
    //        animationDidStop:finished: 方法
    //
    //    b. 接著設定: "選取 / 取消選取 濾鏡 Cell" 的行程 (setSelectProgress),
    //        來延遲套用濾鏡的時間.
    //
    // 3. 時間的設定: 轉場特效 1.50 秒 (ViewController -> startAnimation)
    //     套用濾鏡的延遲時間: 0.75 秒 ([self setSelectProgress])
   
    // 如果在進行的 "轉場特效" 尚未結束, 又點選了濾鏡
    // (實際上, 此時是無法點選的, 只能對上層的 Table 作捲動)

    if (self.dataObj.startTransition)
    {

        // 說明:
        // 當 startTransition = YES, 在 ViewController 的 startAnimation 中,
        // 呼叫了: [self.tsDelegate allowsTableSelection:NO];
        //
        // 即在此設定了 self.currentTableView.allowsSelection = NO;
        // 就算去點選濾鏡 Cell, 也不會呼叫 tableView:didSelectRowAtIndexPath: 方法,
        // 所以此區塊永遠不會執行到.

        NSLog(@"You will never see this message ~");
       
        return;
    }

   
    self.currentIndexPath = indexPath;
    self.currentTableView = tableView;


    // 標示要作 "轉場特效"
    self.dataObj.startTransition = YES;
   
    // 設定 "選取 / 取消選取 濾鏡 Cell" 的行程
    [self setSelectProgress];
}

....

// step 05:
//@add: 設定 "選取 / 取消選取 濾鏡 Cell" 的行程
- (void)setSelectProgress
{
    [NSTimer scheduledTimerWithTimeInterval:0.75f
                                     target:self
                                   selector:@selector(goSelectProgress:)
                                   userInfo:nil
                                    repeats:YES];
}
....
.
// step 06:
//@add: 進行 "選取 / 取消選取 濾鏡 Cell" 的行程
- (void)goSelectProgress:(NSTimer *)theTimer {
   

    // 設定 timer 過期 (所以, 只會執行此一次)
    // 或可將 setSelectProgress 裡的 repeats: 設成 NO

    [theTimer invalidate];
   
    int newRow = [self.currentIndexPath row];
    int oldRow = [self.lastIndexPath row];

    //NSLog(@"oldRow = %d", oldRow);
    //NSLog(@"newRow = %d", newRow);

   
    // 選取濾鏡
    if (newRow != oldRow)
    {
        self.lastIndexPath = self.currentIndexPath;

       
        // 套用濾鏡功能
        /* (此方式亦可)
         FilterCell *cell = (FilterCell *)[tableView cellForRowAtIndexPath:indexPath];
         NSLog(@"FilterID = %@, Title = %@", cell.filterID, cell.titleLabel.text);
         */

       
        NSDictionary *currentFilter = [self.filters objectAtIndex:self.currentIndexPath.row];
        /*
         NSString *FilterID = [currentFilter objectForKey:@"FilterID"];
         NSString *Title = [currentFilter objectForKey:@"Title"];
         NSString *ImageName = [currentFilter objectForKey:@"ImageName"];
         NSLog(@"FilterID = %@, Title = %@, ImageName = %@", FilterID, Title, ImageName);
         */

       
        self.dataObj.isUsingFilter = YES;
        self.dataObj.filterID = [NSMutableString stringWithString:[currentFilter objectForKey:@"FilterID"]];
    }

    // 取消選取濾鏡
    else
    {

        //self.lastIndexPath = nil; // -> not work at section:0 row:0
        self.lastIndexPath = [NSIndexPath indexPathForRow:-1 inSection:0];
        [self.currentTableView deselectRowAtIndexPath:self.currentIndexPath animated:NO];

       
        // 恢復原始影像
        self.dataObj.isUsingFilter = NO;
        self.dataObj.filterID = [NSMutableString stringWithString:@"NoID"];
    }
   
    NSLog(@"filterID = %@", self.dataObj.filterID);
}

....

// step 07:
//@add for <TableSelectionDelegate> protocol method
- (void)allowsTableSelection:(BOOL)allows
{

    // 說明: 當 allows = NO 時, 即使去點選濾鏡 Cell, 也不會執行:
    // tableView:didSelectRowAtIndexPath: 方法

    self.currentTableView.allowsSelection = allows;
}

....

-------------------------------------------------------------------------------

F. 編譯並執行:


2012年9月3日 星期一

Filter4Cam 實作: 29. 影像視窗大小調整

since: 2012/09/03
update: 2012/09/03


A. 說明:
     在 實作 28  中, 於 captureOutput:didOutputSampleBuffer: fromConnection:
     方法裡, 我們利用了 CGRectMake 來建立要畫到 render buffer 的目標矩形大小.
     寬度固定為: self.view.frame.size.width
     高度固定為: self.view.frame.size.height  
     當時並沒有考慮到設備方向改變時的情況, 因此當設備水平擺放時, 就會發生
     寬度被切掉的情況, 因此要做一些調整.
    說明: 影像被切掉的地方顯示為黑色.

------------------------------------------------------------------------

B. 開啟 ViewController.h 檔案, 修改如下:
....
@interface ViewController : GLKViewController <AVCaptureVideoDataOutputSampleBufferDelegate, UITableViewDelegate, UITableViewDataSource>
{
....
    // 目前使用的濾鏡物件
    FilterBase *currentFilter;
   
    //@add: 影像視窗的大小
    CGRect destRect;

}
....


@property (nonatomic, strong) FilterBase *currentFilter;

//@add
@property (assign) CGRect destRect;

....

------------------------------------------------------------------------

C. 開啟 ViewController.m 檔案, 修改如下:
....
// step 01:
@synthesize dataObj = _dataObj;
@synthesize currentFilter = _currentFilter;


//@add
@synthesize destRect = _destRect;


....
// step 02:
- (void)captureOutput:(AVCaptureOutput *)captureOutput didOutputSampleBuffer:(CMSampleBufferRef)sampleBuffer fromConnection:(AVCaptureConnection *)connection {
....
    //@update: comment it
    /*
    //@add
    CGRect destRect = CGRectMake(self.view.frame.origin.x,
                                 self.view.frame.origin.y,
                                 self.view.frame.size.width,
                                 self.view.frame.size.height);
   
    */
   
    //@add: 根據設備擺放方向來設定 "影像視窗大小" 的長寬
    UIDeviceOrientation orientation = [[UIDevice currentDevice] orientation];
   
    // 設備垂直擺放
    if (orientation == UIDeviceOrientationPortrait ||
        orientation == UIDeviceOrientationPortraitUpsideDown)
    {
        self.destRect = CGRectMake(self.view.frame.origin.x,
                                   self.view.frame.origin.y,
                                   self.view.frame.size.width,
                                   self.view.frame.size.height);
    }
    // 設備水平擺放
    else if (orientation == UIDeviceOrientationLandscapeRight ||
             orientation == UIDeviceOrientationLandscapeLeft)
    {
        self.destRect = CGRectMake(self.view.frame.origin.x,
                                   self.view.frame.origin.y,
                                   self.view.frame.size.height,
                                   self.view.frame.size.width);
    }

    // 設備: 面朝上, 面朝下, 未知
    else
    {
        // Do Nothing
    }


    // 然後使用 CIContext 物件將其內容畫到 render buffer
    //[self.coreImageContext drawImage:self.ciImage inRect:destRect fromRect:[self.ciImage extent]];
    //@update
    [self.coreImageContext drawImage:self.ciImage inRect:self.destRect fromRect:[self.ciImage extent]];


    // 最後, 在螢幕上呈現出來.
    [self.glContext presentRenderbuffer:GL_RENDERBUFFER];
}

....

// step 03:
- (void)viewDidLoad
{
....
    //@add
    self.destRect = CGRectMake(self.view.frame.origin.x,
                                                         self.view.frame.origin.y,
                                                         self.view.frame.size.width,
                                                         self.view.frame.size.height);

   
    //@add: establish Render
    [self establishRender];

    //@add: establishCamera
    [self establishCamera:kCameraBack];
   
    //@add test for cameraOverlay
    //[self cameraOverlayTest];
   
    //@add for setting camera Overlay
    [self cameraOverlay];
   
    //@add: startRunning
    [self startRunningSession];
   
    //@add for initialize reusableCells
    [self initReusableCells];
}

....

------------------------------------------------------------------------

D. 編譯並執行:

      拍照畫面(水平擺放)

      拍照結果(水平擺放: 720 x 960)

Filter4Cam 實作: 28. 影像解析度調整

since: 2012/09/03
update: 2012/09/03


A. 說明:
     調整內容如下:
     1. 移除濾鏡的顯示範圍限制, 讓濾鏡效果呈現在整個螢幕上.
     2. 相機前置鏡頭的解析度為: 640x480; 後置鏡頭的解析度為: 720 x 960.

--------------------------------------------------------------------------

B. 開啟 ViewController.h 檔案, 修改如下:
....
@interface ViewController : GLKViewController <AVCaptureVideoDataOutputSampleBufferDelegate, UITableViewDelegate, UITableViewDataSource>
{
....
    //@add for Camera Overlay UI
    //@update: comment it
    //UIImageView *filterLensImageView;
    UITableView *filterListTableView;
    UIView *buttonView;       // 用來放所有按鈕的 View
    UIButton *saveButton;     // "拍照" 按鈕
    UIButton *switchButton;   // "鏡頭切換" 按鈕
    UIButton *torchButton;    // "閃光燈切換" 按鈕
    UIButton *observerButton; // "觀察者模式" 按鈕
....
}

....
//@add for Camera Overlay UI
//@update: comment it
//@property (nonatomic, strong) UIImageView *filterLensImageView;
@property (nonatomic, strong) UITableView *filterListTableView;
@property (nonatomic, strong) UIView *buttonView;
@property (nonatomic, strong) UIButton *saveButton;
@property (nonatomic, strong) UIButton *switchButton;
@property (nonatomic, strong) UIButton *torchButton;
@property (nonatomic, strong) UIButton *observerButton;

....
//@add for orientation Transform
- (CIImage *)orientationTransform:(CIImage *)sourceImage;

//@update: comment it
//- (void)drawFilteredImage:(CIImage *)filteredImage;
....

--------------------------------------------------------------------------

C. 移除 "界定濾鏡顯示範圍的圖" (filterLensImageView):
      開啟 ViewController.m 檔案, 修改如下:
 ....
// step 01:
//@add for Camera Overlay UI
//@update: comment it
//@synthesize filterLensImageView = _filterLensImageView;
@synthesize filterListTableView = _filterListTableView;
....


// step 02:
//@update: comment it
/*
//@add for Camera Overlay UI
- (UIImageView *)filterLensImageView
{  
    if (_filterLensImageView == nil) {
        _filterLensImageView = [[UIImageView alloc] initWithImage:[UIImage imageNamed:@"filterLens.png"]];
    }
   
    return _filterLensImageView;
}
*/

....

// step 03:
- (void)cameraOverlay
{  
    //@update: comment it
    //[self.filterLensImageView setFrame:CGRectMake(20, 80, 280, 280)];

    //@update: comment it
    //[self.view addSubview:self.filterLensImageView];
....
}
....


// step 04:
- (void)viewDidUnload
{   
....

    //@update: comment it
    //self.filterLensImageView = nil;
....
}

....

// step 05:
- (BOOL)shouldAutorotateToInterfaceOrientation:(UIInterfaceOrientation)interfaceOrientation
{
....
        //@update: Tune UI

        //@update: comment it (共有 5 個地方)
        //[self.filterLensImageView setFrame:CGRectMake(20, 120, 280, 280)];
....
}
....


--------------------------------------------------------------------------

D. 相機解析度調整:
      開啟 ViewController.m 檔案, 修改如下:
....
// step 01:
- (void)establishCamera:(uint)whichCamera
{
....   
    // begin
    [self.session beginConfiguration];
    //[self.session setSessionPreset:AVCaptureSessionPreset640x480];
    //[self.session setSessionPreset:AVCaptureSessionPreset1280x720];
    //[self.session setSessionPreset:AVCaptureSessionPresetHigh];

    //@update: 預設後置鏡頭的解析度: 720 x 960
    [self.session setSessionPreset:AVCaptureSessionPresetPhoto];
// 720 x 960
    //[self.session setSessionPreset:AVCaptureSessionPresetiFrame1280x720];
    //[self.session setSessionPreset:AVCaptureSessionPresetiFrame960x540];   
....

....


// step 02:
//@update: comment it
/*
// 畫出 "濾鏡範圍" 內的影像(含方向轉變的調整)
- (void)drawFilteredImage:(CIImage *)filteredImage
{
....
}

*/
....

// step 03:
- (void)captureOutput:(AVCaptureOutput *)captureOutput didOutputSampleBuffer:(CMSampleBufferRef)sampleBuffer fromConnection:(AVCaptureConnection *)connection {
....   
    // 然後使用 CIContext 物件將其內容畫到 render buffer
    //@update: comment it
    //[self.coreImageContext drawImage:self.ciImage atPoint:CGPointZero fromRect:[self.ciImage extent]];
   
    //@update
    if(self.dataObj.isUsingFilter == YES)
    {       
        // check if key "filterID" exists:
        // objectForKey will return nil if a key doesn't exists.
        if (self.currentFilter = [self.dataObj.filterDictionary objectForKey:self.dataObj.filterID])
        {
            self.ciImage = [self.currentFilter filterImage:self.ciImage];
            //@update: comment it
            //[self drawFilteredImage:self.ciImage];
        }
    }
   
    //@add
    CGRect destRect = CGRectMake(self.view.frame.origin.x,
                                                                 self.view.frame.origin.y,
                                                                 self.view.frame.size.width,
                                                                 self.view.frame.size.height);

   
    // 然後使用 CIContext 物件將其內容畫到 render buffer
    [self.coreImageContext drawImage:self.ciImage inRect:destRect fromRect:[self.ciImage extent]];
   
    // 最後, 在螢幕上呈現出來.
    [self.glContext presentRenderbuffer:GL_RENDERBUFFER];
}
....


--------------------------------------------------------------------------

E. 調整 "切換鏡頭" 的解析度:
     開啟 ViewController.m 檔案, 修改如下:
....
- (void)switchCameras
{
....  
    // Change the input
    AVCaptureDeviceInput *captureInput = [AVCaptureDeviceInput deviceInputWithDevice:newDevice error:nil];
    [self.session addInput:captureInput];
   
    //@add
    // 使用前置鏡頭: 640x480
    if (self.isUsingFrontCamera)
    {
        [self.session setSessionPreset:AVCaptureSessionPreset640x480];
    }
    else
    {
        // 使用後置鏡頭: 720 x 960
        [self.session setSessionPreset:AVCaptureSessionPresetPhoto];
    }

   
    [self.session commitConfiguration];
}
....


--------------------------------------------------------------------------

F. 拍照 "影像範圍" 調整:

     開啟 ViewController.m 檔案, 修改如下:
....
//@update: "拍照": 截取相機鏡頭全部範圍的影像
- (void)savePhoto
{   
....
            //cgImage = [self.coreImageContext createCGImage:self.ciImage fromRect:CGRectMake(23, -557.5, 274, 274)];
            //@update (總共有 6 個地方)
            cgImage = [self.coreImageContext createCGImage:self.ciImage fromRect:[self.ciImage extent]];

....
}
....


--------------------------------------------------------------------------

G. 編譯並執行:
      拍照畫面

      拍照結果(720 x 960)

2012年8月8日 星期三

Filter4Cam 實作: 27. 選擇濾鏡之二

since: 2012/08/08
update: 2013/04/18


套用個別濾鏡

A. 建立濾鏡類別

     1. 基底濾鏡(用來讓其它濾鏡類別繼承使用)
         a. Xcode > File > New > File...
             iOS > Cocoa Touch > Objective-C class > Next
            Class: FilterBase
            Subclass of: NSObject
            > Next
            Targets: Filter4Cam
            > Create

         b. 開啟 FilterBase.h 檔案, 修改如下:
#import <Foundation/Foundation.h>

@interface FilterBase : NSObject
{
   
}

//@add for apply Filter
- (CIImage *)filterImage:(CIImage *)sourceImage;

//@add for debug use
- (void)showAllFilters; // 顯示內建可用的所有濾鏡名稱
- (void)showCategoryFilters:(NSString *)categoryName; // 顯示特定分類的濾鏡名稱
- (void)showFilterAttributes:(NSString *)filterName; // 顯示特定濾鏡的屬性

@end

         c. 開啟 FilterBase.m 檔案, 修改如下:
#import "FilterBase.h"

@implementation FilterBase

//@add for apply Filter
- (CIImage *)filterImage:(CIImage *)sourceImage
{
    return sourceImage; // just return the source
}

// 顯示內建可用的所有濾鏡名稱
- (void)showAllFilters
{
    NSArray *properties = [CIFilter filterNamesInCategory:kCICategoryBuiltIn];
    NSLog(@"\n AllFilters = \n %@", properties);
}

// 顯示特定分類的濾鏡名稱
- (void)showCategoryFilters:(NSString *)categoryName
{
    NSArray *properties = [CIFilter filterNamesInCategory:categoryName];
    NSLog(@"\n %@ Category: \n %@", categoryName, properties);
}

// 顯示特定濾鏡的屬性
- (void)showFilterAttributes:(NSString *)filterName
{
    CIFilter *filter = [CIFilter filterWithName:filterName];
    NSLog(@"\n %@ Filter: \n %@", filterName, [filter attributes]);
}

@end

*************************************************

     2. 墨魚濾鏡(復古風格)
          a. Xcode > File > New > File...
              iOS > Cocoa Touch > Objective-C class > Next

             Class: SepiaFilter
             Subclass of: NSObject
             > Next

            Targets: Filter4Cam

             > Create

          b. 開啟 SepiaFilter.h 檔案, 修改如下:
#import <Foundation/Foundation.h>

//@add
#import "FilterBase.h"

//@interface SepiaFilter : NSObject
//@update: 墨魚濾鏡
@interface SepiaFilter : FilterBase
{
   
}

@end

          c. 開啟 SepiaFilter.m 檔案, 修改如下:
#import "SepiaFilter.h"

@implementation SepiaFilter

//@add for apply Filter
- (CIImage *)filterImage:(CIImage *)sourceImage
{
    CIFilter *coreImageFilter = [CIFilter filterWithName:@"CISepiaTone"];

    [coreImageFilter setValue:sourceImage forKey:kCIInputImageKey];

    [coreImageFilter setValue:[NSNumber numberWithFloat:0.8] forKey:@"inputIntensity"];
   
    return [coreImageFilter outputImage];
}

//@add
- (id)init
{
    if (self = [super init]) {
        //[self showAllFilters];
       
        //[self showCategoryFilters:kCICategoryColorEffect];
        //[self showCategoryFilters:kCICategoryColorAdjustment];
        //[self showCategoryFilters:kCICategoryGenerator];
        //[self showCategoryFilters:kCICategoryStylize];
       
        //[self showFilterAttributes:@"CISepiaTone"];
       
        /*
        CISepiaTone Filter:
        {
            CIAttributeFilterCategories =     (
                                               CICategoryColorEffect,
                                               CICategoryVideo,
                                               CICategoryInterlaced,
                                               CICategoryNonSquarePixels,
                                               CICategoryStillImage,
                                               CICategoryBuiltIn
                                               );
            CIAttributeFilterDisplayName = "Sepia Tone";
            CIAttributeFilterName = CISepiaTone;
            inputImage =     {
                CIAttributeClass = CIImage;
                CIAttributeType = CIAttributeTypeImage;
            };
            inputIntensity =     {
                CIAttributeClass = NSNumber;
                CIAttributeDefault = 1;
                CIAttributeIdentity = 0;
                CIAttributeMax = 1;
                CIAttributeMin = 0;
                CIAttributeSliderMax = 1;
                CIAttributeSliderMin = 0;
                CIAttributeType = CIAttributeTypeScalar;
            };
        }
        */
    }
   
    return self;
}

@end

*************************************************

     3. 假色濾鏡(將圖片的內容對應到二種顏色)
          a. Xcode > File > New > File...
              iOS > Cocoa Touch > Objective-C class > Next

             Class: FalseFilter
             Subclass of: NSObject
             > Next

            Targets: Filter4Cam

             > Create

          b. 開啟 FalseFilter.h 檔案, 修改如下:
#import <Foundation/Foundation.h>


//@add
#import "FilterBase.h"

//@interface FalseFilter : NSObject
//@update: 假色濾鏡
@interface FalseFilter : FilterBase
{
  
}

@end

          c. 開啟 FalseFilter.m 檔案, 修改如下:
#import "FalseFilter.h"

@implementation FalseFilter

//@add for apply Filter
- (CIImage *)filterImage:(CIImage *)sourceImage
{
    // 假色濾鏡(False Color filter), 將圖片的內容對應到二種顏色.   
    CIFilter *coreImageFilter = [CIFilter filterWithName:@"CIFalseColor"];
    [coreImageFilter setValue:sourceImage forKey:kCIInputImageKey];

    [coreImageFilter setValue:[CIColor colorWithRed:0.145 green:0.016 blue:0.308] forKey:@"inputColor0"];

    [coreImageFilter setValue:[CIColor colorWithRed:0.972 green:0.912 blue:0.762] forKey:@"inputColor1"];
   
    return [coreImageFilter outputImage];
}

//@add
- (id)init
{
    if (self = [super init]) {
        //[self showFilterAttributes:@"CIFalseColor"];
       
        /*
        CIFalseColor Filter:
        {
            CIAttributeFilterCategories =     (
                                               CICategoryColorEffect,
                                               CICategoryVideo,
                                               CICategoryInterlaced,
                                               CICategoryNonSquarePixels,
                                               CICategoryStillImage,
                                               CICategoryBuiltIn
                                               );
            CIAttributeFilterDisplayName = "False Color";
            CIAttributeFilterName = CIFalseColor;
            inputColor0 =     {
                CIAttributeClass = CIColor;
                CIAttributeDefault = "(0.3 0 0 1)";
                CIAttributeType = CIAttributeTypeColor;
            };
            inputColor1 =     {
                CIAttributeClass = CIColor;
                CIAttributeDefault = "(1 0.9 0.8 1)";
                CIAttributeType = CIAttributeTypeColor;
            };
            inputImage =     {
                CIAttributeClass = CIImage;
                CIAttributeType = CIAttributeTypeImage;
            };
        }
        */
    }
   
    return self;
}

@end

*************************************************

     4. 顏色調節濾鏡(調整顏色的: 飽和, 對比與亮度)
          a. Xcode > File > New > File...
              iOS > Cocoa Touch > Objective-C class > Next

             Class: ColorFilter
             Subclass of: NSObject
             > Next

            Targets: Filter4Cam

             > Create

          b. 開啟 ColorFilter.h 檔案, 修改如下:
#import <Foundation/Foundation.h>

//@add
#import "FilterBase.h"

//@interface ColorFilter : NSObject
//@update: 顏色調節濾鏡
@interface ColorFilter : FilterBase
{
   
}

@end

          c. 開啟 ColorFilter.m 檔案, 修改如下:

#import "ColorFilter.h"

@implementation ColorFilter

//@add for apply Filter
- (CIImage *)filterImage:(CIImage *)sourceImage
{
    // 顏色調節濾鏡(調整顏色的: 飽和, 對比與亮度)
    CIFilter *coreImageFilter = [CIFilter filterWithName:@"CIColorControls"];
    [coreImageFilter setValue:sourceImage forKey:kCIInputImageKey];
   
    // 亮度: -1~1 (default:0)
    [coreImageFilter setValue:[NSNumber numberWithFloat:0.0] forKey:@"inputBrightness"];
   
    // 對比度: 0~4 (default:1)
    [coreImageFilter setValue:[NSNumber numberWithFloat:1.8] forKey:@"inputContrast"];
   
    // 飽和度: 0~2 (default:1)
    [coreImageFilter setValue:[NSNumber numberWithFloat:1.6] forKey:@"inputSaturation"];
   
    return [coreImageFilter outputImage];
}

//@add
- (id)init
{
    if (self = [super init]) {
        //[self showFilterAttributes:@"CIColorControls"];
       
        /*
        CIColorControls Filter:
        {
            CIAttributeFilterCategories =     (
                                               CICategoryColorAdjustment,
                                               CICategoryVideo,
                                               CICategoryStillImage,
                                               CICategoryInterlaced,
                                               CICategoryNonSquarePixels,
                                               CICategoryBuiltIn
                                               );
            CIAttributeFilterDisplayName = "Color Controls";
            CIAttributeFilterName = CIColorControls;
            inputBrightness =     {
                CIAttributeClass = NSNumber;
                CIAttributeDefault = 0;
                CIAttributeIdentity = 0;
                CIAttributeSliderMax = 1;
                CIAttributeSliderMin = "-1";
                CIAttributeType = CIAttributeTypeScalar;
            };
            inputContrast =     {
                CIAttributeClass = NSNumber;
                CIAttributeDefault = 1;
                CIAttributeIdentity = 1;
                CIAttributeSliderMax = 4;
                CIAttributeSliderMin = 0;
                CIAttributeType = CIAttributeTypeScalar;
            };
            inputImage =     {
                CIAttributeClass = CIImage;
                CIAttributeType = CIAttributeTypeImage;
            };
            inputSaturation =     {
                CIAttributeClass = NSNumber;
                CIAttributeDefault = 1;
                CIAttributeIdentity = 1;
                CIAttributeSliderMax = 2;
                CIAttributeSliderMin = 0;
                CIAttributeType = CIAttributeTypeScalar;
            };
        }
        */
    }
   
    return self;
}

@end

*************************************************

     5. 複合濾鏡(在此為: "假色濾鏡" 與 "顏色調節濾鏡")
          a. Xcode > File > New > File...
              iOS > Cocoa Touch > Objective-C class > Next

             Class: ComboFilter
             Subclass of: NSObject
             > Next

            Targets: Filter4Cam

             > Create

          b. 開啟 ComboFilter.h 檔案, 修改如下:
#import <Foundation/Foundation.h>

//@add
#import "FilterBase.h"

//@interface ComboFilter : NSObject
//@update: 複合濾鏡
@interface ComboFilter : FilterBase
{
   
}

@end

          c. 開啟 ComboFilter.m 檔案, 修改如下:
#import "ComboFilter.h"


@implementation ComboFilter

//@add
- (CIImage *)filterImage:(CIImage *)sourceImage
{
    // 複合濾鏡 (在此為: "假色濾鏡" 與 "顏色調節濾鏡")
   
    /* 假色濾鏡 */
    CIFilter *coreImageFilter1 = [CIFilter filterWithName:@"CIFalseColor"];

    [coreImageFilter1 setValue:sourceImage forKey:kCIInputImageKey];

    [coreImageFilter1 setValue:[CIColor colorWithRed:0.145 green:0.016 blue:0.308] forKey:@"inputColor0"];

    [coreImageFilter1 setValue:[CIColor colorWithRed:0.972 green:0.912 blue:0.762] forKey:@"inputColor1"];
   
    /* 顏色調節濾鏡 */
    CIFilter *coreImageFilter2 = [CIFilter filterWithName:@"CIColorControls"];

    [coreImageFilter2 setValue:[coreImageFilter1 outputImage] forKey:kCIInputImageKey];
   
    // 亮度: -1~1 (default:0)
    [coreImageFilter2 setValue:[NSNumber numberWithFloat:0.0] forKey:@"inputBrightness"];
   
    // 對比度: 0~4 (default:1)
    [coreImageFilter2 setValue:[NSNumber numberWithFloat:1.8] forKey:@"inputContrast"];
   
    // 飽和度: 0~2 (default:1)
    [coreImageFilter2 setValue:[NSNumber numberWithFloat:1.6] forKey:@"inputSaturation"];
   
    return [coreImageFilter2 outputImage];
}

//@add
- (id)init
{
    if (self = [super init]) {
       
    }
   
    return self;
}

@end

-----------------------------------------------------------------------------

B. 儲存所有的濾鏡物件

     1. 開啟 GlobalDataClass.h 檔案, 修改如下:
#import <Foundation/Foundation.h>


//@add
#import "SepiaFilter.h"
#import "FalseFilter.h"
#import "ColorFilter.h"
#import "ComboFilter.h"

@interface GlobalDataClass : NSObject
{   
    //@add: array for storage filterCells
    NSMutableArray *filterCellArray;
    BOOL isUsingFilter;        // 有使用濾鏡?
    NSMutableString *filterID; // 濾鏡 ID
   
    //@add: 存放濾鏡物件的字典
    NSMutableDictionary *filterDictionary;
}

//@add
@property (nonatomic, strong) NSMutableArray *filterCellArray;
@property (assign) BOOL isUsingFilter;
@property (nonatomic, strong) NSMutableString *filterID;
@property (nonatomic, strong) NSMutableDictionary *filterDictionary;

//@add
+ (GlobalDataClass *)getInstance;

@end

     2. 開啟 GlobalDataClass.m 檔案, 修改如下:
....

//@add
@synthesize filterCellArray = _filterCellArray;
@synthesize isUsingFilter = _isUsingFilter;
@synthesize filterID = _filterID;
@synthesize filterDictionary = _filterDictionary;
....
//@add
- (NSMutableDictionary *)filterDictionary
{
    if (_filterDictionary == nil) {
        _filterDictionary = [[NSMutableDictionary alloc] init];
        [_filterDictionary setObject:[SepiaFilter new] forKey:@"filter0"];
        [_filterDictionary setObject:[FalseFilter new] forKey:@"filter1"];
        [_filterDictionary setObject:[ColorFilter new] forKey:@"filter2"];
        [_filterDictionary setObject:[ComboFilter new] forKey:@"filter3"];
    }
   
    return _filterDictionary;
}
....

-----------------------------------------------------------------------------

C. 濾鏡套用
     1. 開啟 ViewController.h 檔案, 修改如下:
....

@interface ViewController : GLKViewController <AVCaptureVideoDataOutputSampleBufferDelegate, UITableViewDelegate, UITableViewDataSource>
{
....
    GlobalDataClass *dataObj;
   
    // 目前使用的濾鏡物件
    FilterBase *currentFilter;
}
....
@property (nonatomic, strong) GlobalDataClass *dataObj;

@property (nonatomic, strong) FilterBase *currentFilter;
....//- (CIImage *)filterTest:(CIImage *)sourceImage;
....

     2. 開啟 ViewController.m 檔案, 修改如下:
....

// step 1:
@synthesize dataObj = _dataObj;
@synthesize currentFilter = _currentFilter;

....
// step 2:
//@add:filter Test
/*
- (CIImage *)filterTest:(CIImage *)sourceImage
{   
    self.coreImageFilter = [CIFilter filterWithName:@"CISepiaTone" keysAndValues:
                        kCIInputImageKey, sourceImage,
                        @"inputIntensity", [NSNumber numberWithFloat:0.8], nil];
   
    return [self.coreImageFilter outputImage];
}
*/

....
// step 3:
- (void)captureOutput:(AVCaptureOutput *)captureOutput didOutputSampleBuffer:(CMSampleBufferRef)sampleBuffer fromConnection:(AVCaptureConnection *)connection {
....
    //@update
    if(self.dataObj.isUsingFilter == YES)
    {
        //@update: comment it
        /*
        // 濾鏡功能測試
        self.ciImage = [self filterTest:self.ciImage];
   
        // 畫出 "濾鏡範圍" 內的影像(含方向轉變的調整)
        [self drawFilteredImage:self.ciImage];
        */
       
        // check if key "filterID" exists:
        // objectForKey will return nil if a key doesn't exists.
        if (self.currentFilter = [self.dataObj.filterDictionary objectForKey:self.dataObj.filterID])
        // for Xcode: 4.6.2 update
        if ((self.currentFilter = [self.dataObj.filterDictionary objectForKey:self.dataObj.filterID]))

        {
            self.ciImage = [self.currentFilter filterImage:self.ciImage];
            [self drawFilteredImage:self.ciImage];
        }
    }
   
    // 最後, 在螢幕上呈現出來.
    [self.glContext presentRenderbuffer:GL_RENDERBUFFER];
}

....
// step 4:
- (void)viewDidUnload
{   
    [super viewDidUnload];
   
    //@add
    if ([EAGLContext currentContext] == self.glContext) {
        [EAGLContext setCurrentContext:nil];
    }
....
    self.dataObj = nil;
    self.currentFilter = nil;
}
....

-----------------------------------------------------------------------------

D. 編譯並執行:
     1. 未套用濾鏡:

     2. 套用 "墨魚濾鏡":

     3. 套用 "假色濾鏡":

     4. 套用 "顏色調節濾鏡":

     5. 套用 "複合濾鏡": ("假色濾鏡" 與 "顏色調節濾鏡")