update: 2012/01/17
reference: iOS Developer Library - PocketCoreImage
sample code: PocketCoreImage.zip
A. 有關 PocketCoreImage
1. 這個例子示範應用 Core Image 濾鏡到靜態的圖片上. 濾鏡的參數自動設定
(使用隨機數字), 並且可以在同時間套用多重濾鏡. 這個例子採用預先調整好的
濾鏡列表讓使用者選擇, 在程式碼中會示範向系統請求濾鏡列表的方式.
2. 這篇文章, 參考 apple 的文件, 來建立整個專案.
---------------------------------------------------------------------------------------------
B. 說明
1. 取得濾鏡清單
濾鏡清單是在 -awakeFromNib 方法裡被建立的. 簡而言之, 雖然這裡使用的
四個濾鏡是被手動指明的; 但是可以向 iOS 系統查詢到已安裝的濾鏡清單.
以下的程式碼區段顯示了如何來達成.
| |||
| 備註: a. 以下的網址可以取得查詢濾鏡分類的 keys 清單: CIFilter Class Reference b. 以下的網址列出了 Apple 提供的完整 Core Images 濾鏡清單: Core Image Filter Reference (目前, 並非所有列出的濾鏡清單都可以在 iOS 中使用) |
2. 濾鏡參數的設定
大部份的濾鏡都包含數個參數可用來設定以改變輸出的影像. 一個濾鏡的實體能夠
藉由呼叫 -attributes 查詢到相關資訊與其提供的參數. 你也可以命令 CIFilter 的實體
藉由呼叫 -setDefaults 來自動設定原始的預設值.
在這個範例中, 我們定義了一個方法: +(void)configureFilter:(CIFilter*)filter, 它帶著
CIFilter 實體作為方法參數, 檢查 filter 可用的參數並將其設成隨機值. 在這個方法中
所展示的技巧能夠輕易地被使用於: 實作一個動態的使用者介面, 允許使用者去設定
濾鏡.
3. 套用濾鏡到輸出的影像
我們的 controller 管理著一個包含著許多 CIFilter 實體的 NSArray. 當
FilteredImageView 需要自行繪出時, 它就會要求獲得此濾鏡清單, 並且為輸入的影像
連續地套用每個濾鏡.
4. 套件清單:
a. FilteredImageView.m/h
為 UIView 的子類別. 會從 data source 要求取得濾鏡清單, 並且將它們套用至輸入
的影像, 再將結果影像畫到螢幕上.
b. ViewController.m/h
包含著 UI 的邏輯部分. 管理著套用濾鏡的 image view 與濾鏡清單.
c. xxxFilterDetailCategory.m
為 ViewController 類別的類目(category). 實作了一個方法: 利用隨機產生
的值來設定濾鏡參數.
---------------------------------------------------------------------------------------------
C. 新增專案
1. Xcode > File > New > New Project...
iOS > Application > Single View Application > Next
Product Name: PocketCoreImage
Device Family: iPhone
Use Storyboard: checked
Use Automatic Reference Couting: checked
> Next


---------------------------------------------------------------------------------------------
D. 基本 UI 配置
Navigation Bar, UIView 與 Table View.
1. 依序將: Navigation Bar, Navigation Item 與 Bar Button Item 拖拉到 UI 最上方,
並修改 Navigation Item 的 Title 為: Filtered Image , Bar Button Item 的名稱為:
Clear All, 如下所示:


a. 選取 Table View, 並將屬性中的 Style 改成 Grouped,
取消勾選: Scrolling Enabled.


4. 再選取整個 View, 將屬性中的 Background 設為:
Group Table View Background Color


E. 在 ViewController 中, 調整 UI 相關的程式碼
1. 開啓 ViewController.h 檔案, 調整如下:
#import <UIKit/UIKit.h>
//@interface ViewController : UIViewController
//@update: 加入 UINavigationControllerDelegate protocol
@interface ViewController : UIViewController <UINavigationControllerDelegate>
{
//@add
UITableView *tableView;
// Array of CIFilters currently applied to the image.
NSMutableArray *_filtersToApply;
// Array created at startup containg the names of filters that can be applied to the image.
NSArray *_availableFilters;
}
//@add
@property (nonatomic, strong) NSMutableArray *filtersToApply;
@property (nonatomic, strong) IBOutlet UITableView *tableView;
//@add
- (IBAction)clearFilters:(id)sender;
@end
//@add
@interface ViewController (FilterDetailCategory)
+ (void)configureFilter:(CIFilter*)filter;
@end
2. 開啓 ViewController.m 檔案, 調整如下:
#import "ViewController.h"
@implementation ViewController
//@add
@synthesize filtersToApply = _filtersToApply;
@synthesize tableView = _tableView;
//@add
- (IBAction)clearFilters:(id)sender
{
}
//@add
#pragma mark - TableView
// Standard table view datasource/delegate code.
//
// Create a table view displaying all the filters named in the _availableFilters array.
// Only the names of the filters a stored in the _availableFilters array, the actual filter
// is created on demand when the user chooses to add it to the list of applied filters.
//
//@add
- (NSInteger)numberOfSectionsInTableView:(UITableView *)tableView
{
return 1;
}
//@add
- (NSInteger)tableView:(UITableView *)tableView numberOfRowsInSection:(NSInteger)section
{
return [_availableFilters count];
}
//@add
- (UITableViewCell *)tableView:(UITableView *)tableView cellForRowAtIndexPath:(NSIndexPath *)indexPath
{
static NSString *filterCellID = @"filterCell";
UITableViewCell *cell;
cell = [tableView dequeueReusableCellWithIdentifier:filterCellID];
if(!cell)
cell = [[UITableViewCell alloc] initWithStyle:UITableViewCellStyleDefault reuseIdentifier:filterCellID];
cell.textLabel.text = [_availableFilters objectAtIndex:indexPath.row];
// Check if the filter named in this row is currently applied to the image. If it is,
// give this row a checkmark.
cell.accessoryType = UITableViewCellAccessoryNone;
for (CIFilter *filter in _filtersToApply)
if ([[filter name] isEqualToString:[_availableFilters objectAtIndex:indexPath.row]])
cell.accessoryType = UITableViewCellAccessoryCheckmark;
return cell;
}
//@add
- (NSString*)tableView:(UITableView *)tableView titleForHeaderInSection:(NSInteger)section
{
return @"Select a Filter";
}
//@add
- (void)tableView:(UITableView *)tableView didSelectRowAtIndexPath:(NSIndexPath *)indexPath
{
}
//@add
- (void)awakeFromNib
{
_availableFilters = [NSArray arrayWithObjects:@"CIColorInvert", @"CIColorControls", @"CIGammaAdjust", @"CIHueAdjust", nil];
}
3. 接著, 將 IBOutlet UITableView *tableView 與 UI 上的 table view 作連結;
- (IBAction)clearFilters: 與 UI 上的 Bar Button Item 作連結.
4. UI 上的 UIView 稍後會做客制處理與相關連結.
5. 編譯並執行.

F. 新增 FilteredImageView 類別
1. 新增類別檔案:
Xcode > File > New > New File >
iOS > Cocoa Touch > Objective-C class > Next
Class: FilteredImageView
Subclass of: UIView
> Next

#import <UIKit/UIKit.h>
//@add a protocol for datasource used
@protocol FilteredViewDatasource <NSObject>
- (NSMutableArray*)filtersToApply;
@end
@interface FilteredImageView : UIView
{
//@add
CIImage *_filteredImage;
}
//@add
@property (nonatomic, weak) IBOutlet id<FilteredViewDatasource> datasource;
@property (nonatomic, strong) UIImage *inputImage;
//@add
- (void)reloadData;
@end
3. 調整 FilteredImageView.m 檔案, 如下:
#import "FilteredImageView.h"
@implementation FilteredImageView
//@add
@synthesize datasource;
@synthesize inputImage = _inputImage;
//@add
// Requests the list of filters from the data source and applies each filter
// in order to the _inputImage.
- (void)reloadData
{
if (!_inputImage)
return;
// Create a CIImage from the _inputImage. While UIImage has a property returning
// a CIImage representation of it, there are cases where it will not work. This is the
// most compatible route.
_filteredImage = [[CIImage alloc] initWithCGImage:_inputImage.CGImage options:nil];
// Retrieve the list of CIFilters to apply from our datasource.
NSArray *filters = [self.datasource filtersToApply];
if (filters)
// Iterate through each filter setting our CIImage as the input and re-assigning
// the filter's output back to our CIImage. This creates a chaining effect.
for(CIFilter *filter in filters) {
[filter setValue:_filteredImage forKey:@"inputImage"];
// Certain filters place restrictions on their input values that we may not have
// accounted for in the configuration method. For example, CIColorCube
// requires its parameter to be a power of 2. In such as case, the filter will throw
// an exception when we ask it generate and image. Catch the exception and
// pretend nothing happened thereby bypassing the filter.
@try {
_filteredImage = filter.outputImage;
}
@catch (NSException* e) { }
}
// Inform UIKit that we need to be redrawn.
[self setNeedsDisplay];
}
// Only override drawRect: if you perform custom drawing.
// An empty implementation adversely affects performance during animation.
- (void)drawRect:(CGRect)rect
{
// Drawing code
//@add
[super drawRect:rect];
if (!_filteredImage)
return;
// This is the rect we'll draw our final image into. By making it a bit smaller than our
// bounds we'll get a nice border.
CGRect innerBounds = CGRectMake(5, 5, self.bounds.size.width - 10, self.bounds.size.height - 10);
// To display the image, convert it back to a UIImage and draw it in our rect.
// UIImage takes into account the orientation of an image when drawing which
// we would have needed to worry about when drawing it directly with Core Image
// and Core Graphics calls.
[[UIImage imageWithCIImage:_filteredImage] drawInRect:innerBounds];
}
//@add
- (void)setInputImage:(UIImage *)inputImage
{
// Since Core Image filters must be operate on every pixel in an image, you may
// want to consider resizing an input image to the view size before applying any
// filters.
_inputImage = inputImage;
[self reloadData];
}
---------------------------------------------------------------------------------------------
G. 調整 ViewController
1. 修改 ViewController.h 檔案如下:
#import <UIKit/UIKit.h>
//@add
#import <QuartzCore/QuartzCore.h>
#import "FilteredImageView.h"
....
//@add
@property (nonatomic, strong) NSMutableArray *filtersToApply;
@property (nonatomic, strong) IBOutlet UITableView *tableView;
@property (nonatomic, strong) IBOutlet FilteredImageView *imageView;
....
2. 修改 ViewController.m 檔案如下:
....
//@add
@synthesize filtersToApply = _filtersToApply;
@synthesize tableView = _tableView;
@synthesize imageView = _imageView;
//@add
// Action sent by the right navigation bar item.
// Removes all applied filters and updates the display.
- (IBAction)clearFilters:(id)sender
{
[_filtersToApply removeAllObjects];
// Instruct the filtered image view to refresh
[_imageView reloadData];
// Instruct the table to refresh. This will remove
// any checkmarks next to selected filters.
[_tableView reloadData];
}
//@add
// Private method to add a filter given it's name.
// Creates a new instance of the named filter and adds
// it to the list of filters to be applied, then
// updates the display.
- (void)addFilter:(NSString*)name
{
// Create a new filter with the given name.
CIFilter *newFilter = [CIFilter filterWithName:name];
// A nil value implies the filter is not available.
if (!newFilter) return;
// -setDefaults instructs the filter to configure its parameters
// with their specified default values.
[newFilter setDefaults];
// Our filter configuration method will attempt to configure the
// filter with random values.
[ViewController configureFilter:newFilter];
[_filtersToApply addObject:newFilter];
// Instruct the filtered image view to refresh
[_imageView reloadData];
}
//@add
// Private method to remove a filter given it's name.
// Updates the display when finished.
- (void)removeFilter:(NSString*)name
{
NSUInteger filterIndex = NSNotFound;
// Find the index named filter in the array.
for (CIFilter *filter in _filtersToApply)
if ([filter.name isEqualToString:name])
filterIndex = [_filtersToApply indexOfObject:filter];
// If it was found (which it always should be) remove it.
if (filterIndex != NSNotFound)
[_filtersToApply removeObjectAtIndex:filterIndex];
// Instruct the filtered image view to refresh
[_imageView reloadData];
}
//@add
- (void)tableView:(UITableView *)tableView didSelectRowAtIndexPath:(NSIndexPath *)indexPath
{
UITableViewCell *selectedCell = [tableView cellForRowAtIndexPath:indexPath];
// Determine if the filter is or is not currently applied.
BOOL filterIsCurrentlyApplied = NO;
for (CIFilter *filter in _filtersToApply)
if ([[filter name] isEqualToString:selectedCell.textLabel.text])
filterIsCurrentlyApplied = YES;
// If the filter is currently being applied, remove it.
if (filterIsCurrentlyApplied) {
[self removeFilter:[_availableFilters objectAtIndex:indexPath.row]];
[tableView cellForRowAtIndexPath:indexPath].accessoryType = UITableViewCellAccessoryNone;
}
// Otherwise, add it.
else {
[self addFilter:[_availableFilters objectAtIndex:indexPath.row]];
[tableView cellForRowAtIndexPath:indexPath].accessoryType = UITableViewCellAccessoryCheckmark;
}
[tableView deselectRowAtIndexPath:indexPath animated:YES];
}
- (void)viewDidLoad
{
[super viewDidLoad];
// Do any additional setup after loading the view, typically from a nib.
//@add
_filtersToApply = [[NSMutableArray alloc] init];
// p.s. 先自行將圖檔加入專案中
_imageView.inputImage = [UIImage imageNamed:@"LakeDonPedro2.jpg"];
}
- (void)viewDidUnload
{
[super viewDidUnload];
// Release any retained subviews of the main view.
// e.g. self.myOutlet = nil;
//@add
self.tableView = nil;
self.imageView = nil;
}
---------------------------------------------------------------------------------------------
H. 調整 UI 設定
開啓 MainStoryboard.storyboard 檔案, 調整如下:
1. 選取 UIView, 在 Identity 將其 Class 選為 FilteredImageView.

連結到 UI 的 Filtered Image View上

分別皆與 View Controller 作連結.

與 View Controller 作連結.


I. 建立給 ViewController 使用的 Category
1. 新增檔案:
Xcode > File > New > New File >
iOS > Cocoa Touch > Objective-C category > Next
Category: FilterDetailCategory
Category on: ViewController
> Next
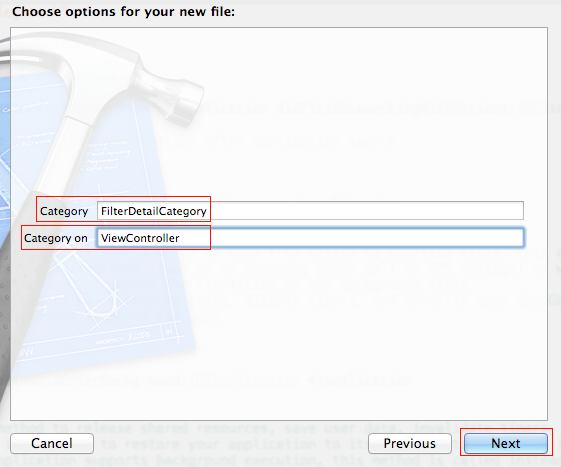
說明: 產生 ViewController+FilterDetailCategory.h 與 .m 檔.
2. 修改 ViewController+FilterDetailCategory.h 檔案如下:
#import "ViewController.h"
// 之前已經在 ViewController.h 宣告了
/*
@interface ViewController (FilterDetailCategory)
//@add
+ (NSDictionary*)deriveEditableAttributesForFilter:(CIFilter*)filter;
@end
*/
3. 修改 ViewController+FilterDetailCategory.m 檔案如下:
#import "ViewController+FilterDetailCategory.h"
@implementation ViewController (FilterDetailCategory)
//@add
//
// Helper method.
// Returns an NSDictionary containg only the parameters we want our
// configure method to operate on.
+ (NSDictionary*)deriveEditableAttributesForFilter:(CIFilter*)filter
{
NSMutableDictionary *editableAttributes = [NSMutableDictionary dictionary];
NSDictionary *filterAttributes = [filter attributes];
for (NSString *key in filterAttributes) {
if ([key isEqualToString:@"CIAttributeFilterCategories"]) continue;
else if ([key isEqualToString:@"CIAttributeFilterDisplayName"]) continue;
else if ([key isEqualToString:@"inputImage"]) continue;
else if ([key isEqualToString:@"outputImage"]) continue;
else if (![[[filter attributes] objectForKey:key] isKindOfClass:[NSDictionary class]]) continue;
[editableAttributes setObject:[[filter attributes] objectForKey:key] forKey:key];
}
return editableAttributes;
}
//@add
//
// Helper function that returns a random float value within the specified range.
float randFloat(float a, float b);
float randFloat(float a, float b)
{
srand(time(NULL));
return ((b-a)*((float)arc4random()/RAND_MAX))+a;
}
//@add
//
// Given a filter, examine all its parameters and configure them with
// randomly generated values.
// randomly generated values.
+ (void)configureFilter:(CIFilter*)filter
{
// Get the filter's parameters we're interested in configuring here.NSDictionary *editableAttributes = [ViewController deriveEditableAttributesForFilter:filter];
for (NSString *key in editableAttributes) {
NSDictionary *attributeDictionary = [editableAttributes objectForKey:key];
// Our method here only supports generating random values for parameters
// that expect numbers. Some paramters take an image, color, or vector.
if ([[attributeDictionary objectForKey:kCIAttributeClass] isEqualToString:@"NSNumber"]) {// that expect numbers. Some paramters take an image, color, or vector.
// The number types are further broken down into sub types. For our purposes,
// we can group them into types that require either a boolean, float, or integer.
// we can group them into types that require either a boolean, float, or integer.
if ([attributeDictionary objectForKey:kCIAttributeType] == kCIAttributeTypeBoolean)
{
NSInteger randomValue = (rand() % 2);
NSLog(@"Setting %i for key %@ of type BOOL", randomValue, key);
[filter setValue:[NSNumber numberWithInteger:randomValue] forKey:key];
}
else if([attributeDictionary objectForKey:kCIAttributeType] == kCIAttributeTypeScalar ||
[attributeDictionary objectForKey:kCIAttributeType] == kCIAttributeTypeDistance ||
[attributeDictionary objectForKey:kCIAttributeType] == kCIAttributeTypeAngle)
{
// Get the min and max valuesfloat maximumValue = [[attributeDictionary valueForKey:kCIAttributeSliderMax] floatValue];
float minimumValue = [[attributeDictionary valueForKey:kCIAttributeSliderMin] floatValue];
float randomValue = randFloat(minimumValue, maximumValue);
NSLog(@"Setting %f for key %@ of type Decimal", randomValue, key);
[filter setValue:[NSNumber numberWithFloat:randomValue] forKey:key];
}
else
{
// Get the min and max values NSInteger maximumValue = [[attributeDictionary valueForKey:kCIAttributeMax] integerValue];
NSInteger minimumValue = [[attributeDictionary valueForKey:kCIAttributeMin] integerValue];
NSInteger randomValue = (rand() % (maximumValue - minimumValue)) + minimumValue;
NSLog(@"Setting %i for key %@ of type Integer", randomValue, key);
[filter setValue:[NSNumber numberWithInteger:randomValue] forKey:key];
}
}
}
}
@end
4. 編譯並執行.


沒有留言:
張貼留言
注意:只有此網誌的成員可以留言。