2017年3月27日 星期一

Unreal: Simple Head Up Display (HUD)

since: 2017/03/27
update: 2017/04/14
reference:
1. UMG UI Designer Quick Start Guide | Unreal Engine

A. 新增 Widget Blueprints
    1. Add New > User Interface > Widget Blueprint
        > 取名為: HUD, 並開啟.


    2. 在 Canvas Panel 下新增: Horizonal Box Panel

       Details:
    備註: 若要匯出成 VR 執行檔, 建議: Size X = 380; Size Y = 350, 螢幕才看得到.

    3. 在 Horizonal Box 下新增: Text Box (Editable)

       Details:

-----------------------------------------------------------------------------------------------

B. 在 Level Blueprint, 將此 Widget 顯示出來
     1. Event BeginPlay -> Create Widget

     2. 將 Class 設為先前新增的 HUD Widget

     3. 將 Return Value 提升(Promote)為變數

     4. 將此變數取名為: HUD Reference

      Details:

     結果:

     5. 加上 "Add to Viewport" 節點

-----------------------------------------------------------------------------------------------

C. 在 Level Blueprint, 設定 HUD Widget 顯示特定的文字
     1. 新增存放 Text 的變數:

      Details:

     2. 設定 HUD Widget 顯示特定的文字

     3. 顯示 / 隱藏 HUD Widget

2017年3月12日 星期日

Raspberry Pi: Install OpenCV 3 with Python2,Python3

since: 2017/03/12
since: 2017/03/31
reference:
1. Install guide: Raspberry Pi 3 + Raspbian Jessie + OpenCV 3 - PyImageSearch
2. Accessing the Raspberry Pi Camera with OpenCV and Python - PyImageSearch

A. 前置準備
    1. Raspberry Pi 3
    2. 16 GB microSD Card (編譯 OpenCV 大約會佔用 3G 的容量)
    3. Camera Module
    4. Enable Camera Interface
         > $ sudo raspi-config


    5. (optional) delete the Wolfram engine to free up some space
        $ sudo apt-get purge wolfram-engine

    6. check Python version
        $ python -V
           Python 2.7.9

        $ python3 -V
           Python 3.4.2

-----------------------------------------------------------------------------------------------

B. 安裝相關套件
    1. update and upgrade any existing packages
        $ sudo apt-get update
        $ sudo apt-get upgrade

    2. install some developer tools
        $ sudo apt-get install build-essential cmake pkg-config

    3. install some image I/O packages
        $ sudo apt-get install libjpeg-dev libtiff5-dev libjasper-dev libpng12-dev


    4. install some video I/O packages
        $ sudo apt-get install libavcodec-dev libavformat-dev libswscale-dev libv4l-dev
        $ sudo apt-get install libxvidcore-dev libx264-dev

    5. install the GTK development for highgui
        $ sudo apt-get install libgtk2.0-dev

    6. installing a few extra dependencies for optimized
        $ sudo apt-get install libatlas-base-dev gfortran

    7. install both the Python 2.7 and Python 3 header files
        $ sudo apt-get install python2.7-dev python3-dev

-----------------------------------------------------------------------------------------------

C. 下載 OpenCV source code
     1. opencv
         $ cd ~
         $ wget -O opencv.zip https://github.com/Itseez/opencv/archive/3.2.0.zip
         $ chmod 755 opencv.zip
         $ unzip opencv.zip

     2. opencv_contrib (full install of OpenCV)
         $ wget -O opencv_contrib.zip https://github.com/Itseez/opencv_contrib/archive/3.2.0.zip
         $ chmod 755 opencv_contrib.zip
         $ unzip opencv_contrib.zip

Note: Make sure your opencv  and opencv_contrib  versions are the same
          (in this case, 3.2.0)


-----------------------------------------------------------------------------------------------

D. Install Python package manager
     $ wget https://bootstrap.pypa.io/get-pip.py
     $ chmod 755 get-pip.py
     $ sudo python get-pip.py
     $ sudo python3 get-pip.py

-----------------------------------------------------------------------------------------------

E. Installing NumPy
    $ pip install numpy (it may take a bit of time)

-----------------------------------------------------------------------------------------------

F. Compile and Install OpenCV
    $ cd ~/opencv-3.2.0
    $ mkdir build
    $ cd build
    $ cmake -D CMAKE_BUILD_TYPE=RELEASE -D CMAKE_INSTALL_PREFIX=/usr/local -D INSTALL_PYTHON_EXAMPLES=ON -D OPENCV_EXTRA_MODULES_PATH=~/opencv_contrib-3.2.0/modules -D BUILD_EXAMPLES=ON ..

備註: 選擇性參數: -D INSTALL_C_EXMAPLES=ON

   => Ensuring that Python 2.7 and Python 3 will be used

   > compile OpenCV
     // The Raspberry Pi 3 has four cores, thus we supply a value of 4  to allow OpenCV
     // to compile faster. However, due to race conditions, there are times when
     // make  errors out when using multiple cores.
     // $ make -j4

     $ make // about 7 hours
     $ sudo make install
     $ sudo ldconfig

-----------------------------------------------------------------------------------------------

G. 檢查與測試安裝結果
     1. 檢查
         $ ls -al /usr/local/lib/python2.7/dist-packages/cv2.so
         $ ls -al /usr/local/lib/python3.4/dist-packages/cv2.cpython-34m.so
         //$ cd /usr/local/lib/python3.4/dist-packages/
         //$ sudo cp cv2.cpython-34m.so cv2.so    

     2. 測試 
// python2
$ cd
$ python
>>> import cv2
>>> cv2.__version__
'3.2.0'
>>> exit()

// python3
$ cd
$ python3
>>> import cv2
>>> cv2.__version__
'3.2.0'
>>> exit()

-----------------------------------------------------------------------------------------------

H. 程式測試   
     1. Test out the camera module
         $ raspistill -o output.jpg

-----------------------------------------------------------------------------------------------
     2. Installing picamera
         // when using Python bindings, OpenCV represents images as NumPy arrays

         $ pip install "picamera[array]"

-----------------------------------------------------------------------------------------------
     3. Grabbing a single image (需要先啟動 X Window: $ startx)
         // test_image.py


# import the necessary packages
from picamera.array import PiRGBArray
from picamera import PiCamera
import time
import cv2

# initialize the camera and grab a reference to the raw camera capture
camera = PiCamera()
rawCapture = PiRGBArray(camera)

# allow the camera to warmup
time.sleep(0.1)

# grab an image from the camera
camera.capture(rawCapture, format="bgr")
image = rawCapture.array

# display the image on screen and wait for a keypress
cv2.imshow("Image", image)
cv2.waitKey(0)


$ python test_image.py


-----------------------------------------------------------------------------------------------

     4. access the video stream (需要先啟動 X Window: $ startx)
         // test_video.py

# import the necessary packages
from picamera.array import PiRGBArray
from picamera import PiCamera
import time
import cv2

# initialize the camera and grab a reference to the raw camera capture
camera = PiCamera()
camera.resolution = (640, 480)
camera.framerate = 32
rawCapture = PiRGBArray(camera, size=(640, 480))

# allow the camera to warmup
time.sleep(0.1)

# capture frames from the camera
for frame in camera.capture_continuous(rawCapture, format="bgr", use_video_port=True):
    # grab the raw NumPy array representing the image, then initialize the timestamp
    # and occupied/unoccupied text

    image = frame.array

    # show the frame
    cv2.imshow("Frame", image)
    key = cv2.waitKey(1) & 0xFF

    # clear the stream in preparation for the next frame
    rawCapture.truncate(0)

    # if the `q` key was pressed, break from the loop
    if key == ord("q"):
        break

 
$ python test_video.py


2017年2月19日 星期日

Start Kinect for Windows v2 in C++

since: 2017/02/18
update: 2017/02/19
reference:
1. Kinect for Windows SDK v2 基本介紹 | Heresy's Space
2. Kinect for Windows SDK v2 C++ API 簡介 | Heresy's Space
3. K4W v2 C++ Part 1:簡單的深度讀取方法 | Heresy's Space

4. Kinect with Visual Studio 2015 and Windows 10

A. 系統需求:
     1. A Kinect for Windows v2 Device (K4W2)
     2. 64bit computer with a dedicated USB 3.0
     3. Windows 10, 8, 8.1 (64bit)
     4. Update your latest video card driver
     5. Install DirectX 11

     6. Visual Studio Community 2012, 2013, 2015

     備註:
      a. How to Check Direct X Version in Windows:
      (1). Click “Start” > Run” or hold down the “Windows Key” and press “R“.
      (2). Type “dxdiag“, then click “OK“.
      (3). The version of DirectX you are currently running will be displayed
             on your screen.

       b.  check your system: run the Kinect Configuration Verifier tool


-----------------------------------------------------------------------------------------------

B. 安裝 Kinect for Windows SDK 2.0

    1. 下載 Kinect for Windows SDK 2.0

    2. 解壓縮後, 開始安裝

    3. 預設安裝路徑為: C:\Program Files\Microsoft SDKs\Kinect\v2.0_1409

    4. 可以檢查環境變數, 已自動新增一個系統變數:
        變數: KINECTSDK20_DIR
        : C:\Program Files\Microsoft SDKs\Kinect\v2.0_1409\

    5. 接著, 將 Kinect 插上電源並連接到電腦, 從裝置管理員可以看到相關的裝置.

    6. 工作管理員也可以看到相關的背景程式正在執行

    7. Windows 10 亦可檢查:
        >  設定

      > 裝置

       > 連線的裝置

    8. 測試: 開啟 SDKBrowser

    9. 注意: 不需要再執行 "Kinect Configuration Verifier" 了, 可能會造成之後的程式
        無法正常執行. (如果有發生的話, 請移除Kinect for Windows SDK 2.0, 再重裝一次)


  10. 執行 "Samples: C++" 分類的 Depth Basics-D2D

   > 結果:

-----------------------------------------------------------------------------------------------

C. Visual Studio 專案設定(在此以 Visual Studio 2015 為例)
     1. 新增專案:
         a. 檔案 > 新增 > 專案

         b. Visual C++ > Win32 主控台應用程式 > 確定

         c.下一步 > 勾選: 空專案 > 完成

         d. 結果

     2. 新增主程式:
         a. 專案 > 加入 > 新增項目

         b. Visual C++ > C++ 檔(.cpp) > 名稱: DepthReader.cpp > 新增

     3. 專案屬性設定
         a. 專案 > 屬性

         b. C/C++ > 一般 > 其他 Include 目錄: 加入 $(KINECTSDK20_DIR)\inc

         c. 連結器 > 一般 > 其他程式庫目錄: 加入 $(KINECTSDK20_DIR)\Lib\x64

         d. 連結器 > 輸入 > 其他相依性: 加入 kinect20.lib

-----------------------------------------------------------------------------------------------

D. 深度讀取
     1. 程式碼: DepthReader.cpp
// Standard Library
#include <iostream>

// Kinect for Windows SDK Header
#include <Kinect.h>

int main(int argc, char** argv)
{
    // 1a. Get default Sensor
    IKinectSensor* pSensor = nullptr;
    GetDefaultKinectSensor(&pSensor);

    // 1b. Open sensor
    pSensor->Open();

    // 2a. Get frame source
    IDepthFrameSource* pFrameSource = nullptr;
    pSensor->get_DepthFrameSource(&pFrameSource);

    // 3a. get frame reader
    IDepthFrameReader* pFrameReader = nullptr;
    pFrameSource->OpenReader(&pFrameReader);

    //@add: show Title ############
    std::cout << "\n" << "Depth Reader: " << "\n" << std::endl;

    // Enter main loop
    size_t uFrameCount = 0;
    while (uFrameCount < 3)
    {
        // 4a. Get last frame
        IDepthFrame* pFrame = nullptr;

        if (pFrameReader->AcquireLatestFrame(&pFrame) == S_OK)
        {
            // 4b. Get frame description
            int        iWidth = 0;
            int        iHeight = 0;
            IFrameDescription* pFrameDescription = nullptr;
            pFrame->get_FrameDescription(&pFrameDescription);
            pFrameDescription->get_Width(&iWidth);
            pFrameDescription->get_Height(&iHeight);
            pFrameDescription->Release();
            pFrameDescription = nullptr;
           
            //@add: show iWidth & iHeight ############
            std::cout << "iWidth = " << iWidth << std::endl;
            std::cout << "iHeight = " << iHeight << std::endl;

            // 4c. Get image buffer
            UINT    uBufferSize = 0;
            UINT16*    pBuffer = nullptr;
            pFrame->AccessUnderlyingBuffer(&uBufferSize, &pBuffer);

            // 4d. Output depth value
            int x = iWidth / 2,
                y = iHeight / 2;
            size_t idx = x + iWidth * y;

            //@add: show x, y, idx & uBufferSize ############
            std::cout << "x = " << x << std::endl;
            std::cout << "y = " << y << std::endl;
            std::cout << "idx = " << idx << std::endl;
            std::cout << "uBufferSize = " << uBufferSize << std::endl;

            std::cout << "pBuffer[idx] = " << pBuffer[idx] << std::endl;
            std::cout << "------------------------------------------------" << std::endl;
           
            // 4e. release frame
            pFrame->Release();
            pFrame = nullptr;

            ++uFrameCount;
        }

        //@add: sleep ############
        Sleep(10); // 0.01 second
    }

    // 3b. release frame reader
    pFrameReader->Release();
    pFrameReader = nullptr;

    // 2b. release Frame source
    pFrameSource->Release();
    pFrameSource = nullptr;

    // 1c. Close Sensor
    pSensor->Close();

    // 1d. Release Sensor
    pSensor->Release();
    pSensor = nullptr;

    //@add: pause ############
    //
    // Gill Bates:
    // system("pause"); it isn't cross platform.
    // Use getchar(); to pause program execution.

    printf("Press ENTER key to Continue\n");
    getchar();

    return 0;
}


    2. 執行:
         > 選擇 x64 模式

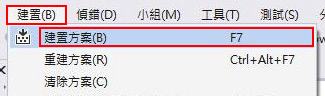
         > 建置 > 建置方案


         > 結果

2017年2月1日 星期三

How to Fix: Launch an older app crashes immediately on Mac

since: 2017/02/01
update: 2017/02/01

reference:
1. macos - "This UPX compressed binary contains an invalid Mach-O header and cannot be loaded." - Ask Different
2. Install upx on Mac OSX – Mac App Store


A. Error Message:
     “This UPX compressed binary contains an invalid Mach-O header and cannot be loaded.”
    
-----------------------------------------------------------------------------------------------

B. Install ups on Mac
    1. Install Homebrew:
$ ruby -e "$(curl -fsSL https://raw.githubusercontent.com/Homebrew/install/master/install)" < /dev/null 2> /dev/null

    2. Install upx: (目前版本: 3.93)
$ brew install upx

-----------------------------------------------------------------------------------------------

C. 檢查 app 套件執行位置:
     > yourApp.app > 顯示套件內容 > Contents > MacOS > x-force
        (不同 app 會有不同檔名)


-----------------------------------------------------------------------------------------------

D. Decompressing the app's binary using the -d option

     $ upx -d yourApp.app/Contents/MacOS/x-force

     (完成)

-----------------------------------------------------------------------------------------------

D. 備註:
     1. 讓 Mac Sierra 可以安裝第三方軟體
         a. 啟用功能: (開啟允許「任何來源」選項)
             終端機程式 > sudo spctl --master-disable

         b. 停用功能: (關閉「任何來源」選項)
             終端機程式 > sudo spctl --master-enable

2016年12月30日 星期五

Unreal: Sound Analysis

since: 2016/12/30
update: 2016/12/30

reference:
1. eXifreXi/eXiSoundVis: UE4 Plugin
2. Plugin eXi's Sound Visualization Plugin
3. BigSoundBank.com - Download sounds in WAV, AIFF, MP3 and OGG


A. 版本
     1. Windows 10
     2. Unreal 4.14.1
     3. Visual Studio 2015 Update 2

-----------------------------------------------------------------------------------------------

B. 新增專案
    1. New Project > C++ > Basic Code
         > Name: SoundAnalysis > Create Project

    2. 關閉 Unreal > 在 SoundAnalysis 專案目錄內:
        > 刪除 Binaries 目錄
        > 新增 Plugins 目錄

    3. 到 eXifreXi/eXiSoundVis: UE4 Plugin下載 eXiSoundVis-master.zip 檔案
        解壓縮後更名為 eXiSoundVis 資料夾

    4. 將 eXiSoundVis 資料夾 copy 到專案目錄下的 Plugins 目錄內,
        並刪除
eXiSoundVis 裡的 Binaries 目錄.

    5. 到 BigSoundBank.com 下載.ogg 音效檔 (在此為 0614.ogg)
        > copy 到專案目錄下的 Songs 目錄(自行新增)

    6. Unreal 專案名稱 > Generate Visual Studio project files

    7. 重新開啟 Unreal 專案:
        > Would you like to rebuild them now? > 是(Y)

    8. 檢查 Plugin 是否已裝好:


    9. 檢查是否能正常編譯

   10. 新增 Empty Actor 到場景裡

   11. 新增此 ActorBlueprint

   12. 取名為: Actor_Blueprint

    13. 開啟 Actor_Blueprint, 新增 Sound Vis Component

     結果:

-----------------------------------------------------------------------------------------------

C.  列出專案下的 Songs 目錄內所有的 .ogg 音效檔
    1. 新增 Load Sound File Names 節點

    2. 結果(目前只有一個 0614.ogg 檔案)

-----------------------------------------------------------------------------------------------

D. 載入單一音檔(.ogg) 並加入 "載入完成" 的事件
    1. Add Load Sound File Node & Assign OnFileLoadCompleted Event


    2. 結果:

-----------------------------------------------------------------------------------------------

(舊方法,  不建議使用)
E. 分析音效頻率
    1. 新增 2 個變數:
        startTime: float , default: 0.0
        duration: float, default: 1.0

    startTime:


   duration:


    2. Calculate Freq Spectrum 相關節點

    3. 結果:

-----------------------------------------------------------------------------------------------

(新方法,  建議使用)
F. 分析音效頻率
    1. 新增 Start Calculate Freq Spectrum 相關節點

    2. 產生 OnFrequencySpectrumCalculated Event 節點

    3. 新增 Get Freq Value 相關節點:

    4. 結果: