2014年4月25日 星期五

OpenCL: Query Platforms Info


since: 2014/04/25
update: 2014/04/25

reference:
1. Amazon.com: OpenCL Programming by Example
2. VIML-OpenCL 簡介
3. OpenCL 教學(一) - Hotball's Hive
4. Richard's blog: OpenCL 介紹
5. OpenCL - leon的专栏
6. Khronos 2013 - opencl_overview.pdf
7. OpenCL Programming Guide for Mac: About OpenCL for OS X
8. OpenCL 1.2 Reference Pages

A. 前言
     1. 本系列學習 OpenCL 的文章主要的參考來源是:
         a. 電子書: Amazon.com: OpenCL Programming by Example
         b. 網路文章

     2. 詳細的基本觀念說明, 請參考上方 reference 裡的文章.

     3. 以 OpenCL 1.2 為主要的版本.

---------------------------------------------------------------------------------------------

B. 測試環境 (只用貼圖, 越來越懶了我...)


---------------------------------------------------------------------------------------------

C. 相關觀念說明
     1. OpenCL Platform(平台)
         何謂 OpenCL Platform? 簡單來說, 就是不同的硬體廠商(ex: AMD, Intel,
         NVIDIA...)依照硬體架構所提供 OpenCL 實作framework / SDK,
         在 PC 上, 可以存在多個 OpenCL Platform, 而在 Mac 上只有一個.

     2. OpenCL Platform Model


         a. 主機上的 CPU 會與一個或多個 OpenCL devices(CPU, GPU, DSP...) 作連結.
             (A host is connected to one or more OpenCL devices)

         b. OpenCL device 聚集了一組或多組的計算單位.
             (OpenCL device is collection of one or more compute units)

         c. 一組計算單位是由一個或多個處理元素所組成
             (A compute unit is composed of one or more processing elements)

         d. 處理元素是以 "單一指令多筆資料" 或 "單一程序多筆資料" 的方式來執行程式碼.
             (Processing elements execute code as SIMD or SPMD)
             備註: SIMD: single Instruction, Multiple Data
                     SPMD: single program, multiple data


---------------------------------------------------------------------------------------------

D. 新增專案
     1. Xcode > File > New > Project...
         OS X > Application > Command Line Tool


     2. Choose options for your project:
         Product Name: HelloOpenCL
         Type: C++
          > Next

         備註: Type 可以選擇 C, 在這邊是預留以後可以加入 C++ 的程式

     3. 加入 OpenCL framework: OpenCL.framework


     4. 幫專案新增一個叫作 Utility 的群組: 
         > 在此群組內, 新增檔案: OpenCLHeader.h, QueryPlatformInfo.h
            與 QueryPlatformInfo.cpp

     5. 專案結構如下:


---------------------------------------------------------------------------------------------

E. 撰寫程式碼
     1. 標頭檔: 開啓 OpenCLHeader.h 檔案, 修改如下
/*
#ifndef HelloOpenCL_OpenCLHeader_h
#define HelloOpenCL_OpenCLHeader_h

#endif

*/

//@add
#include <stdio.h>
#include <stdlib.h>
#ifdef __APPLE__
#include <OpenCL/cl.h>
#else
#include <CL/cl.h>
#endif


*************************************************************


     2. 開啓 QueryPlatformInfo.h 檔案, 修改如下
/*
#ifndef HelloOpenCL_QueryPlatformInfo_h
#define HelloOpenCL_QueryPlatformInfo_h

#endif

*/

//@add
#include "OpenCLHeader.h"

void PrintPlatformInfo(cl_platform_id platform);


*************************************************************

     3. 開啓 QueryPlatformInfo.cpp 檔案, 修改如下
#include "QueryPlatformInfo.h"

//@add
void PrintPlatformInfo(cl_platform_id platform)
{
    char queryBuffer[1024];
    cl_int clError;
   
    clError = clGetPlatformInfo (platform, CL_PLATFORM_NAME, 1024, &queryBuffer, NULL);
    if(clError == CL_SUCCESS)
    {
        printf("CL_PLATFORM_NAME   : %s\n", queryBuffer);
    }

    clError = clGetPlatformInfo (platform, CL_PLATFORM_VENDOR, 1024, &queryBuffer, NULL);
    if(clError == CL_SUCCESS)
    {
        printf("CL_PLATFORM_VENDOR : %s\n", queryBuffer);
    }

    clError = clGetPlatformInfo (platform, CL_PLATFORM_VERSION, 1024, &queryBuffer, NULL);
    if (clError == CL_SUCCESS)
    {
        printf("CL_PLATFORM_VERSION: %s\n", queryBuffer);
    }

    clError = clGetPlatformInfo (platform, CL_PLATFORM_PROFILE, 1024, &queryBuffer, NULL);
    if (clError == CL_SUCCESS)
    {
        printf("CL_PLATFORM_PROFILE: %s\n", queryBuffer);
    }

    clError = clGetPlatformInfo (platform, CL_PLATFORM_EXTENSIONS, 1024, &queryBuffer, NULL);
    if (clError == CL_SUCCESS)
    {
        printf("CL_PLATFORM_EXTENSIONS: %s\n", queryBuffer);
    }

    return;
}


*************************************************************


     4. 開啓 main.cpp 檔案, 修改如下
//#include <iostream>
//@add
#include "QueryPlatformInfo.h"


int main(int argc, const char * argv[])
{
    // insert code here...
    //std::cout << "Hello, World!\n";

   
    //@add
    cl_int           clError;
    cl_platform_id *platforms = NULL;
    cl_uint          num_platforms;

    // Get the number of Platforms available
    // Note that the second parameter "platforms" is set to NULL.
    // If this is NULL then this argument is ignored
    // and the API returns the total number of OpenCL platforms available. 

    // 先呼叫 clGetPlatformIDs, 以得到 num_platforms 的值
    clError = clGetPlatformIDs(0, NULL, &num_platforms);
    if(clError != CL_SUCCESS)
    {
        printf("Error in call to clGetPlatformIDs....\n Exiting");
        exit(0);
    }
    else
    {
        if (num_platforms == 0)
        {
            printf("No OpenCL Platforms Found ....\n Exiting");
        }
        else
        {
            //Allocate memory for OpenCL platforms.
            printf ("Found %d Platforms\n", num_platforms);
            platforms = (cl_platform_id *)malloc(num_platforms * sizeof(cl_platform_id));

            // Get the platform id's
            // In contrast to the above call with "platforms" as NULL. The below call actually fills the buffer with
            // the platform IDs. It will list the platforms upto the value specified by num_platforms. One should make
            // sure that the appropriate buffer size is allocated.
           
            // 
再次呼叫 clGetPlatformIDs, 得到 platforms 的值           
            clError = clGetPlatformIDs (num_platforms, platforms, NULL);


            // for each platform now start printing the information

            for(cl_uint index = 0; index < num_platforms; index++)
            {
                printf("==================Platform No %d======================\n",index);
                PrintPlatformInfo(platforms[index]);
                printf("======================================================\n\n");
            }
        }
    }
   
    return 0;
}

---------------------------------------------------------------------------------------------

F. 執行結果:

2014年1月3日 星期五

OpenCV: Erosion and Dilation

since: 2014/01/03
update: 2014/01/03

reference:
1. Amazon.com: Practical OpenCV eBook
2. Welcome to opencv documentation!
3. I touchs: Using OpenCV on Mac OS X

A. 前置作業:
     1. 先依照 I touchs: Using OpenCV on Mac OS X 的說明, 建置好開發環境.

     2. 需要加入到專案的 OpenCV 函式庫爲: (Add Files to Project...)
          libopencv_core.dylib
          libopencv_highgui.dylib
          libopencv_imgproc.dylib

     3. 將 main.cpp 的 main function 更名.(不作為程式執行的進入點)
          //int main(int argc, const char * argv[])  
          int main_main(int argc, const char * argv[])

     4. 爲專案新增 C++ 檔案:      
         點選專案 > New File... > OS X > C and C++ > C++ Class > Next >
         Save as: ErosionAndDilation.cpp > Create

----------------------------------------------------------------------------------------

B. 撰寫程式:
    1. 開啓 ErosionAndDilation.h 檔案, 修改如下:
#ifndef __HelloOpenCV__ErosionAndDilation__
#define __HelloOpenCV__ErosionAndDilation__

#include <iostream>

//@add
#include <opencv2/opencv.hpp>
#include <opencv2/highgui/highgui.hpp>
#include <opencv2/imgproc/imgproc.hpp>


#endif /* defined(__HelloOpenCV__ErosionAndDilation__) */

---------------------------------------------------------------------------------
    2. 開啓 ErosionAndDilation.cpp 檔案, 修改如下:
#include "ErosionAndDilation.h"

using namespace std;
using namespace cv;


// 原始照片, 處理過的照片

Mat ED_image, ED_imageProcessed;

// 選擇的形態學類型: 0: erode(侵蝕), 1: dilate(擴張)
int choice_slider = 0;

// 形態學的結構元素的大小: n x n (ex: 5 x 5)
int size_slider = 5;

const int choice_slider_max = 1; // 選擇形態學類型的最大值
const int size_slider_max = 21; // 形態學的結構元素之最大值

// 進行形態學處理
void process()
{

    // 設定形態學的結構元素(在此為矩形, 長寬皆為 size_slider 的大小)
    Mat st_elem = getStructuringElement(MORPH_RECT, Size(size_slider, size_slider));
   
    // erode(侵蝕)
    if (choice_slider == 0) {
        erode(ED_image, ED_imageProcessed, st_elem);
    }

    // dilate(擴張)
    else {
        dilate(ED_image, ED_imageProcessed, st_elem);
    }
   
    imshow("Processed image", ED_imageProcessed);
    printf("morphological type: %s \n", choice_slider == 0 ? "Erosion" : "Dilation");
    printf("size_slider position: %d \n\n", size_slider);
}


// 選擇形態學類型
void on_choice_slider(int, void*)
{
    process();
}


// 調整形態學的結構元素大小
void on_size_slider(int, void*)
{

    // 將形態學的結構元素大小(值為 size_slider), 調整為大於零的奇數
    size_slider = max(1, size_slider);
    size_slider = size_slider % 2 == 0 ? size_slider + 1 : size_slider;
    setTrackbarPos("Kernel Size", "Processed image", size_slider);
   
    process();
}

int main()
{

    // 讀取檔案
    ED_image = imread("/Lanli/RD/Projects/OpenCV_Mac/HelloOpenCV/pipiGray.png");
    namedWindow("Original image");
    namedWindow("Processed image");
    imshow("Original image", ED_image);

   
    // 設定形態學的結構元素(在此為矩形, 長寬皆為 size_slider 的大小)
    Mat st_elem = getStructuringElement(MORPH_RECT, Size(size_slider, size_slider));
   
    // erode(侵蝕)
    erode(ED_image, ED_imageProcessed, st_elem);
    imshow("Processed image", ED_imageProcessed);
   
    createTrackbar("Erode/Dilate", "Processed image", &choice_slider, choice_slider_max, on_choice_slider);
    createTrackbar("Kernel Size", "Processed image", &size_slider, size_slider_max, on_size_slider);
   
    printf("morphological type: %s \n", choice_slider == 0 ? "Erosion" : "Dilation");
    printf("size_slider position: %d \n\n", size_slider);
   
    while (char(waitKey(1) != 'q')) {}
   
    return 0;
}


----------------------------------------------------------------------------------------

C. 執行結果:
     原始圖片:

     erosion(侵蝕): 結構元素大小: 5 x 5

     dilation(擴張): 結構元素大小: 5 x 5

2013年12月30日 星期一

OpenCV: Blurring Images

since: 2013/12/30
update: 2013/12/30

reference:
1. Amazon.com: Practical OpenCV eBook
2. Welcome to opencv documentation!
3. I touchs: Using OpenCV on Mac OS X
4. 高斯模糊 - 維基百科
5. 標準差 - 維基百科

A. 前置作業:
     1. 先依照 I touchs: Using OpenCV on Mac OS X 的說明, 建置好開發環境.

     2. 需要加入到專案的 OpenCV 函式庫爲: (Add Files to Project...)
          libopencv_core.dylib
          libopencv_highgui.dylib
          libopencv_imgproc.dylib

     3. 將 main.cpp 的 main function 更名.(不作為程式執行的進入點)
          //int main(int argc, const char * argv[])  
          int main_main(int argc, const char * argv[])

     4. 爲專案新增 C++ 檔案:      
         點選專案 > New File... > OS X > C and C++ > C++ Class > Next >
         Save as: GaussianKernelBlur.cpp > Create

----------------------------------------------------------------------------------------

B. 撰寫程式:
    1. 開啓 GaussianKernelBlur.h 檔案, 修改如下:
#ifndef __HelloOpenCV__GaussianKernelBlur__
#define __HelloOpenCV__GaussianKernelBlur__

#include <iostream>

//@add
#include <opencv2/opencv.hpp>
#include <opencv2/highgui/highgui.hpp>
#include <opencv2/imgproc/imgproc.hpp>


#endif /* defined(__HelloOpenCV__GaussianKernelBlur__) */

---------------------------------------------------------------------------------

    2. 開啓 GaussianKernelBlur.cpp 檔案, 修改如下:
#include "GaussianKernelBlur.h"

using namespace std;
using namespace cv;

Mat image, image_blurred;

const int sliderMax = 21; // slider 最大的數值
int slider = 5;
float sigma; // 常態分佈的標準差

void on_trackbar(int, void*)
{

    // kernel size(k_size): 限制為大於零的奇數
    int k_size = max(1, slider);
    k_size = k_size % 2 == 0 ? k_size + 1 : k_size;
   
    setTrackbarPos("Kernel Size", "Blurred image", k_size);
    sigma = 0.3 * ((k_size - 1) * 0.5 - 1) + 0.8;
   
    printf("Gausscian k_size: %d \n", k_size); // kernel size
    printf("Gausscian sigma: %f \n", sigma); // 常態分佈的標準差
   
    GaussianBlur(image, image_blurred, Size(k_size, k_size), sigma);
    imshow("Blurred image", image_blurred);
}


int main()
{
    image = imread("/Lanli/RD/Projects/OpenCV_Mac/HelloOpenCV/pipi2.png");
    namedWindow("Original image");
    namedWindow("Blurred image");
   
    imshow("Original image", image);
    sigma = 0.3 * ((slider - 1) * 0.5 - 1) + 0.8;
   
    printf("Gausscian k_size: %d \n", slider); // kernel size
    printf("Gausscian sigma: %f \n", sigma); // 常態分佈的標準差
   
    GaussianBlur(image, image_blurred, Size(slider, slider), sigma);
    imshow("Blurred image", image_blurred);
   
    createTrackbar("Kernel Size", "Blurred image", &slider, sliderMax, on_trackbar);
    while (char(waitKey(1) != 'q')) {}
   
    return 0;
}


----------------------------------------------------------------------------------------

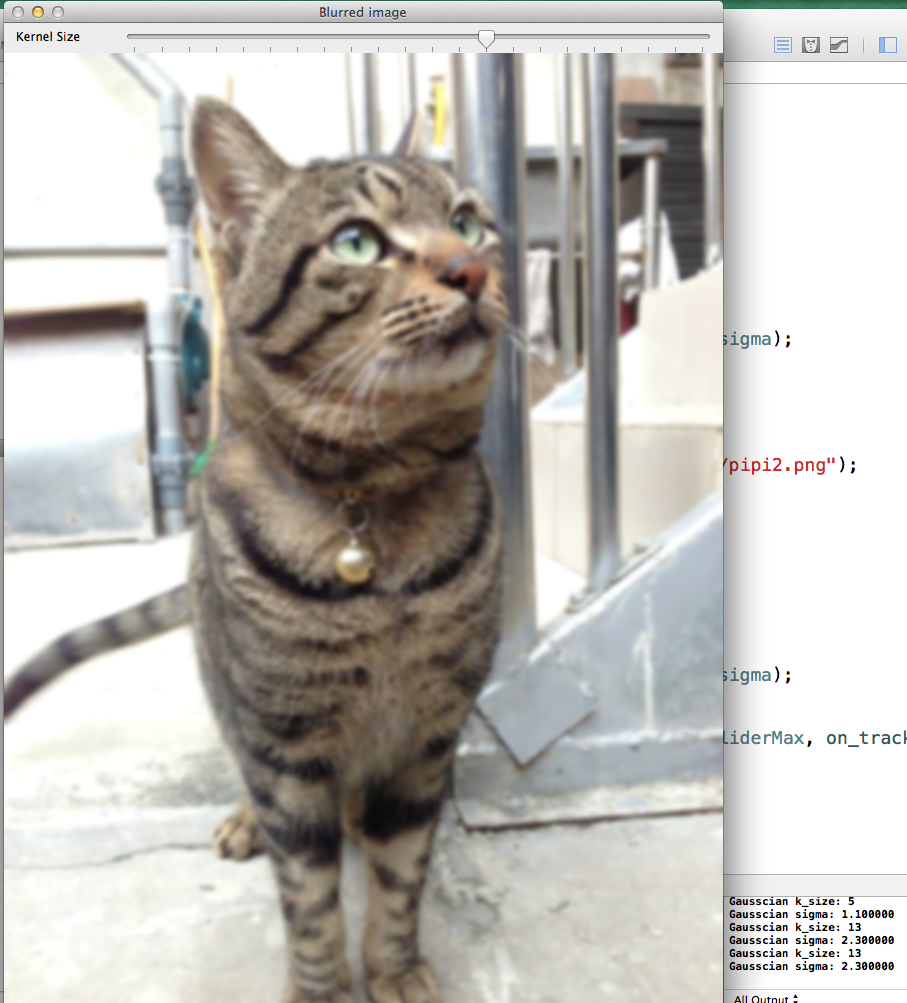
C. 執行結果:
     原始圖片:

     Gaussian kernel size: 5
     sigma(標準差): 1.10

     Gaussian kernel size: 13
     sigma(標準差): 2.30


     Gaussian kernel size: 21
     sigma(標準差): 3.50


2013年12月27日 星期五

OpenCV: Detecting Horizontal Edges

since: 2013/12/27
update: 2013/12/27

reference:
1. Amazon.com: Practical OpenCV eBook
2. Welcome to opencv documentation!
3. I touchs: Using OpenCV on Mac OS X


A. 前置作業:
     1. 先依照 I touchs: Using OpenCV on Mac OS X 的說明, 建置好開發環境.

     2. 需要加入到專案的 OpenCV 函式庫爲: (Add Files to Project...)
          libopencv_core.dylib
          libopencv_highgui.dylib

     3. 將 main.cpp 的 main function 更名.(不作為程式執行的進入點)
          //int main(int argc, const char * argv[])  
          int main_main(int argc, const char * argv[])

     4. 爲專案新增 C++ 檔案:      
         點選專案 > New File... > OS X > C and C++ > C++ Class > Next >
         Save as: detectHorizontalEdges.cpp > Create

     5. 說明:    
          a. 使用 OpenCV 的 filter2D() 函式, 來作 kernel-based filtering.

          b. 在 filter matrix(or kernel) 與被 kernel 涵蓋住的像素間, 會作
              Element-wise multiplication(矩陣元素對應相乘)之和的運算.

          c. filter2D() 函式使用的演算法:
              DFT(Discrete Fourier transform)-based algorithm for large kernels;
              direct algorithm for small kernels.

----------------------------------------------------------------------------------------

B. 撰寫程式:
    1. 開啓 detectHorizontalEdges.h 檔案, 修改如下:
#ifndef __HelloOpenCV__detectHorizontalEdges__
#define __HelloOpenCV__detectHorizontalEdges__

#include <iostream>

//@add
#include <opencv2/opencv.hpp>
#include <opencv2/highgui/highgui.hpp>


#endif /* defined(__HelloOpenCV__detectHorizontalEdges__) */

---------------------------------------------------------------------------------

    2. 開啓 detectHorizontalEdges.cpp 檔案, 修改如下:
#include "detectHorizontalEdges.h"

using namespace std;
using namespace cv;

int main()
{
    Mat img = imread("/Lanli/RD/Projects/OpenCV_Mac/HelloOpenCV/officeRoom.png", CV_LOAD_IMAGE_GRAYSCALE);
    Mat img_filtered;
   

    // Filter kernel for detecting vertical edges
    //float vertical_fk[5][5] = {{0,0,0,0,0}, {0,0,0,0,0}, {-1,-2,6,-2,-1}, {0,0,0,0,0}, {0,0,0,0,0}};
    /*
     0  0   -1  0   0
     0  0   -2  0   0
     0  0    6  0   0
     0  0   -2  0   0
     0  0   -1  0   0
     */
    //Mat filter_kernel = Mat(5, 5, CV_32FC1, vertical_fk);


    // Filter kernel for detecting horizontal edges
    float horizontal_fk[5][5] = {{0,0,-1,0,0}, {0,0,-2,0,0}, {0,0,6,0,0}, {0,0,-2,0,0}, {0,0,-1,0,0}};
    /*
      0   0   0   0    0
      0   0   0   0    0
     -1  -2   6  -2   -1
      0   0   0   0    0
      0   0   0   0    0
     */

    Mat filter_kernel = Mat(5, 5, CV_32FC1, horizontal_fk); // for float 32 bits,  1 channel
   
    // Apply filter
    // -1: the output image will have the same depth as the source.

    filter2D(img, img_filtered, -1, filter_kernel);
   
    namedWindow("Image");
    imshow("Image", img);
   
    namedWindow("Filtered image");
    imshow("Filtered image", img_filtered);
   
    imwrite("/Lanli/RD/Projects/OpenCV_Mac/HelloOpenCV/officeRoom_filtered.png", img_filtered);
    while (char(waitKey(1)) != 'q') {
    }
   
    return 0;
}


----------------------------------------------------------------------------------------

C. 執行結果:
     原始圖片:

     水平濾波:

2013年12月26日 星期四

OpenCV: Displaying the video feed from camera device

since: 2013/12/26
update: 2013/12/26

reference:
1. Amazon.com: Practical OpenCV eBook
2. Welcome to opencv documentation!
3. I touchs: Using OpenCV on Mac OS X

A. 前置作業:
     1. 先依照 I touchs: Using OpenCV on Mac OS X 的說明, 建置好開發環境.

     2. 需要加入到專案的 OpenCV 函式庫爲: (Add Files to Project...)
          libopencv_core.dylib
          libopencv_highgui.dylib
          libopencv_imgproc.dylib

     3. 將 main.cpp 的 main function 更名.(不作為程式執行的進入點)
          //int main(int argc, const char * argv[])  
          int main_main(int argc, const char * argv[])

     4. 爲專案新增 C++ 檔案:      
         點選專案 > New File... > OS X > C and C++ > C++ Class > Next >
         Save as: displayVideo.cpp > Create

     5. 使用設備:  
          Logitech HD Webcam C310
          參考: 支援 Mac OS 10.4.9 與更新版本的 UVC 網路攝影機

----------------------------------------------------------------------------------------
  
B. 撰寫程式:
    1. 開啓 displayVideo.h 檔案, 修改如下:
#ifndef __HelloOpenCV__displayVideo__
#define __HelloOpenCV__displayVideo__

#include <iostream>

//@add
#include <opencv2/opencv.hpp>
#include <opencv2/highgui/highgui.hpp>
#include <opencv2/imgproc/imgproc.hpp>
#include <opencv2/core/core.hpp>


#endif /* defined(__HelloOpenCV__displayVideo__) */

---------------------------------------------------------------------------------

    2. 開啓 displayVideo.cpp 檔案, 修改如下:
#include "displayVideo.h"

//@add
using namespace cv;
using namespace std;


#define CAMERA_OUTPUT_WINDOW_NAME "camera-output"

int main(int argc, char **argv)
{

    // C structure: for video capturing from video files or cameras.
    CvCapture *camCapture;
    int ret = 0;
   
    if (!(camCapture = cvCaptureFromCAM(CV_CAP_ANY))) {
        cout << "Failed to capture from camera" << endl;
       
        ret = 1;
       
        goto exitCameraOpenFailed;
    }
   
    cout << "Camera opened successfully" << endl;

   
    // C function, Creates a window.
    cvNamedWindow(CAMERA_OUTPUT_WINDOW_NAME, CV_WINDOW_AUTOSIZE);
   
    // C/C++ struct: The IplImage is taken from the Intel Image Processing Library, in which the format is native.
    IplImage *cameraFrame;
   
    while (true) {

        // cvQueryFrame(C function): It combine VideoCapture::grab() and VideoCapture::retrieve() in one call.
        if ((cameraFrame = cvQueryFrame(camCapture))) {
            cvShowImage(CAMERA_OUTPUT_WINDOW_NAME, cameraFrame);
        }
       
        if (cvWaitKey(60) != -1) {
            cout << "Input" << endl;
            break;
        }
    }
   
    cout << "Done" << endl;
   
    cvReleaseCapture(&camCapture);

    // C function, destroys the window with the given name.
    cvDestroyWindow(CAMERA_OUTPUT_WINDOW_NAME);
   
    exitCameraOpenFailed:
    return ret;
}


----------------------------------------------------------------------------------------

C. 執行結果:

OpenCV: Cropping a ROI(Regions of Interest) out of an Image

since: 2013/12/26
update: 2013/12/26

reference:
1. Amazon.com: Practical OpenCV eBook
2. Welcome to opencv documentation!
3. I touchs: Using OpenCV on Mac OS X

A. 前置作業:
     1. 先依照 I touchs: Using OpenCV on Mac OS X 的說明, 建置好開發環境.

     2. 需要加入到專案的 OpenCV 函式庫爲: (Add Files to Project...)
          libopencv_core.dylib
          libopencv_highgui.dylib
          libopencv_imgproc.dylib

     3. 將 main.cpp 的 main function 更名.(不作為程式執行的進入點)
          //int main(int argc, const char * argv[])  
          int main_main(int argc, const char * argv[])

     4. 爲專案新增 C++ 檔案:      
         點選專案 > New File... > OS X > C and C++ > C++ Class > Next >
         Save as: ROICropping.cpp > Create

----------------------------------------------------------------------------------------

B. 撰寫程式:
    1. 開啓 ROICropping.h 檔案, 修改如下:
#ifndef __HelloOpenCV__ROICropping__
#define __HelloOpenCV__ROICropping__

#include <iostream>
//@add
#include <opencv2/opencv.hpp>
#include <opencv2/highgui/highgui.hpp>
#include <opencv2/imgproc/imgproc.hpp>


#endif /* defined(__HelloOpenCV__ROICropping__) */

---------------------------------------------------------------------------------

    2. 開啓 ROICropping.cpp 檔案, 修改如下:
#include "ROICropping.h"

//@add
using namespace std;
using namespace cv;


bool ldown = false;
// left mouse button down flag
bool lup = false; // left mouse button up flag

Mat img; // original image
Mat croppedImage; // cropped image
Point corner1, corner2; // Starting and ending of the user's selection point
Rect box; // (ROI)Regions of Interest

// Callback function for mouse events
static void mouse_callback(int event, int x, int y, int, void*)
{

    // when left mouse button is pressed
    if (event == EVENT_LBUTTONDOWN) {
        ldown = true;

        // record its position and save it in corner1
        corner1.x = x;
        corner1.y = y;
        cout << "Corner 1 recorded at " << corner1 << endl;
    }

    // when left mouse button is released
    if (event == EVENT_LBUTTONUP) {
        // if user selection is bigger than 20 piexels
        if (abs(x - corner1.x) > 20 && abs(y - corner1.y) > 20) {
            lup = true;

            // record its position and save it in corner1
            corner2.x = x;
            corner2.y = y;
            cout << "Corner 2 recorded at " << corner2 <<  endl << endl;
        }
        else
        {
            cout << "Please select a bigger region" << endl;
            ldown = false;
        }
    }

    // update the box showing the selected region as the user drags the mouse
    if (ldown == true && lup == false) {
        Point pt;
        pt.x = x;
        pt.y = y;
        Mat local_img = img.clone();
        rectangle(local_img, corner1, pt, Scalar(0, 0, 255)); // b, g, r
        imshow("Cropping app", local_img);
    }

    // Define ROI and crop it out when both corners have been selected
    if (ldown == true && lup == true) {
        box.width = abs(corner1.x - corner2.x); // 2 個 corner X 軸座標距離的絕對值

        box.height = abs(corner1.y - corner2.y); // 2 個 corner Y 軸座標距離的絕對值
        box.x = min(corner1.x, corner2.x); // 2 個 corner X 軸座標的最小值
        box.y = min(corner1.y, corner2.y); // 2 個 corner Y 軸座標的最小值
       
        // Make a image out of just the selected ROI and display it in a new window
        Mat crop(img, box);
        namedWindow("Crop");
        imshow("Crop", crop);

       
        // clone the cropped image(ROI) and save it to a file
        croppedImage = img(box).clone();
        imwrite("/Lanli/RD/Projects/OpenCV_Mac/HelloOpenCV/pipi_cropped.png", croppedImage);
       
        ldown = false;
        lup = false;
    }
}

int main()
{

    // Read image
    img = imread("/Lanli/RD/Projects/OpenCV_Mac/HelloOpenCV/pipi.png");
    namedWindow("Cropping app");
    imshow("Cropping app", img);
   
    setMouseCallback("Cropping app", mouse_callback);
   
    while (char(waitKey(1) != 'q')) {
    }
   
    return 0;
}


----------------------------------------------------------------------------------------

C. 執行結果:
     Cropping:

     Saving:

2013年12月24日 星期二

OpenCV: Color-space conversion

since: 2013/12/23
update: 2013/12/24

reference:
1. Amazon.com: Practical OpenCV eBook
2. Welcome to opencv documentation!
3. I touchs: Using OpenCV on Mac OS X

A. 前置作業:
     1. 先依照 I touchs: Using OpenCV on Mac OS X 的說明, 建置好開發環境.

     2. 需要加入到專案的 OpenCV 函式庫爲: (Add Files to Project...)
          libopencv_core.dylib
          libopencv_highgui.dylib
          libopencv_imgproc.dylib

     3. 將 main.cpp 的 main function 更名.(不作為程式執行的進入點)
          //int main(int argc, const char * argv[])  
          int main_main(int argc, const char * argv[])

     4. 爲專案新增 C++ 檔案:      
         點選專案 > New File... > OS X > C and C++ > C++ Class > Next >
         Save as: colorSpaceConversion.cpp > Create

----------------------------------------------------------------------------------------

B. 撰寫程式:
     1. 開啓 colorSpaceConversion.h 檔案, 修改如下:
#ifndef __HelloOpenCV__colorSpaceConversion__
#define __HelloOpenCV__colorSpaceConversion__

#include <iostream>

//@add
#include <opencv2/opencv.hpp>
#include <opencv2/highgui/highgui.hpp>
#include <opencv2/imgproc/imgproc.hpp>

#endif /* defined(__HelloOpenCV__colorSpaceConversion__) */

---------------------------------------------------------------------------------


     2. 開啓 colorSpaceConversion.cpp 檔案, 修改如下:
#include "colorSpaceConversion.h"

//@add
using namespace std;
using namespace cv;


// Global variables
const int slider_max = 100; // slider 最大的數值
int slider; // slider 目前的數值
double alpha; // 加權數(0.0 ~ 1.0)
double beta;  // 加權數(0.0 ~ 1.0)

// Matrices to store images
Mat img_source; // 原始照片
Mat img_converted; // 存放色彩轉換後的照片
Mat img_destination; // 存放二張照片加權後所合成的照片

// Callback function for trackbar event
void on_trackbar(int pos, void *)
{
    // case 1 與 case 2: 擇一執行
    printf("slider position: %d \n", slider);
   
    // case 1: RGB to GRAY
    if (pos > 0) {
        // 將 RGB 的照片: img_source, 轉換成灰階並存入 img_converted 中
        cvtColor(img_source, img_converted, CV_RGB2GRAY);
    }
    else {
        img_converted = img_source;
    }
   
    // 顯示照片
    imshow("Trackbar app", img_converted);
   
    /*************************************************************/
   
    /*
    // case 2: RGB to BGR
    // 將 RGB 的照片: img_source, 轉換成 BGR 並存入 img_converted 中
    cvtColor(img_source, img_converted, CV_RGB2BGR);

    alpha = (double)slider/slider_max; // 加權數(0.0 ~ 1.0)
    beta = (1.0 - alpha); // 加權數(0.0 ~ 1.0)
   
    // 計算各別(照片)矩陣的加權值 (img_source x beta) + (img_converted) x alpha ,
    // 存入 img_destination 中, 並且各別的照片必須要有相同的大小(size)與類型(type)
    // p.s. 不可使用 RGB(3個 channel) 與 灰階(1個 channel) 來作加權計算.

    addWeighted(img_source, beta, img_converted, alpha, 0.0, img_destination);
    
    // 顯示照片
    imshow("Trackbar app", img_destination);
    */
}

int main()
{
    // Read image
    //img_source = imread("/Lanli/RD/Projects/OpenCV_Mac/HelloOpenCV/pipi.png", CV_LOAD_IMAGE_COLOR);
    //img_source = imread("/Lanli/RD/Projects/OpenCV_Mac/HelloOpenCV/pipi.png", CV_LOAD_IMAGE_GRAYSCALE);

    img_source = imread("/Lanli/RD/Projects/OpenCV_Mac/HelloOpenCV/pipi.png");
   
    // check if image was loaded
    if( !img_source.data ) {
        printf("Error loading img_source \n");
        return -1;
    }
   
    // Initialize values
    slider = 0;
   
    // Create Windows
    //namedWindow("Trackbar app", WINDOW_AUTOSIZE);
    //namedWindow("Trackbar app", WINDOW_NORMAL);

    namedWindow("Trackbar app");
   
    // Create Trackbars
    char TrackbarName[50];
    sprintf(TrackbarName, "TrackBar Max: %d", slider_max);
    createTrackbar(TrackbarName, "Trackbar app", &slider, slider_max, on_trackbar);
 
    // Show some stuff
    on_trackbar(slider, 0);
   
    // Wait until user press 'q'
    //
    // 回圈: 等待 1 微秒(以作業系統的最小時間爲下限)來偵測鍵盤事件,
    // 如果不是按下 'q', 就一直偵測下去.
    // p.s. 至少要有一個 HighGUI 的視窗存在且啟用, 才會有作用

    while(char(waitKey(1)) != 'q') {
    }
   
    // destroys all of the opened HighGUI windows.
    destroyAllWindows();
   
    return 0;
}


----------------------------------------------------------------------------------------

C. 執行結果:
     1. RGB to GRAY:
         slider position: 0


         slider position: 50

     2. RGB to BGR:
         slider position: 75

         slider position: 100